As many of you know, I've made several box lensboards for Packard shutters. One issue has always been how to insert a pin to switch from "B" to the 1/25th sec "I" modes when the shutter is backasswards. While making a new box this week, I came up with this solution that I wanted to share with the APUG community.
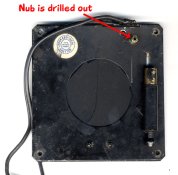
The first step was to drill out the end of the nub on the piston side of the Packard. Needles to say. it's best to disassemble the Packard before drilling. While I was at it, I opened up the corner mount holes in the top and bottom case parts to clear for 6-32 machine screws.
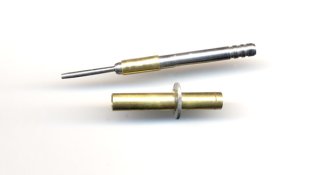
I made a "pin and tube" arrangement as shown in the attached picture. The ridged end of the pin goes into the brass tube, which is then pressed on to the nub on the shutter. The washer that is soldered to the tube lays flat against the inside of the lens panel and keeps everything in place with no adhesives. On the outside-the-box portion of the brass tube, I used a tubing cutter to impress a fine dimple all the way around. It is easiest to do that before cutting the tube to length. Using the next smaller size of K&S brass tube, cut a short piece and press fit that onto the pin. I needed to do a bit of machining to get a snug fit. That short piece acts as a stop against the dimple, preventing the pin from coming out and being lost. I machined in the grooves on the end of the pin to make it easier to operate.
Here's the best part... I didn't have a piece of suitable material to make the pin, so I machined it from a 16d framing nail! Hey, mild steel is mild steel...
Not having a lathe, I made the pin by chucking the 16d nail into my drill press and running it at its highest speed (in the case of my 15" Craftsman, the max speed is 3100 RPM). All of the metal removal (except sawing off the head) was done with files against the spinning steel. BTW - The Micro-Mark 7X14 metal lathe is on the top of my "must buy this tool next" list.
Simple as that!
The first step was to drill out the end of the nub on the piston side of the Packard. Needles to say. it's best to disassemble the Packard before drilling. While I was at it, I opened up the corner mount holes in the top and bottom case parts to clear for 6-32 machine screws.
I made a "pin and tube" arrangement as shown in the attached picture. The ridged end of the pin goes into the brass tube, which is then pressed on to the nub on the shutter. The washer that is soldered to the tube lays flat against the inside of the lens panel and keeps everything in place with no adhesives. On the outside-the-box portion of the brass tube, I used a tubing cutter to impress a fine dimple all the way around. It is easiest to do that before cutting the tube to length. Using the next smaller size of K&S brass tube, cut a short piece and press fit that onto the pin. I needed to do a bit of machining to get a snug fit. That short piece acts as a stop against the dimple, preventing the pin from coming out and being lost. I machined in the grooves on the end of the pin to make it easier to operate.
Here's the best part... I didn't have a piece of suitable material to make the pin, so I machined it from a 16d framing nail! Hey, mild steel is mild steel...
Not having a lathe, I made the pin by chucking the 16d nail into my drill press and running it at its highest speed (in the case of my 15" Craftsman, the max speed is 3100 RPM). All of the metal removal (except sawing off the head) was done with files against the spinning steel. BTW - The Micro-Mark 7X14 metal lathe is on the top of my "must buy this tool next" list.
Simple as that!