Made my first print last night, have questions

St. Clair Beach Solitude

D
St. Clair Beach Solitude

  • 7
  • 2
  • 90
Reach for the sky

H
Reach for the sky

  • 3
  • 4
  • 124
Agawa Canyon

A
Agawa Canyon

  • 3
  • 2
  • 162

Recent Classifieds

Forum statistics

Threads
198,873
Messages
2,782,338
Members
99,737
Latest member
JackZZ
Recent bookmarks
0

Uncle Bill

Member
Joined
Apr 24, 2005
Messages
1,395
Location
Oakville and
Format
Multi Format
Hi, lost my enlarging virginity last night and I cranked out a halfway decent print. I am trying to get more contrast from my print, went through six sheets of Ilford Multigrade IV RC 8x10 paper. I am using a Durst M300 enlarger, Schneider 50 enlarging lens, kodak filters in this case on the best print that I scanned #2, I exposed for 8 seconds, used Ilford Multigrade paper developer at 1+9. What are my options?

The top scan is of the actual print, scanned in colour and then converted grey scale the bottom scan is of the actual negative which I want to get a little closer to.
 

Attachments

  • Benches.jpg
    Benches.jpg
    159 KB · Views: 239
  • Benches 2.jpg
    Benches 2.jpg
    164.5 KB · Views: 269

Mick Fagan

Subscriber
Joined
Sep 13, 2005
Messages
4,421
Location
Melbourne Au
Format
Multi Format
Possibly try grade 3 or 3 1/2 for a contrast bump.

Increasing the exposure will make it darker. Try a 1/4 stop increase to 10 seconds, or a 1/2 stop increase to 12 seconds.

These are only guestimations.

Your basic tonality seems to match the neg scan but it's a bit flat. Just a bit.

Making it darker will bring it closer but you must remember that a neg on the screen is being viewed by transmitted light, not reflected light, like a print is.

The print is rather grey looking, are you sure you are not getting paper fog from the safelight?

Mick.
 

noseoil

Member
Joined
Oct 6, 2003
Messages
2,887
Location
Tucson
Format
Multi Format
Bill, one thing I can suggest is the use of a different paper (after a while). Work with the RC paper to get an idea of printing, as it is quick and easy to use. Mick has already made a couple of good suggestions (grade and time). I would also suggest a stop less light for the print, because you have a short print time, a bit more exposure time during the enlargement will allow you to see more subtle changes. Another suggestion might be a bit more time in development of the film. It will bump the contrast and firm up the shadow areas. Selenium toner (KSRT, or kodak selenium rapid toner) will also add a lot to the bottom end. Try 1:9 for about 1:30 or 2 minutes with this paper and I think you will notice a nice difference.

To get a different tonality and feel in the same image, try J&C's poly-warmtone and an amidol paper developer, once you are more comfortable with the whole process. The fiber based papers can yield a richer tonal scale, but take more time and water to do well. RC is good for proofing, but the fiber papers have a nicer scale, in general. Amidol is amazing stuff to work with and gives clean whites with inky blacks, great stuff. Take a quick look at my gallery and see what you think about the J&C paper. The warm tone look is nice to work with. Good job, tim
 
OP
OP
Uncle Bill

Uncle Bill

Member
Joined
Apr 24, 2005
Messages
1,395
Location
Oakville and
Format
Multi Format
In regards to the safelight, good question. The whole darkroom set up save for the trays and timer were given to me by Bob Carnie. The safelight came with two filters and I am running with the darker of the two filters. I am going to give the #3 filter and 10 and 12 seconds a shot tonight and see if I can't get a little closer.

I am also going to get another safe light bulb today as well to be on the safe side.

Wish me luck.

Bill
 

noseoil

Member
Joined
Oct 6, 2003
Messages
2,887
Location
Tucson
Format
Multi Format
To test your safe light, use an already printed test strip. Once the strip is printed, place a quarter on top of it and leave it out for 5 or 10 minutes, then do your normal development and see if there is a shadow in the image. A lot of people use the quarter trick for testing, but they use a sheet of unexposed paper. Paper has a threshold similar to film. The paper might not show anything on a clean sheet of paper, but may show more, once it has been exposed to light. tim
 

ricksplace

Member
Joined
Jan 22, 2006
Messages
1,561
Location
Thunder Bay,
Format
Multi Format
Have a look at the darkest (pretty much black) part of the scanned negative, and compare it to the same part on your print. The black areas of the scan where the fence logs meet the posts are much darker on the scan than your print. A slightly longer exposure will darken the print overall, and changing to a higher contrast grade like a 3 or 4 will increase the contrast and give the print a little more "snap".

Try about 12 seconds at the same lens f-stop with a grade three contrast filter, and another with a grade 4 contrast filter.

As already mentioned, if you like the look of your print when you use a grade 4 contrast filter, your negatives should probably be developed a little longer to raise the contrast of the negative to allow for printing on a grade 2 or 3 paper.

Instead of using full sheets of paper, try test strips of about 2" wide laid on a section of the easel with the contrasty part of the image. Saves on paper.

Congrats on your first printing. You're hooked now...

Rick
 

Bob F.

Member
Joined
Oct 4, 2004
Messages
3,977
Location
London
Format
Multi Format
The mantra is: "expose for the highlights, grade for the shadows".

Basically, use a grade 2 filter and expose test strip(s) to find the time to get the highlights where you want them (try to ignore the shadows for now). In this case, I'd aim to get the highlights on the front bench or along the top of the fence where I want. Now look at the shadows for that exposure time. If the shadows are too grey then you know you need higher contrast so try Grade 3 and reassess. Contrariwise, if the shadows are too dark and blocking up, then try Grade 1 and reassess. You will probably find you need to tweak exposure as you change grade.

The print scan has no white, suggesting it is over exposed, and has no black, suggesting it is too low in contrast - of course, this may be courtesy of the scanning, but if the print looks the same, you probably need to back off on exposure and increase contrast.

Have fun, Bob.
 

Michel Hardy-Vallée

Membership Council
Subscriber
Joined
Apr 2, 2005
Messages
4,793
Location
Montréal, QC
Format
Multi Format
Pretty much everything has been said, the two most important things being adjusting slightly your exposure (a tad less) and augmenting contrast (try 3 and 3.5), so I'll give you a little trick of mine to make a nice test strip. Instead of using a sequence of equally separated times (e.g. 6, 9, 12), learn by heart the following one: 6, 7, 8, 10, 12, 14, 17, 20, 24.

If you have observed closely the times on your camera shutter, you have noticed that the sequence is not linear because opening one stop is doubling exposure time while closing one stop is halving time. In the sequence above, starting from a base time of 6s, one stop more exposure is 12s and two stops is 24s. The values between are 1/4 of a stop, and I calculated them with a little Excel sheet that I can send you if you like.

The point of this (what people call f-stop printing) is simply to ensure consistent adjustements of exposure. If you printed at 6s and your print needs more exposure, you have to be careful and add just one second or two to make a significant difference. If you printed at 20s, you need at least four more seconds to see a difference.

I have learned that sequence by heart because almost all of my printing times for 35mm using my standard procedure fall within that interval. My timer is just a ticking clock and I do my test strip by gradually covering a piece of paper with a card while I count in my head.
 

srs5694

Member
Joined
May 18, 2005
Messages
2,718
Location
Woonsocket,
Format
35mm
First, I disagree with an earlier post or two about trying different papers -- at least for now. Stick with what you've got, learn to print with it, and only after you're comfortable with one paper should you try others. There's no point in adding variables when you're trying to learn the process; that'll just slow you down. Ultimately, of course, using different papers for different purposes is worthwhile, but for now using a single paper is more important, IMHO.

Second, on my screen the negative scan looks too high in contrast. A lot of shadow details are gone, for instance the bench legs under the bench slats and the ends of the logs in the fence. The print scan, OTOH, is a bit low in contrast and perhaps a bit dark in the highlights. Overall, I'd aim for something in-between the two by slightly reducing exposure and increasing contrast. That said, scans of prints aren't always accurate representations of the originals and different monitors can display the same image in very different ways, so my advice could be wrong just because my monitor's not showing me what your print really looks like. There's also personal preferences and your intent; maybe you want something that's extremely high in contrast with lost shadow details, say to convey a certain mood.
 

Roger Hicks

Member
Joined
May 17, 2006
Messages
4,895
Location
Northern Aqu
Format
35mm RF
First, I disagree with an earlier post or two about trying different papers -- at least for now. Stick with what you've got, learn to print with it...

Well, I'll disagree with the disagreement. Different papers 'sing' for different photographers. Try as many as you can afford. Some will look better than others: others won't look so good. I'd hate to try learning with a paper that didn't suit me, merely because it was what I tried first. After you've tried lots, stick with the one that suits you best.

Cheers,

R.
 

firecracker

Member
Joined
Jan 22, 2005
Messages
1,950
Location
Japan
Format
35mm
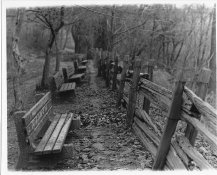
Well, based on what I see on my monitor screen (which is a laptop screen, so I cannot be 100 percent certain, though), it looks like the actual print is too light and lacks contrast. So, add more time to your previous exposure time(8 seconds, you said)) first and see how the density and contrast will match the neg-scan version of the image, which is your goal.

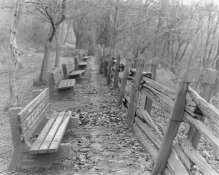
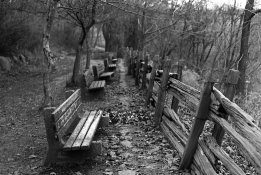
Start from a test strip again and have it placed in the area of an image where you want to see the most and where your eyes see first. I belive in this case, it's the bench and the trees in the foreground, then worry about the rest of the area.

For calcutrating exposure time, think in percentage, like adding (or subtract) extra 10, 20 percent, for instance, everytime you change. That way it's easiler to visualize the final picture. I'm sure you already have, though.

If the contrast is not good and too dull or too mushy, change it to a higher contrast. If it gets too muddy, watch out the exposure time, too.

Keep the developing time (1minute for RC) and agitation consistent if you're doing the basics until you get a better result in a final print. Also, if you're printing longer hours, watch out the exhaustion of the developer and the fix. When changing the old dev to fresh dev, change the stop bath, also.

I personally think Ilford RC paper (in my preference, pearl) is a neutral paper and very easy to use before getting too seduced and in some way distracted by other factors such as color and hue (as well as surface quality) to learn about printing. I wouldn't suggest FB paper to someone at this stage because it's not adequate.

Don't put too much burden on your shoulder, but just try to meet your goal first with what you have. Good luck.
 

Michel Hardy-Vallée

Membership Council
Subscriber
Joined
Apr 2, 2005
Messages
4,793
Location
Montréal, QC
Format
Multi Format
Well, I'll disagree with the disagreement. Different papers 'sing' for different photographers. Try as many as you can afford. Some will look better than others: others won't look so good. I'd hate to try learning with a paper that didn't suit me, merely because it was what I tried first. After you've tried lots, stick with the one that suits you best.

Cheers,

R.

Well, I'll disagree with your disagreement to the disagreement (er, syntax is failing me here). I think Bill just want to get a print that reflect an adequate contrast range. Having a print that sings depends on being able to know how to expose and develop properly a sheet of paper, THEN finding the paper that has the extra 1%. With all due respect to Bill--he's old enough to do whatever pleases him--I think it's just simpler for him to start understanding how contrast works first because that's what he's struggling with.
 

Ray Heath

Member
Joined
Dec 29, 2005
Messages
1,204
Location
Eastern, Aus
Format
Multi Format
Well, I'll disagree with your disagreement to the disagreement (er, syntax is failing me here). I think Bill just want to get a print that reflect an adequate contrast range. Having a print that sings depends on being able to know how to expose and develop properly a sheet of paper, THEN finding the paper that has the extra 1%. With all due respect to Bill--he's old enough to do whatever pleases him--I think it's just simpler for him to start understanding how contrast works first because that's what he's struggling with.

yeh, what he said

don't confuse the issue, you've got good quality materials, learn the basics, but keep in mind for later there are other materials that will give other results
 

Woolliscroft

Member
Joined
Oct 22, 2004
Messages
726
Format
Multi Format
I'd agree with Roger long term. Finding papers you like is as important as finding films you like, but maybe for a newbee, getting the basic technique right without introducing too many variables would take priority for now.

One question: how long are you developing your prints for? It's important to let them develop fully, but there is a temptation to pull them as soon as they look cooked under safelight, especially if you have over exposed a bit. Safelight is very deceptive, though, and subtle tones will continue to come up for quite a while after the print looks done and if you don't let that happen, the print will look flat. RC paper instructions usually specify a full minute, but it actually makes a real difference if you leave them in for two. Agitation and chemical temperature also makes a significant difference and at this time of year your dev might be a bit cool. That said, I'd agree with those who say that if you like contrasty prints, use a higher contrast filter, and maybe even dev the film itself for higher contrast, albeit that might give you a grain increase.

David.
 

Nicholas Lindan

Advertiser
Advertiser
Joined
Sep 2, 2006
Messages
4,245
Location
Cleveland, Ohio
Format
Multi Format
Lack of contrast can be due to a fogged or dirty enlarging lens. Unscrew it an check that it is pristine. When I first started out it was with a donated Federal enlarger[think two coffee cans with a lightbulb in the top one]. I went nuts trying to get any contrast in the prints. Then I looked up into the lens when the enlarger was on ... bingo.
 
OP
OP
Uncle Bill

Uncle Bill

Member
Joined
Apr 24, 2005
Messages
1,395
Location
Oakville and
Format
Multi Format
Update

I got a much better print last night running with oddly enough sticking to 8 seconds exposure at f5.6 but switching to a #3 kodak filter, I got the contrast I was looking for, granted I am not going to win awards with it, this is my first print and in retrospect with a beautiful but tricky negative. What I did is keep the safe light off until I am halfway through developing. I also cranked off two pictures from a shoot I did back in November at the Shanks CD release party. Pictures to follow when I get time to scan them.

would you believe to find a replacement safe light as a back up is near impossible in a metropolitan region of almost 6 million people. I hit downtown Henrys location, Downtown Camera, Vistek, 8 Elm Photo, Elpro, and Aden Camera. I am going to check Burlington Camera later this week.

Bill
 

srs5694

Member
Joined
May 18, 2005
Messages
2,718
Location
Woonsocket,
Format
35mm
I got a much better print last night running with oddly enough sticking to 8 seconds exposure at f5.6 but switching to a #3 kodak filter, I got the contrast I was looking for, granted I am not going to win awards with it, this is my first print and in retrospect with a beautiful but tricky negative.

That sounds perfectly plausible to me, given your scans.

What I did is keep the safe light off until I am halfway through developing.

If your safelight isn't too bright and is putting out light in the proper range of the spectrum, you should be able to leave it on at all times when doing B&W enlargements. You can do a safelight test: Give a strip of paper just a little exposure to white light -- enough to almost begin to darken it, were it to be developed. Then put a coin or some other object on the paper, to cover part of it, and leave it out in your safelight conditions for a few minutes -- for a bit longer than you expect the paper to normally be exposed to safelight conditions. Then develop the paper. If you can see the outline of the coin, then it means your safelight isn't safe -- it fogged the paper. If you see no outline, then your safelight is safe, at least for the time period, brightness, and distance you tested. You could legitimately test for several exposure periods and locations in your darkroom. You'll probably need less than a full 8x10 sheet of paper for a full range of tests.

would you believe to find a replacement safe light as a back up is near impossible in a metropolitan region of almost 6 million people.

Check (there was a url link here which no longer exists) for discussion of using LEDs as safelights. The specific models mentioned are from mail-order outfits, but you might be able to find similar models in a party store, the lighting section of a big hardware store, a specialty lighting shop, or whatnot. It's best to give whatever you get a safelight test, as just described.
 
OP
OP
Uncle Bill

Uncle Bill

Member
Joined
Apr 24, 2005
Messages
1,395
Location
Oakville and
Format
Multi Format
Show and Tell time

Ok here are the three enlargements I did last night, first the new and improved Benches, and the other two came from a shoot I did at CD release party for a local band called the Shanks.

The available light/concerts shots were done with a 3 second exposure with a #2 filter and F5.6 on the enlarging lens. Bear in mind the crud on the bar shot is from my cheapie Canon flatbed scanner.

Not bad for my first weekend doing this.

Bill
 

Attachments

  • Benches Second Try.jpg
    Benches Second Try.jpg
    152.7 KB · Views: 122
  • Shanks Enlargement.jpg
    Shanks Enlargement.jpg
    109 KB · Views: 120
  • Taken care of Enlargement.jpg
    Taken care of Enlargement.jpg
    109.4 KB · Views: 107

firecracker

Member
Joined
Jan 22, 2005
Messages
1,950
Location
Japan
Format
35mm
The available light/concerts shots were done with a 3 second exposure with a #2 filter and F5.6 on the enlarging lens. Bear in mind the crud on the bar shot is from my cheapie Canon flatbed scanner.

Looks good. You have pretty steady hands for available low-light photography (the bar shot). I guess you weren't drinking much... :smile:

I would suggest that perhaps the next time you try to close down the F stop on your enlarging lens to F8 or F11 for the 3-sec-at-F5.6 ones simply because the longer exposure time will give you more control. Anything that becomes less than 10 seconds of an exposure time, I close down the F stop to make it longer, but maybe that's just me. It enables you to do dodging and burning-in much easier. That's for sure.

Also, you might see the difference in quality of prints, too at different F stops depending on the design of the lens that you use.
 

Michel Hardy-Vallée

Membership Council
Subscriber
Joined
Apr 2, 2005
Messages
4,793
Location
Montréal, QC
Format
Multi Format
Quite a nice improvement, and great available lights shots, Bill! I think you might want to try reducing a tad the exposure of the bench shot to get clearer highlights. As mentioned before, printing at a smaller f-stop allows you to have longer printing times that are easier to control.
 
OP
OP
Uncle Bill

Uncle Bill

Member
Joined
Apr 24, 2005
Messages
1,395
Location
Oakville and
Format
Multi Format
Three seconds is very fast in the grand scheme of things. I think if I am going to try another enlargement from an low light negative, I will try F8 and go longer. I am the equivalent of learning how to walk, its a question of a learning curve. I will be printing so much better, I might go back and reprint the concert shots a couple of months from now.

As for the low light shooting, I have a couple of photos from the Shanks gig in the gallery and yup, I had a couple of Brick Brewing's finest Waterloo Dark. Another musican friend told me I won the Dr. Johnny Fever award after shooting his gig if those out there get the WKRP reference.
 
Photrio.com contains affiliate links to products. We may receive a commission for purchases made through these links.
To read our full affiliate disclosure statement please click Here.

PHOTRIO PARTNERS EQUALLY FUNDING OUR COMMUNITY:


Ilford ADOX Freestyle Photographic Stearman Press Weldon Color Lab Blue Moon Camera & Machine
Top Bottom