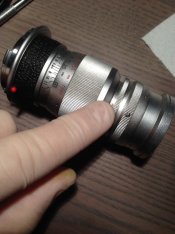
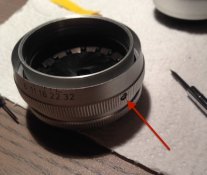
Loose aperture blades on Leica Elmar 90mm

On the edge of town.

A
On the edge of town.

  • 7
  • 4
  • 130
Peaceful

D
Peaceful

  • 2
  • 12
  • 281
Cycling with wife #2

D
Cycling with wife #2

  • 1
  • 3
  • 108
Time's up!

D
Time's up!

  • 1
  • 1
  • 101

Recent Classifieds

Forum statistics

Threads
198,269
Messages
2,772,069
Members
99,585
Latest member
cosmicfish
Recent bookmarks
0

Søren

Member
Joined
Dec 3, 2012
Messages
15
Format
35mm
Hi,
I have a quite nice Leica Elmar 90mm f4. Unfortunately, the two screws which hold the aperture ring came loose and I wasn't able to fix it right away, because I was on a holiday trip and did not have a small screwdriver so I just left it in my bag. When I came home I saw that both screws fell off (found them in my bag, so I still have them). Now the aperture blades are loose and slightly out of alignment, so I guess it is necessary to open the lens and readjust the blades and then put back the two screws. Does anyone know if it is possible to fix it myself? I spend around 100EUR for the lens, and a repair service would charge close to 100EUR as well (that's what they charge to clean the blades here). Hence, a repair seems not to be very attractive to me (I don't use the 90mm very much also). As far as I can see, it's not very difficult to open the lens on the back and front. However, I don't know if it is difficult to realign the blades or if it requires even special tools.
Thanks in advance!
Soeren
 
Joined
Oct 29, 2006
Messages
4,827
Location
İstanbul
Format
35mm
May be price low and make itself unattractive but believe me you cant take a similar image with 2000 dollars canon lens.
So do not screw the lens and send it to an Leica service and will cost you around 200 dollars not less.
You cant align and fix it.
 

shutterfinger

Member
Joined
Feb 25, 2013
Messages
5,020
Location
San Jose, Ca.
Format
4x5 Format
Aperture blades in any lens are arc shaped with a pin in each end but on opposite sides of the blade. Sometimes the pin is offset on one side. The blades fit into a fixed plate with a hole for the pin. The standard orientation is counterclockwise from the front of the lens. The other end fit into a movable ring that has a slot for each pin to fit into. Alignment of the plates and blades is at wide open. The biggest obstacle is how to remove the rear of your lens to access the plates and blades. The more blades there are the harder it is to get them to stay in position until assembled. Stop detentes are usually a spring loaded ball under the aperture ring.
 

02Pilot

Member
Joined
Feb 9, 2011
Messages
321
Format
Multi Format
I don't have my Elmar 90/4 with me at the moment, but IIRC the front portion unscrews from the rest of the body without tools, which should expose the aperture blades. I doubt this gets you in far enough to effect a repair, but it might if all you need to do is realign them. There are no click-stops on the aperture on this lens.

It is not a difficult lens to work on at all; if you don't want to pay someone else to do it, it's worth taking a shot at it yourself. I'm sure there are detailed instructions out there on the net somewhere.
 
OP
OP

Søren

Member
Joined
Dec 3, 2012
Messages
15
Format
35mm
Thanks. The back of the lens is easy to open. However, I can't realign the blades from behind, because they seem to be stuck somehow. The ring next to the front element has two tiny screws. Unfortunately, my thinnest screwdriver is just a tiny bit too large. I will stop by a store tomorrow to buy an appropriate screwdriver and then hopefully I can fix the issue.

Unfortunately, I found no repair manual on the net (for this particular lens). But as you said, the lens built quite simple, so I'm optimistic. If someone knows a manual/video for this fix, I'd be grateful, though.
 

02Pilot

Member
Joined
Feb 9, 2011
Messages
321
Format
Multi Format
OP
OP

Søren

Member
Joined
Dec 3, 2012
Messages
15
Format
35mm
I tried to disassemble to lens yesterday. Unfortunately, the two tiny screws holding to front ring seem to be stuck and rusty. I wasn't able to unscrew the screws without ruining them. I don't know if there is some way to get them out. Maybe with a tiny drop of WD-40 or something, but I'm afraid that these screw are so tiny that the last solution would be the drill.

Nice :smile:. You are close to Leica store http://www.leica-store-berlin.de/ , and Hamburg store is also close to you.
You can try to fix it, if you fail, sell it on ebay and buy another elmar for some small extra money.
Yes, but I suspect that sending the lens to Leica would cost more than twice what I have paid for it. ;-( Selling it on ebay might be a possibility indeed.
 

02Pilot

Member
Joined
Feb 9, 2011
Messages
321
Format
Multi Format
Do not use WD-40 on camera equipment. It is not a penetrating oil, but simply a very light oil in a solvent carrier (originally designed for water displacement, hence WD). A drop of lighter fluid would be the first thing to try; if that fails, a true penetrating oil may help, but this will require thorough and careful clean-up afterwards.

With a properly-sized screwdriver, try to gently work the screw back and forth while the fluid is in the recess. The slight motion can help to get the fluid into the threads. Do not apply pressure until you see that the screw is moving relatively freely.
 
OP
OP

Søren

Member
Joined
Dec 3, 2012
Messages
15
Format
35mm
I did it! It took some time and a steady hand, but after all the lens works even better than before since I cleaned the blades on that occasion. Unfortunately, I don't have broadband internet at the moment, but I will post a few pictures in the next few days. Maybe the they will help someone or maybe someone will just find it interesting how the interior of the lens looks like (at least I couldn't find pictures of assembling the blades).
Right now I'm very happy to have my lens 'back' and would like to thank you all very much!

Do not use WD-40 on camera equipment. It is not a penetrating oil, but simply a very light oil in a solvent carrier (originally designed for water displacement, hence WD). A drop of lighter fluid would be the first thing to try; if that fails, a true penetrating oil may help, but this will require thorough and careful clean-up afterwards.

With a properly-sized screwdriver, try to gently work the screw back and forth while the fluid is in the recess. The slight motion can help to get the fluid into the threads. Do not apply pressure until you see that the screw is moving relatively freely.
Thank you in particular. It turned out that I did not need to unscrew the front ring. Instead I had to unscrew the top and bottom part by hand. On my first investigation of the lens they did not separate and I assumed that one had to take off the front element first. Actually they were just incredibly tight.
Thank you for the basic assembly guide as well. I actually did the plumber wrench thing some time ago (on another lens), but I would not recommend it. :smile: Spent a few euros to for an appropriate tool, which I certainly don't regret.
 

02Pilot

Member
Joined
Feb 9, 2011
Messages
321
Format
Multi Format
Glad to hear you got it working again.
 
OP
OP

Søren

Member
Joined
Dec 3, 2012
Messages
15
Format
35mm
A lot of screws in cameras and lens are secured with a threadlocking compound. Applying a little acetone (nail polish remover) to the screw and letting it set for 5 to 10 minutes may loosen the stuck fastener.

Congratulations on the repair.
That's very nice to know. Thanks!

Here are some pictures:

First unscrew the section for focusing from the lens section (I believe this is to use the lens on the varioflex).
IMG_1355.jpg
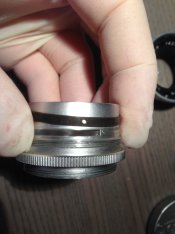
Then unscrew the two parts of the lens section. I don't think it is necessary
to take off the very back element behind the aperture, but I did it just to be
safe from scratching it when working on the aperture blades. Here you can see
that the blades are out of alignment:
IMG_1343.jpg
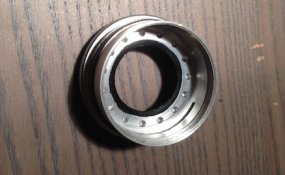
Then you can unscrew the aperture ring. Here you can see the small ring with two holes (where
the screws from the aperture ring go through to move the blades) and the slit on the chrome
element which limit the movement.
IMG_1348.jpg
I took off the inner ring(which hold the blades) and the blades themselves:
IMG_1347.jpg
Here I cleaned everything carefully. It was not greasy at all, but after assembling I definitely could feel a difference.
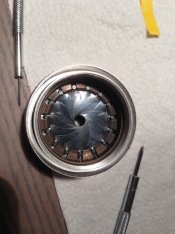
The tricky part was to put the blades back. I don't know how a professional does this but I put as many blades back
as I could (in the wide open position). Then 5 blades were left, since their little holes were covered by the previous
blades. I then slid them under one by one very carefully and voila:
IMG_1351.jpg
If you do this for the first time be very careful, because the blades are very light and come out off their position very easily, and
if they do you probably have to start all over again!
Then put the ring back and it actually worked (yes!):
IMG_1353.jpg
One thing I noticed was that the copper ring above (which holds the blades) does not seem to be symmetric. That is, the first time I assembled
everything the aperture did not open enough (or closed properly at f32). I then tried to remove the copper ring and but it pack such that the two holes (where the screws from the aperture ring go through) were reversed (effectively turn the copper ring about 180 degrees). Then, everything worked perfectly!

Finally put back the two little screws to secure the aperture ring. Remember, that the go through the aperture ring, the very thin ring (see the third picture), the slit in the chrome element, and finally into the inner copper ring (holding the blades). So you make sure to align everything beforehand.
IMG_1354.jpg

Sorry for the long post. I hope I did someone a favour by uploading the pics!
 
Photrio.com contains affiliate links to products. We may receive a commission for purchases made through these links.
To read our full affiliate disclosure statement please click Here.

PHOTRIO PARTNERS EQUALLY FUNDING OUR COMMUNITY:


Ilford ADOX Freestyle Photographic Stearman Press Weldon Color Lab Blue Moon Camera & Machine
Top Bottom