Lines and Bands

Table for four.

H
Table for four.

  • 1
  • 0
  • 9
Waiting

A
Waiting

  • 1
  • 0
  • 30
Westpier

A
Westpier

  • 1
  • 2
  • 29
Westpier

A
Westpier

  • 2
  • 0
  • 24
Morning Coffee

A
Morning Coffee

  • 6
  • 0
  • 63

Recent Classifieds

Forum statistics

Threads
197,580
Messages
2,761,427
Members
99,408
Latest member
Booger Flicker
Recent bookmarks
0

giglaeoplexis

Member
Joined
Mar 26, 2019
Messages
20
Location
California
Format
35mm
Greetings,

I only have my own negatives to which to compare so I'm putting this here. Perhaps someone can offer some guidance, suggestions, or at least confirm what I'm seeing.

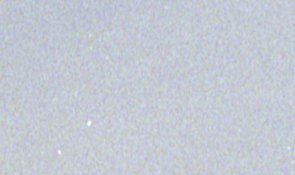
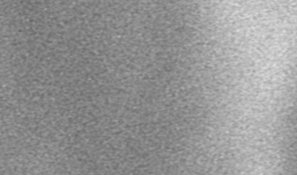
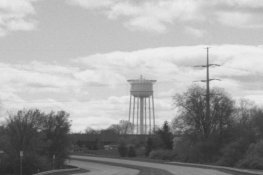
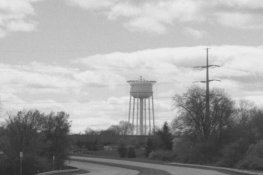
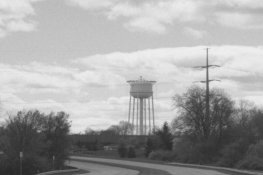
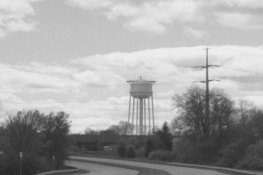
I'm seeing bands and lines in the grain of scans - both color and black & white. The color negative was processed by a lab, a couple weeks ago. The black & white, I processed myself in 1995, Both were scanned in the last few days on an Epson V550. I've scanned directly on the glass AND scanned using the Epson negative holder with and without the Better Scanning ANR glass insert. While the Better Scanning ANR glass removes newton rings, all scans exhibit the same lines and blotching/banding.

The attached scans were made at 6400 dpi and are at 1:1 (100%).

Is this just the way negatives look at 100% zoom or is there something else going on here?

Thanks,
Jonathan
 

Attachments

  • color-bands.jpg
    color-bands.jpg
    286.7 KB · Views: 109
  • mono-bands.jpg
    mono-bands.jpg
    173.2 KB · Views: 114

MattKing

Moderator
Moderator
Joined
Apr 24, 2005
Messages
52,003
Location
Delta, BC Canada
Format
Medium Format
What format film is this?
The actual, optical native resolution of that (and any flatbed) scanner is probably maxed out at less than 2400 ppi, and may be as low as 1700 ppi. Try scanning at a resolution closer to that and compare those results.
 
OP
OP

giglaeoplexis

Member
Joined
Mar 26, 2019
Messages
20
Location
California
Format
35mm
I just checked Epson's specs for this scanner. 6400x9600 is the V550's optical resolution. I've never used Digital ICE, Grain Reduction, or Dust Removal. I'm running test scans now. I have a feeling a combination of these may get me to where I want to go.
 

MattKing

Moderator
Moderator
Joined
Apr 24, 2005
Messages
52,003
Location
Delta, BC Canada
Format
Medium Format
I just checked Epson's specs for this scanner. 6400x9600 is the V550's optical resolution. I've never used Digital ICE, Grain Reduction, or Dust Removal. I'm running test scans now. I have a feeling a combination of these may get me to where I want to go.
The 6400x9600 figure is theoretical, not actual - it doesn't take into account the real world effects of things like the platen glass and the optics employed.
The 1700 - 2400 ppi figures are the results of real world tests.
All the scanner manufacturers report the theoretical resolution capabilities in their specifications.
Here is a link to a detailed test of the similar V600 scanner - they report an actual resolution of 1560 ppi: https://www.filmscanner.info/en/EpsonPerfectionV600Photo.html
 
OP
OP

giglaeoplexis

Member
Joined
Mar 26, 2019
Messages
20
Location
California
Format
35mm
Matt,
I really appreciate your replies and suggestions. However, a scan at 2400ppi yields the same lines, only smaller. Here's the 2400ppi scan at 200%.
It could be that my expectations for 35mm enlargements are beyond my equipment, the film medium, the size of my enlargement or some combination of these. Next step is to reinstall Vuescan to see if there is any difference in scan output.

-Jonathan
 

shutterfinger

Member
Joined
Feb 25, 2013
Messages
5,020
Location
San Jose, Ca.
Format
4x5 Format
The OPTICAL limit as stated by the manufacturer is the limit that the scan software DPI/PPI can be set to and NOT have software interpolation
The test target and procedure determine the results you get for true resolution. Many 3rd party testing procedures require the highest optical limit to be set in the scan software to get their true resolution.
Manufacturer stated max optical resolution is a REFERENCE STANDARD and nothing more.
 

Adrian Bacon

Member
Joined
Oct 18, 2016
Messages
2,086
Location
Petaluma, CA.
Format
Multi Format
The OPTICAL limit as stated by the manufacturer is the limit that the scan software DPI/PPI can be set to and NOT have software interpolation
The test target and procedure determine the results you get for true resolution. Many 3rd party testing procedures require the highest optical limit to be set in the scan software to get their true resolution.
Manufacturer stated max optical resolution is a REFERENCE STANDARD and nothing more.

+1

It is better to initially scan at the native sensor resolution, possibly do some post at that res, then scale down from there, knowing that the scanners optical system isn’t actually resolving that native sensor resolution. You can scan at a lower resolution if you want to, but run the risk of other artifacts being introduced into the image between the sensor and the resulting image from either the scanner hardware itself, or the scanner driver.

As far as the scans that have posted, I’m not seeing anything out of the ordinary. If you scan it at 6400 dpi, then scale it down to 3000x2000 pixels (just under 2400 dpi for 35mm), what does it look like? Sometimes it’s easy to get tripped up by looking too close.
 

Adrian Bacon

Member
Joined
Oct 18, 2016
Messages
2,086
Location
Petaluma, CA.
Format
Multi Format
Also, if you're using Vuescan, on the bw negative, you can set it to scan in monochrome using just the blue channel, then output a monochrome image from that one channel.

Why? Light on the blue end of the spectrum is shorter wavelength, a little more detail makes it through the optical system and onto the sensor. You can test this by doing the above with the red channel, then doing it with the blue channel and compare the two. The blue channel version looks better.
 
OP
OP

giglaeoplexis

Member
Joined
Mar 26, 2019
Messages
20
Location
California
Format
35mm
Thanks everyone. Because I don't have any other negatives or hardware, other than my own to work with, it's impossible to make any comparisons. As Adrian said he sees nothing out of the ordinary, I'd say what I'm seeing has more to do with grain structure than software or hardware. I've printed this particular image at 16"x20" and it's okay. It just took a lot of work to get it there. I don't mind doing the work. However, I'd much rather not find an easier, faster, and more efficient path to this end AFTER I complete this project.
 

MattKing

Moderator
Moderator
Joined
Apr 24, 2005
Messages
52,003
Location
Delta, BC Canada
Format
Medium Format
Matt,
I really appreciate your replies and suggestions. However, a scan at 2400ppi yields the same lines, only smaller. Here's the 2400ppi scan at 200%.
It could be that my expectations for 35mm enlargements are beyond my equipment, the film medium, the size of my enlargement or some combination of these. Next step is to reinstall Vuescan to see if there is any difference in scan output.

-Jonathan
For clarity, the reason I suggested that you try a scan at the lower settings was because the higher numbers end up adding data that wasn't on the film originally, and the banding could have arisen because of that part of the process. If your re-scanning at lower numbers gives you the same results, you can eliminate that as being a causative factor.
Personally, I can't really see any banding in the colour version. I can see some unevenness in the black and white version, but have no way of telling whether that is due to detail in the subject.
Are you able to see the banding in a larger segment of the image?
Does the banding repeat itself in the same way, at the same location of the subject, if you rotate the negatives 180 degrees and scan them again? If so, the problem may be in the negative. If not, the problem arises from the scanning process, the scanner or the software.
 

Adrian Bacon

Member
Joined
Oct 18, 2016
Messages
2,086
Location
Petaluma, CA.
Format
Multi Format
Thanks everyone. Because I don't have any other negatives or hardware, other than my own to work with, it's impossible to make any comparisons. As Adrian said he sees nothing out of the ordinary, I'd say what I'm seeing has more to do with grain structure than software or hardware. I've printed this particular image at 16"x20" and it's okay. It just took a lot of work to get it there. I don't mind doing the work. However, I'd much rather not find an easier, faster, and more efficient path to this end AFTER I complete this project.

I have a V850 Pro that I use for large format and sometimes medium format. For 35mm, it’s much higher quality and faster to “scan” with a DSLR and copy stand in a macro setup.
 

brbo

Member
Joined
Dec 28, 2011
Messages
2,025
Location
EU
Format
Multi Format
What exactly is wrong with the scans that you are posting here? I can't see a problem.Can you explain what you mean with "bands and lines in the grain", mark them clearly in the scan?

Or, what would the scan that you expect from a desktop scanner look like?
 
OP
OP

giglaeoplexis

Member
Joined
Mar 26, 2019
Messages
20
Location
California
Format
35mm
After a sleepless night and a eureka moment, I did a little more searching. In the olden days, when I printed using an enlarger, I would have never considered getting close enough to a print to view it as closely as I am able in Photoshop. I'm preparing for my first show and am probably obsessing about the details. What I am seeing are dye clouds, in the color emulsions and grain clumps in the black and white. The Espon V550 scans are fine at 6400ppi. The weakest link in my chain is the size of my negatives and my film/developer combinations. Most of the negatives we're exposed about 25 years ago and I would have never had the money, resources, need, or desire to work at this detail.

Again, thanks for all your input a suggestions.
 
OP
OP

giglaeoplexis

Member
Joined
Mar 26, 2019
Messages
20
Location
California
Format
35mm
Just to confirm what you all already know, I scanned the same 35mm negative at several resolutions and resized them all to my target size of 18"x12". Although not scientific by any stretch, this was the quickest way for me to see what I have. I centered all scans in a single Photoshop file to facilitate easier comparison.

The resolutions I scanned at were 300, 800, 2400, 3200, 4800, 6400, 9600 dpi. The bottom and top resolutions were to satisfy my obsessive "what if" complex. I noticed a shift in the placement of the image between 300, 800, and 2400 dpi. There was no shift in the image between 4800, 6400, and 9600.

All images were cropped to keep the file size small. None of the images has been sharpened with either Epson Scan or Photoshop.

300, 800, and 2400 dpi were blurry.
4800, 6400, and 9600 dpi were all slightly out of focus and appear to be the same.

3200 dpi is without a doubt the sharpest resolution at which to scan on my particular Epson v550.

Again, thank you all for guiding me toward the light!
 

Attachments

  • 300-dpi.jpg
    300-dpi.jpg
    273.8 KB · Views: 73
  • 600-dpi.jpg
    600-dpi.jpg
    335.4 KB · Views: 77
  • 800-dpi.jpg
    800-dpi.jpg
    402.7 KB · Views: 73
  • 2400-dpi.jpg
    2400-dpi.jpg
    564.1 KB · Views: 74
  • 3200-dpi.jpg
    3200-dpi.jpg
    618.3 KB · Views: 78
  • 4800-dpi.jpg
    4800-dpi.jpg
    503.9 KB · Views: 67
  • 6400-dpi.jpg
    6400-dpi.jpg
    533.5 KB · Views: 65
  • 9600-dpi.jpg
    9600-dpi.jpg
    580.2 KB · Views: 79

MattKing

Moderator
Moderator
Joined
Apr 24, 2005
Messages
52,003
Location
Delta, BC Canada
Format
Medium Format
I note that you re-sized all the images. Be cautious, because the re-sizing adds its own effects.
 
Photrio.com contains affiliate links to products. We may receive a commission for purchases made through these links.
To read our full affiliate disclosure statement please click Here.

PHOTRIO PARTNERS EQUALLY FUNDING OUR COMMUNITY:


Ilford ADOX Freestyle Photographic Stearman Press Weldon Color Lab Blue Moon Camera & Machine
Top Bottom