Light leaks?

Carved bench

A
Carved bench

  • 0
  • 3
  • 45
Anthotype-5th:6:25.jpg

A
Anthotype-5th:6:25.jpg

  • 6
  • 4
  • 107
Spain

A
Spain

  • 2
  • 0
  • 88
Nothing

A
Nothing

  • 2
  • 3
  • 166

Recent Classifieds

Forum statistics

Threads
198,053
Messages
2,768,961
Members
99,547
Latest member
edithofpolperro
Recent bookmarks
0

silvertab

Member
Joined
Dec 31, 2021
Messages
43
Location
Canada
Format
Multi Format
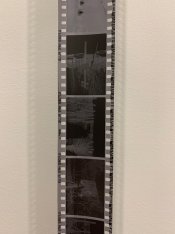
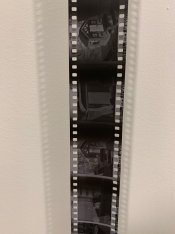
Hi there! I recently purchased a Minolta XD-11, which was in decent shape, but after shooting my first roll with it, I noticed black bands on the negative, but attributed them to human error (it was my first attempt at developing a film at home in 20+ years, I figured I may have done something wrong). However, upon shooting another roll with it, I'm seeing a very similar pattern. The weird thing is that, it's mostly affecting the beginning and the end of the roll, whereas the middle section isn't too bad.

I've attached 2 pictures to show what it looks like, the first one is one end of the roll (the other end is similar) and the other is the middle, where the black bands are a lot less subtle.

After some googling, it looks like the camera might suffer from light leaks? Anything else that could explain this? Does it make sense that the problem would be more obvious at both ends of the roll but not the middle? Any help would be appreciated!

Ends of the roll
IMG_3518.jpeg

Middle of the roll
IMG_3519.jpeg
 
OP
OP

silvertab

Member
Joined
Dec 31, 2021
Messages
43
Location
Canada
Format
Multi Format
What developing tank and reel did you use?

a basic paterson tank (the one that lets you do either 2 rolls of 35mm or 1 roll of 120), and the reel that came with it... I used the very same tank to develop a roll of 120 last week and it came out perfectly fine.
 

shutterfinger

Member
Joined
Feb 25, 2013
Messages
5,020
Location
San Jose, Ca.
Format
4x5 Format
Then I assume you used the center spindle.
The leak covers the sprockets and overlaps frames as I can see distinct frames lines in the leak shaded area so I would suspect the back hinge or its seal.
EDIT
I would inspect the back to body gap with the back closed. The back should be flush with the body edge with no gap at the hinge.
 
Last edited:

foc

Subscriber
Joined
Jun 30, 2010
Messages
2,505
Location
Sligo, Ireland
Format
35mm
Thank you for posting the photos of the neg strips.
Your first image (end of roll) shows what appears to me to be a light leak caused by opening the back of the camera slightly and then closing it again quickly but then why would you get it at the start of the roll as well.
If it was the developing reel or tank fault, then I would expect to see the light fogging more evenly spread across the negs and not so close together as shown in your images.
Could the camera door be faulty?
As @shutterfinger suggested, check the door for gaps.
 

tokam

Subscriber
Joined
Nov 7, 2008
Messages
586
Location
Sydney, Aust
Format
Multi Format
I've seen similar partial fogging of frames back in the mid '70s while using a Zenit E. The catch holding the door closed was a poor design and after rubbing against the ER case it would unlatch the camera door allowing fogging of the film.

I haven't seen an XD-11 but hopefully the catch is better designed. Is it a sliding, spring loaded catch? If so the sliding action may be a bit sticky preventing the catch from locking correctly.
 
OP
OP

silvertab

Member
Joined
Dec 31, 2021
Messages
43
Location
Canada
Format
Multi Format
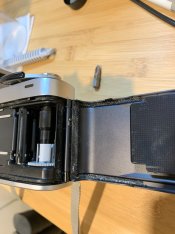
Thank you all! I tried to assess the state of the light-insulating foam on the camera and... to be honest; there really isn't any foam left... some glue, and what looks like it might've been foam at one point, but that's about it. Thinking about it some more; the timing at which I shot the film was something like: Put it in the camera, leave it there for a couple of hours (which could explain the start of the problem at the start of the roll), then I shot a bunch of pictures fairly quickly (middle of the roll), and then left it in the camera for an entire day before shooting the remaining 4-5 frames (which could explain the problem at the other end of the roll). I might be grasping at straws, but I think the timing might make sense *scratches head*
 
OP
OP

silvertab

Member
Joined
Dec 31, 2021
Messages
43
Location
Canada
Format
Multi Format
Adding a pic to show what I'm talking about... looks like there was black foam at one point there, but now it's just glue residues
IMG_3521.jpeg
 

foc

Subscriber
Joined
Jun 30, 2010
Messages
2,505
Location
Sligo, Ireland
Format
35mm
Put it in the camera, leave it there for a couple of hours (which could explain the start of the problem at the start of the roll), then I shot a bunch of pictures fairly quickly (middle of the roll), and then left it in the camera for an entire day before shooting the remaining 4-5 frames (which could explain the problem at the other end of the roll). I might be grasping at straws, but I think the timing might make sense *scratches head*

I think you nailed it. That would explain the start and end fogging.
 

Kino

Subscriber
Joined
Jan 20, 2006
Messages
7,682
Location
Orange, Virginia
Format
Multi Format
Thank you all! I tried to assess the state of the light-insulating foam on the camera and... to be honest; there really isn't any foam left... some glue, and what looks like it might've been foam at one point, but that's about it. Thinking about it some more; the timing at which I shot the film was something like: Put it in the camera, leave it there for a couple of hours (which could explain the start of the problem at the start of the roll), then I shot a bunch of pictures fairly quickly (middle of the roll), and then left it in the camera for an entire day before shooting the remaining 4-5 frames (which could explain the problem at the other end of the roll). I might be grasping at straws, but I think the timing might make sense *scratches head*

If you have some printing paper, cut a strip to fit the film path of the camera that spans the entire back from spool to spool and load it in the camera in the dark. (Frankly, I would cut two strips and place them with one emulsion side facing the pressure plate and one facing the lens to make sure I had both directions covered.)

Take the camera outside and hold it up, rotating the camera all directions to expose every side to the sun. Of course, don't fire the shutter, just expose all surfaces to the light.

Process the paper normally and see what you get; it should show the general area of where the light leak(s) originate. You might want to mark the orientation of each strip with a pencil before you develop.
 
Photrio.com contains affiliate links to products. We may receive a commission for purchases made through these links.
To read our full affiliate disclosure statement please click Here.

PHOTRIO PARTNERS EQUALLY FUNDING OUR COMMUNITY:


Ilford ADOX Freestyle Photographic Stearman Press Weldon Color Lab Blue Moon Camera & Machine
Top Bottom