I'll be interested to apply my so far math/optics skills I'm gaining during my current academic study to certain self-assihned project that is aimed to design an optimal lens hood for my LF lenses I currently own (Fuji-W 150mm/5.6 and Grandagon-N 90mm/6.8). The market offerings don't excite me much (each has its own annoying drawbacks), so I thought to try to make one by myself (actually with he help of my relative who is very skilled metal worker and not only). First of course I need to proceed with necessary calculations. To make the things simple at the first, I will only take into account the actual media area (4x5) not taking into account actual excessive lens coverage (image circle), but the hood shall be flexible enough to accomodate moderate movements manually and preferrably accomodate 1-2 square filters in front of the lens (slots for Cokin, Lee or Hitech sized)
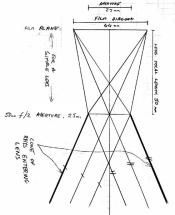
So, first I assume there is no movements applied (camera is at the respective detents), the lens is projecting straight onto the film area.
The viewing angle can be calculated easily by given focal lenght and of course it is constant. (i.e. for instance 150mm lens is expected to produce roughly 43 degrees of viewing angle horizontally and approx. 37 degrees vertically). There are two questions so far Im asking myself:
1. What is actual, precise size of 4x5 active film area ? (I guess is must be somewhat smaller then just plain 4" by 5"). Cannot measure myself since have yet shot single frame - still in the process of learning LF basics and have had no time to go to the shop for some 4x5 film to purchase)
2. What is the point the viewing angle is measured from ? (i.e. where is located the top of "viewing angle cone") Shall I take it located at len's front principal focusing plane, len's rear principal focusing plane or perhaps from the film plane once focused at infinity ?
I noticed most LF manufacturers provide full data for their respective lenses including optical construction and physical dimensions, so once I'll know the necessary calculating parameters and will have particular len's manufacturer data, I will be able to proceed with calculations (unless you see a major mistake in my approach).
So, if you feel you can contribute answering my questions above, I'll be grateful.
Alex