Ghak
Member
Hi all,
There are few older posts on this topic, but need a bit more help.
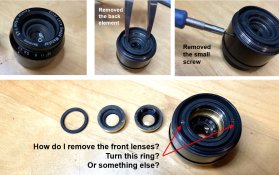
I'm trying to disassemble an earlier version (DOOCQ) that I am trying to clean. Based on the instructions posted here on Photorio, I've removed the two back lenses, but cannot remove the ones in front of the aperture.
I think I remove the small screw, and turn the ring with the slits in them -- but it's super hard, won't move at all (as you can see, I've stripped it a bit already.
Can somebody help me and advise what I should do to remove the front lens assembly?
Thank you so much!
There are few older posts on this topic, but need a bit more help.
I'm trying to disassemble an earlier version (DOOCQ) that I am trying to clean. Based on the instructions posted here on Photorio, I've removed the two back lenses, but cannot remove the ones in front of the aperture.
I think I remove the small screw, and turn the ring with the slits in them -- but it's super hard, won't move at all (as you can see, I've stripped it a bit already.
Can somebody help me and advise what I should do to remove the front lens assembly?
Thank you so much!