Is it my Scanner or me? HP S20 and FP4+

Friends in the Vondelpark

A
Friends in the Vondelpark

  • 0
  • 0
  • 6
S/S 2025

A
S/S 2025

  • 0
  • 0
  • 35
Street art

A
Street art

  • 0
  • 0
  • 35
20250427_154237.jpg

D
20250427_154237.jpg

  • 2
  • 0
  • 69
Genbaku Dome

D
Genbaku Dome

  • 7
  • 2
  • 89

Recent Classifieds

Forum statistics

Threads
197,510
Messages
2,760,229
Members
99,523
Latest member
Wetplatephotography
Recent bookmarks
0

Wolfram Malukker

Subscriber
Joined
Apr 13, 2024
Messages
138
Location
Kentucky USA
Format
35mm
So I finally got my HP Photosmart S20 scanner in a usable state. I have had it working, but not reliably, and it turns out that the HP Photosmart 5510 printer drivers will significantly improve the functionality of the Photosmart S20 scanner with Windows 10.

Now, I only ran the scanner at 1200 DPI, because I was not familiar with the interface, but I think I have figured it out a little better. I plan to re-scan these images tomorrow at 2400DPI and see if they're more than just bigger files.

0hOFZaeh.jpg


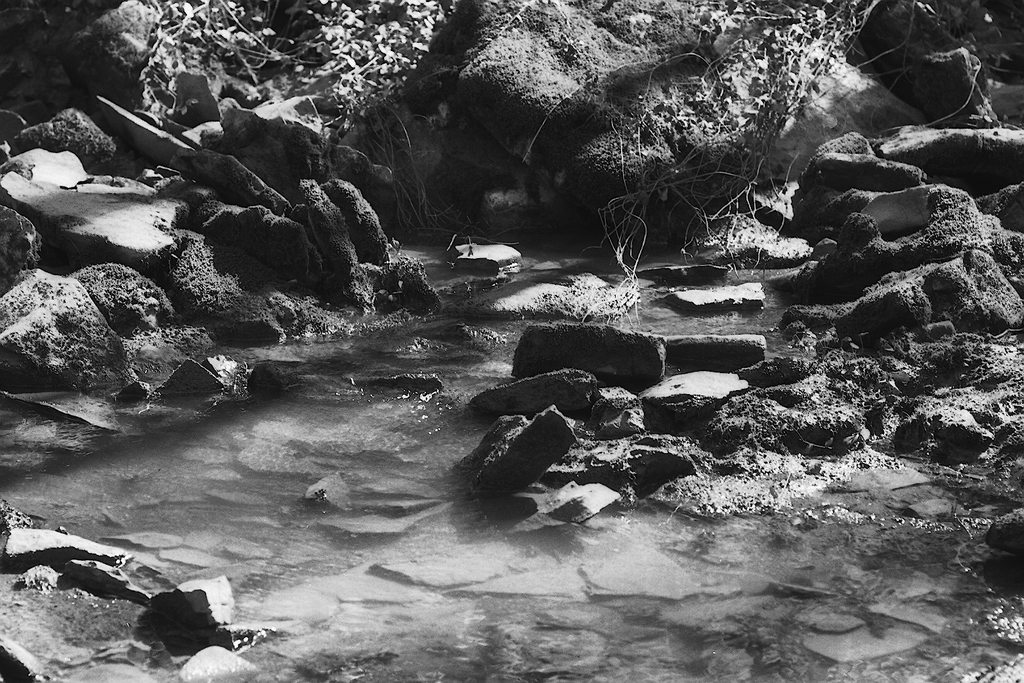
These images only have the in-scanner sharpness set from 15 up to 60, and I used the auto-exposure settings in the scanner. No dust removal, but it's black-and-white anyway.

xVRzctBh.jpg


And the image that came out the best of the whole roll, I think:

uSTRg0qh.jpg


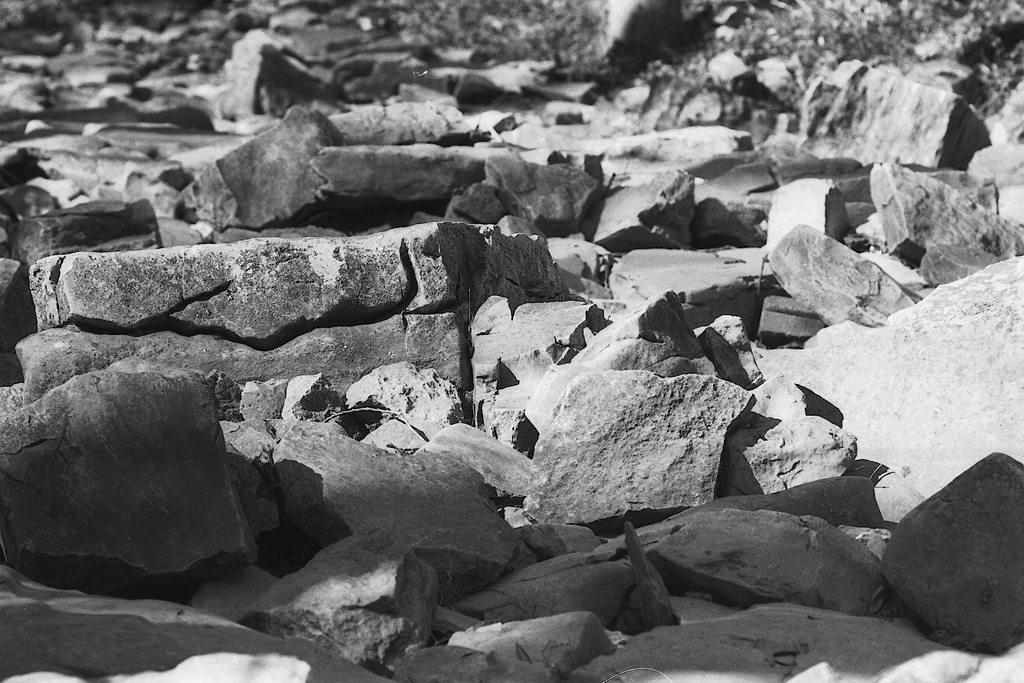
I shot this roll of film on FP4+ and my new-to-me super takumar 105/F2.8 lens, and I'm trying to decide if I have in-camera focus issues or if I have some scanner setting issues to solve. Most of the images I scanned so far look a little fuzzy to me, except this last image. This one looks pretty darn good to me. Is this just me wanting to see these scanned at 2400DPI or should I be happy with my 26 year old film scanner?
 

koraks

Moderator
Moderator
Joined
Nov 29, 2018
Messages
20,713
Location
Europe
Format
Multi Format
If you're looking at images the size they're presently displayed here on the forum, there's going to be no benefit in scanning at >1200dpi. For prints, it may make a difference, depending if the scanner actually resolves anything beyond that point. (As I understand, this scanner was reasonably good for the era it's from and will effectively deliver around 2000dpi).

When it comes to sharpness of digital images, it's rarely smart to perform the sharpening operation at the scanning stage. Sharpening is best applied immediately before output, at the final resolution the image will be displayed/printed at. Sharpening on all three of your images looks overly aggressive and since it happened on the source file, there artifacts resulting from resizing the sharpened originals.

Keep also in mind that 'sharpness' is a difficult construct, since the impression of sharpness or crispness of an image is a combination of several factors. Some are affected by digital sharpening (using e.g. an unsharp mask action), while others are barely related to it (e.g. macro-level contrast).

Looking at your images, I see no problems with motion blur or in-camera focus issues on these small-sized files; 'sharpness' as such looks OK to me apart from the over-aggressive sharpening. The main area of improvement for this images in my view would be in tonal rendition (that also very fuzzy concept of 'tonal scale' or 'tonality'). But you'd have to re-scan them so you have a better base material to work with in this regard.

Overall, when scanning film, my preferred approach is to scan everything as a positive ('slide') in 16 bit/pixel depth, resulting in a rather flat, inverted/negative image. Then use curves to manually optimize the overall contrast, and especially when working with B&W images, using masked adjustment layers to locally adjust contrast depending on subject matter (digital 'burning & dodging').

One final note on 'sharpness' - if you scan negatives at high resolution (>600dpi), the files when viewed at 100% magnification virtually always look kind of fuzzy (if you leave any sharpening disabled during the scan process, as I feel you should). There's some relation between this 'fuzziness' and actual effective resolution, but they're not the same thing. You can have a somewhat fuzzy scan that's still of high resolution, and some digital adjustments can help make the end result presentable.
 

loccdor

Subscriber
Joined
Jan 12, 2024
Messages
1,391
Location
USA
Format
Multi Format
Looks good for 1200 dpi. Lovely images. I like the first one especially. Like Koraks, I turn sharpening and autoexposure off.
 
OP
OP

Wolfram Malukker

Subscriber
Joined
Apr 13, 2024
Messages
138
Location
Kentucky USA
Format
35mm
Honestly I figured the autoexposure would be junk, but it has done an excellent job of getting everything into the gamut right out of the box. I only made small changes to get an image that I liked, and the image preview window in the HP software is not much bigger than the actual negative, so I am relying on the histogram and clipping pictogram a lot. The default sharpening value is 15, and may have been plenty enough, but I read a few reviews that said they settled on a value around 60 to get an image they liked. I used values between 40 and 60 to get images I thought would be OK, but I will re-scan them at 2400 DPI and try a a few different sharpening settings.

The dry creekbed of just the rocks is the image that looks technically correct to me. The first image, where the creek still has some water in it, is probably my favorite but I think the bit I don't like is the "over-sharpened" look, or maybe the contrast it a bit too high? I will re-scan that one at 2400DPI and the default sharpening value of 15, and try to work it up to an image I am happier with.
 

koraks

Moderator
Moderator
Joined
Nov 29, 2018
Messages
20,713
Location
Europe
Format
Multi Format
the bit I don't like is the "over-sharpened" look, or maybe the contrast it a bit too high?

Oversharpening is likely a factor. I recognize it in that image for sure. As said, I'd start by disabling all sharpening options in the scan software and/or set them to zero.
Contrast-wise, I think that particular scan is problematic, but I can't tell for sure as I don't know what the negative looks like. It does seem to have plenty of shadow and highlight detail; I just have a feeling (it's really just that) that the scanning software tends to automatically apply a rather aggressive S-curve, which compresses both shadows and highlights and overemphasizes midtone contrast. Such automatic "let us decide what you like" options I generally circumvent by scanning film as a positive, which tends to (usually) produce a more linear output which you can then adjust the way you actually like.
 
OP
OP

Wolfram Malukker

Subscriber
Joined
Apr 13, 2024
Messages
138
Location
Kentucky USA
Format
35mm
OK, so I got the rescans done tonight. I rescanned the sinking creek image, at 2400DPI, exposure adjustments zeroed out, sharpening set to zero. I'll start with that image.

SV6B57X.jpg


My attempt at editing in Lightroom 6. I adjusted the RGB curve by moving the bottom left marker to the right until I saw the histogram warning and then backed off a tiny bit, then pulled the linear line down into a curve until I like the look. Sharpening is set to "40" in lightroom, any less and I couldn't see any effect at all. Going over "60" in lightroom started looking wrong. Exported from Lightroom at 240 DPI because I didn't check what I was doing.

c5c77xJ.jpg


The above image, exported at 2400 DPI, with output sharpening set to "screen"

Gb7ZSm4.jpg


The lightroom edited image, exported again at 2400DPI, but this time the output sharpening set for "Matte Paper":

NmW4P1d.jpg


What can I learn from these images? Did I do anything better? What should I be looking for when setting up an image for inkjet printing?
 

loccdor

Subscriber
Joined
Jan 12, 2024
Messages
1,391
Location
USA
Format
Multi Format
Compared to the auto exposed image, you've got a little more detail in the highlight and shadows, and of course better resolution from the higher dpi.

The three manually processed images are essentially indistinguishable when viewed from a short distance on my 65 inch TV, I have to zoom in at the pixel to tell them apart.

A printed image should generally have slightly more contrast than what you think looks good on a screen.

You're probably extracting about half the dpi the film is storing, but if you aren't printing very large, it may not matter.
 
OP
OP

Wolfram Malukker

Subscriber
Joined
Apr 13, 2024
Messages
138
Location
Kentucky USA
Format
35mm
I am looking to print at ~8x10 for a 35mmx24mm original, my printer isn't a super professional grade one, just a basic Epson ET-2800 series. It can apparently do a nice enough job, and if I need better, well, I'll adjust the workflow to suit, may need to send the negative out for a higher quality scan or find someone with a darkroom.

The plan is to develop a usable workflow for creating inket printed images or digital negatives, to do salted paper prints one day.
 

loccdor

Subscriber
Joined
Jan 12, 2024
Messages
1,391
Location
USA
Format
Multi Format
Yep, 2400 dpi is just enough to get you to that print size. I think you've got what you need to begin dialing it in with experiments to see what looks best printed out.
 
Joined
Jan 31, 2020
Messages
1,261
Location
Germany
Format
Multi Format
Work on your curves a bit more and It'll look good! The first image shows that shadow detail is there, don't crush it, unless you want this picture to be only about the sparkly reflections which get all the tonal range now! You probably need to make the bottom part of the curve steeper.
 
Joined
Aug 29, 2017
Messages
9,280
Location
New Jersey formerly NYC
Format
Multi Format
Your photos seem to have clipped whites and blacks. Although different scanners, my Epson V600 and V850 using Epsonscan tend to clip as your scans seem to show as well. This often happens in auto-scan mode. The machines set the auto white and black points or levels too low or too high. I therefore switch off Auto and set the points manually slightly beyond the image data ends to prevent clipping. Or I scan flat with all settings off. Then I adjust the scanned images in my image editing program.
 
Last edited:
Joined
Aug 29, 2017
Messages
9,280
Location
New Jersey formerly NYC
Format
Multi Format
Work on your curves a bit more and It'll look good! The first image shows that shadow detail is there, don't crush it, unless you want this picture to be only about the sparkly reflections which get all the tonal range now! You probably need to make the bottom part of the curve steeper.

Adjusting curves won't help if you already clipped the levels (black and white points). See my last post.
 
Joined
Jan 31, 2020
Messages
1,261
Location
Germany
Format
Multi Format
Adjusting curves won't help if you already clipped the levels (black and white points). See my last post.

The first version in the OP's last post clearly doesn't have clipped blacks, it just arguably a bit underexposed. The whites do see clipped.
 

koraks

Moderator
Moderator
Joined
Nov 29, 2018
Messages
20,713
Location
Europe
Format
Multi Format
The first version in the OP's last post clearly doesn't have clipped blacks, it just arguably a bit underexposed. The whites do see clipped.

Indeed, the blacks aren't clipped at all; the whites are close but have some differentiation still. In 16bit space they would be more or less salvageable although I'd prefer to have them a little further away from the edge when starting editing.
 
Joined
Aug 29, 2017
Messages
9,280
Location
New Jersey formerly NYC
Format
Multi Format
The first version in the OP's last post clearly doesn't have clipped blacks, it just arguably a bit underexposed. The whites do see clipped.

OK. However, it doesn't change the main point I was making. Allowing the scanner to automatically set levels often clips, at least with my Epson V600 and V850 scanners and Epsonscan software. Maybe his software operates similarly and clips as well. He might want to set black and white points manually to prevent it.
 
Photrio.com contains affiliate links to products. We may receive a commission for purchases made through these links.
To read our full affiliate disclosure statement please click Here.

PHOTRIO PARTNERS EQUALLY FUNDING OUR COMMUNITY:


Ilford ADOX Freestyle Photographic Stearman Press Weldon Color Lab Blue Moon Camera & Machine
Top Bottom