Introduction - New Darkroom

Relaxing in the Vondelpark

A
Relaxing in the Vondelpark

  • 5
  • 2
  • 125
Mark's Workshop

H
Mark's Workshop

  • 0
  • 1
  • 78
Yosemite Valley.jpg

H
Yosemite Valley.jpg

  • 3
  • 1
  • 87
Three pillars.

D
Three pillars.

  • 4
  • 4
  • 88
Water from the Mountain

A
Water from the Mountain

  • 4
  • 0
  • 109

Forum statistics

Threads
197,544
Messages
2,760,815
Members
99,399
Latest member
fabianoliver
Recent bookmarks
0

BryanFlnt

Member
Joined
Jun 3, 2023
Messages
30
Location
Tacoma, WA
Format
Medium Format
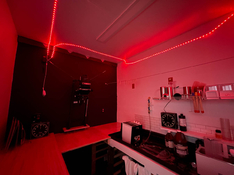
By way of introduction, I would like to describe the darkroom I just built and why.


Black & white film photography is something I started in high school and continued in college. Twice in my life, I had put together darkrooms. The first was modifying the bathroom in the house in such a way that I could be out of there in 30 minutes and no one would know I was there. The second one was built in a shed with a friend of mine on his property. Around the time that professional photographers were dumping all of their analog equipment I purchased a Mamiya 7 and fell in love with it. 2 years ago after the Mamiya had sat in the closet for over 10 years I made a commitment to myself to get back into something that I truly love.

In August of last year, my wife and I started remodeling our unfinished garage. Having recently finished the project I got a 9 ft by 6.5 ft darkroom, and my wife got a weight room. We built the walls, I did the electrical, and we paid someone to insulate and do the drywall. Most of the work to build the darkroom I had never done before - thank you YouTube! Here are some of the highlights:
  • 9 ft ceiling.
  • The sink stand is 28’ wide by 72” long. I used true 2x4s left over from the original build of the garage (which could be from 1906) to build a base for the plastic sink that came out of my friend's shed. I do not recommend trying to build a sink stand from the top down.
  • The dry-side counter is 64’ by 23’. After the sink stand stretched me nearly to the breaking point I decided to go with Strongtie premade corder and standard 2x4’s.
  • The enlarger is mounted to a stud support built behind the drywall.
  • The easel stand is 29” x 28”, and rests on brackets so that I can move it down for larger prints.
  • All surfaces are set to 28” high (Since it's my darkroom, why not make it fit me perfectly). I'm pretty proud of how level all the surfaces are given how uneven the old concrete floor is.
  • In the corner between the sink and the enlarger stand I build shelving for drying racks above where the light-tight vent.
  • Electrical: The dark room has four circuits; one for the overhead light; one for the fan; one for the enlarger wall which also has a switch so I can turn all the outlets off at once; and one for the rest of the electrical outlets that serve the darkroom. I love the red outlet and switch covers. I wanted the darkroom to be a place that was a joy to spend time in - the pop of color makes it.
  • Plumbing: it was not in the budget to bring plumbing from the house. I created a gravity system using PEX. There is an attic space above the darkroom. I use 5-gallon jugs of purified water from a local vendor for a gravity feed system. drainage is into a (red) 10-gallon garbage can from ULINE. ULINE is a great source for a dark room.
  • I built a jump seat for when I need to sit and think. It opens in front of the doorway but folds down when I don't need it.
  • The safe lite is a Blisslight LED string circling the ceiling. I will probably do a separate post on the use of this as a safe light because I could find almost nothing on the internet about using cheap LED string lights. It works great.
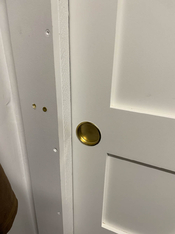
  • Like a tight sliding door.
The sliding door is something I'm particularly proud of because I totally made it up as I went along. I chose a 36-inch door because I knew I would have to create the light trap all around the sides. I wanted to have enough leftover space to get in and move equipment in and out. I used a 1-by-6 for the door framing and overhang the door by 2 inches, then a 1x2 to fill the gap to the door. I sprayed the inside of this 2-inch gap with black spray paint and then lined it with felt theater tape. The door slides along the felt snugly with a bit of friction. After caulking the metal threshold the door is light-tight. Looking at the pictures you can see the scars of my learning and iterations.

It took two-20-minute visits in the dark to find any light leaks and get the entire room light-tight. But since then I have started the break-in period and am relearning the process of making prints. At this point all the technology bits are in place - now comes the artistic part - using my judgment in trying to figure out how I get to my vision out of a finished print - which already feels like the hardest part of this whole Adventure!

Let me know if you have any questions or suggestions. I am sure I will have my own questions to post soon enough.

IMG_4638-230529.jpg

IMG_4647-230529.jpg IMG_4652-230529.jpg
 

MattKing

Moderator
Moderator
Joined
Apr 24, 2005
Messages
51,974
Location
Delta, BC Canada
Format
Medium Format
Welcome to Photrio!
 

mshchem

Subscriber
Joined
Nov 26, 2007
Messages
14,272
Location
Iowa City, Iowa USA
Format
Medium Format
Very nice work. One thing I have caught myself doing was storing extra chemicals, excess tanks, equipment etc.
I've got the chemicals, for the most, in there own spot in a very cool dry room. Just a tip.
Welcome
 

MattKing

Moderator
Moderator
Joined
Apr 24, 2005
Messages
51,974
Location
Delta, BC Canada
Format
Medium Format
Moved to the Introduction sub-forum.
 
OP
OP
BryanFlnt

BryanFlnt

Member
Joined
Jun 3, 2023
Messages
30
Location
Tacoma, WA
Format
Medium Format
This is very nice! Something I would like to do.. and do have similar sized section of my L shape in the Garage. Time will tell.
I copied and saved your pictures :smile: thanks for posting!

It was fun to think through the space. My advice is think through everything from the beginning.
 
OP
OP
BryanFlnt

BryanFlnt

Member
Joined
Jun 3, 2023
Messages
30
Location
Tacoma, WA
Format
Medium Format
Very nice work. One thing I have caught myself doing was storing extra chemicals, excess tanks, equipment etc.
I've got the chemicals, for the most, in there own spot in a very cool dry room. Just a tip.
Welcome

I have decided to store the liquid chemicals in the basement. On very hot and cold days the temp does fluctuate more than I would like.
 

RalphLambrecht

Subscriber
Joined
Sep 19, 2003
Messages
14,567
Location
K,Germany
Format
Medium Format
By way of introduction, I would like to describe the darkroom I just built and why.


Black & white film photography is something I started in high school and continued in college. Twice in my life, I had put together darkrooms. The first was modifying the bathroom in the house in such a way that I could be out of there in 30 minutes and no one would know I was there. The second one was built in a shed with a friend of mine on his property. Around the time that professional photographers were dumping all of their analog equipment I purchased a Mamiya 7 and fell in love with it. 2 years ago after the Mamiya had sat in the closet for over 10 years I made a commitment to myself to get back into something that I truly love.

In August of last year, my wife and I started remodeling our unfinished garage. Having recently finished the project I got a 9 ft by 6.5 ft darkroom, and my wife got a weight room. We built the walls, I did the electrical, and we paid someone to insulate and do the drywall. Most of the work to build the darkroom I had never done before - thank you YouTube! Here are some of the highlights:
  • 9 ft ceiling.
  • The sink stand is 28’ wide by 72” long. I used true 2x4s left over from the original build of the garage (which could be from 1906) to build a base for the plastic sink that came out of my friend's shed. I do not recommend trying to build a sink stand from the top down.
  • The dry-side counter is 64’ by 23’. After the sink stand stretched me nearly to the breaking point I decided to go with Strongtie premade corder and standard 2x4’s.
  • The enlarger is mounted to a stud support built behind the drywall.
  • The easel stand is 29” x 28”, and rests on brackets so that I can move it down for larger prints.
  • All surfaces are set to 28” high (Since it's my darkroom, why not make it fit me perfectly). I'm pretty proud of how level all the surfaces are given how uneven the old concrete floor is.
  • In the corner between the sink and the enlarger stand I build shelving for drying racks above where the light-tight vent.
  • Electrical: The dark room has four circuits; one for the overhead light; one for the fan; one for the enlarger wall which also has a switch so I can turn all the outlets off at once; and one for the rest of the electrical outlets that serve the darkroom. I love the red outlet and switch covers. I wanted the darkroom to be a place that was a joy to spend time in - the pop of color makes it.
  • Plumbing: it was not in the budget to bring plumbing from the house. I created a gravity system using PEX. There is an attic space above the darkroom. I use 5-gallon jugs of purified water from a local vendor for a gravity feed system. drainage is into a (red) 10-gallon garbage can from ULINE. ULINE is a great source for a dark room.
  • I built a jump seat for when I need to sit and think. It opens in front of the doorway but folds down when I don't need it.
  • The safe lite is a Blisslight LED string circling the ceiling. I will probably do a separate post on the use of this as a safe light because I could find almost nothing on the internet about using cheap LED string lights. It works great.
  • Like a tight sliding door.
The sliding door is something I'm particularly proud of because I totally made it up as I went along. I chose a 36-inch door because I knew I would have to create the light trap all around the sides. I wanted to have enough leftover space to get in and move equipment in and out. I used a 1-by-6 for the door framing and overhang the door by 2 inches, then a 1x2 to fill the gap to the door. I sprayed the inside of this 2-inch gap with black spray paint and then lined it with felt theater tape. The door slides along the felt snugly with a bit of friction. After caulking the metal threshold the door is light-tight. Looking at the pictures you can see the scars of my learning and iterations.

It took two-20-minute visits in the dark to find any light leaks and get the entire room light-tight. But since then I have started the break-in period and am relearning the process of making prints. At this point all the technology bits are in place - now comes the artistic part - using my judgment in trying to figure out how I get to my vision out of a finished print - which already feels like the hardest part of this whole Adventure!

Let me know if you have any questions or suggestions. I am sure I will have my own questions to post soon enough.
View attachment 342210
View attachment 342214 View attachment 342215

looks great;much success to you while printing!
 

Andrew O'Neill

Moderator
Moderator
Joined
Jan 16, 2004
Messages
11,775
Location
Coquitlam,BC Canada
Format
Multi Format
Welcome to Photrio! I didn't have plumbing in my darkroom in Japan. I had to carry it in from the bathroom, across the hall. All print/film washing was done in the bathroom. When I came back to Canada and started to make a darkroom, that was the first thing I did. Plumbing.
 

VinceInMT

Subscriber
Joined
Nov 14, 2017
Messages
1,877
Location
Montana, USA
Format
Multi Format
Welcome to Photrio! I didn't have plumbing in my darkroom in Japan. I had to carry it in from the bathroom, across the hall. All print/film washing was done in the bathroom. When I came back to Canada and started to make a darkroom, that was the first thing I did. Plumbing.

Great job on the darkroom and, yes, let’s hear it for plumbing. I worked in various configurations of darkrooms for 20-some years before my current basement one. It was dry at first but a plumbing problem revealed that a drain line ran under the darkroom floor, right where a sink would be handy. I got a jackhammer, blew out a big hole in the floor, dug down to the drain line, fixed the problem, and while there, stubbed up a sweep-ell and a clean out that tied into a sink. I backfilled the hole, repoured the concrete floor, and ran hot and cold water in. No more hiking tubs of wet prints and trays to another room.
 
OP
OP
BryanFlnt

BryanFlnt

Member
Joined
Jun 3, 2023
Messages
30
Location
Tacoma, WA
Format
Medium Format
I did not mention that the garage is detached in the Pacific NW. So there is carrying of water and waist water and wet prints back and forth. I figure it helps me get my steps in. Let see how I feel about things in February. 🌧️
 

Sirius Glass

Subscriber
Joined
Jan 18, 2007
Messages
50,151
Location
Southern California
Format
Multi Format
Welcome to APUG Photrio!!
 

mshchem

Subscriber
Joined
Nov 26, 2007
Messages
14,272
Location
Iowa City, Iowa USA
Format
Medium Format
Great job on the darkroom and, yes, let’s hear it for plumbing. I worked in various configurations of darkrooms for 20-some years before my current basement one. It was dry at first but a plumbing problem revealed that a drain line ran under the darkroom floor, right where a sink would be handy. I got a jackhammer, blew out a big hole in the floor, dug down to the drain line, fixed the problem, and while there, stubbed up a sweep-ell and a clean out that tied into a sink. I backfilled the hole, repoured the concrete floor, and ran hot and cold water in. No more hiking tubs of wet prints and trays to another room.

I love this. I've been there. Oakum and lead 😄 before the house I'm in now. Modern plumbing is amazing 👏
 

VinceInMT

Subscriber
Joined
Nov 14, 2017
Messages
1,877
Location
Montana, USA
Format
Multi Format
I love this. I've been there. Oakum and lead 😄 before the house I'm in now. Modern plumbing is amazing 👏

Yes, it was a cast iron pipe and it was in a long run from the kitchen to the sewer main. Over the years, the previous owners probably did not run enough water after using the garbage disposal and when the pipe clogged up they’d dumped lots of drain cleaner down the line. Again, they didn’t flush the line and this point was low in the run and the cleaner ate a hole in the pipe. I had a plumber in who snaked the line and showed me that he’d pulled back mud, indicating a hole. I measure the length of his snake and calculated where the hole in the pipe might be and when I busted out the concrete and dug down I was right on. I cut out a section of the line and replaced it with PVC and a couple of no-hub bands. That was 25 years ago or so.
 

mshchem

Subscriber
Joined
Nov 26, 2007
Messages
14,272
Location
Iowa City, Iowa USA
Format
Medium Format
Yes, it was a cast iron pipe and it was in a long run from the kitchen to the sewer main. Over the years, the previous owners probably did not run enough water after using the garbage disposal and when the pipe clogged up they’d dumped lots of drain cleaner down the line. Again, they didn’t flush the line and this point was low in the run and the cleaner ate a hole in the pipe. I had a plumber in who snaked the line and showed me that he’d pulled back mud, indicating a hole. I measure the length of his snake and calculated where the hole in the pipe might be and when I busted out the concrete and dug down I was right on. I cut out a section of the line and replaced it with PVC and a couple of no-hub bands. That was 25 years ago or so.

Those no-hub things are the greatest thing! Those will be around for a thousand years. Same is true with the PVC pipe. Cast iron lasts forever properly cared for. Garbage disposals are crazy, fine for the tiny bits.

A former house, I had to clean up a drain, former owners had used disposal and poured cooking grease down the drain. 😱
 

Sirius Glass

Subscriber
Joined
Jan 18, 2007
Messages
50,151
Location
Southern California
Format
Multi Format
Welcome to the forum. I don't have a darkroom. That could be a good thing or a bad thing. :smile:

It means you have to look for other means to make prints. The most expensive part of a darkroom is being able to afford the space.
 
Joined
Aug 29, 2017
Messages
9,283
Location
New Jersey formerly NYC
Format
Multi Format
Thanks. But how could it be a bad thing….🤗

I'm often undisciplined. I'd be falling behind on the development and beating myself up for procrastinating all the time. Now I just send it off to a lab and let the Postal Service worry about it.
 

VinceInMT

Subscriber
Joined
Nov 14, 2017
Messages
1,877
Location
Montana, USA
Format
Multi Format
Thanks. But how could it be a bad thing….🤗

I supposed that some people just want to shoot and skip the process that gets to the finished product. Others, like myself, are “process people” and the process is at least, if not more, attractive as having the final product. That is why I have had a darkroom since 1973.
 
OP
OP
BryanFlnt

BryanFlnt

Member
Joined
Jun 3, 2023
Messages
30
Location
Tacoma, WA
Format
Medium Format
I supposed that some people just want to shoot and skip the process that gets to the finished product. Others, like myself, are “process people” and the process is at least, if not more, attractive as having the final product. That is why I have had a darkroom since 1973.

One of the main reasons I finally built the darkroom (besides being of the age to have disposable income) is the realization that it's about the process. It's not about what I produce, but the process of creating something. It uses different parts of my brain and heart. And the door is shut and it's quiet!
 

VinceInMT

Subscriber
Joined
Nov 14, 2017
Messages
1,877
Location
Montana, USA
Format
Multi Format
One of the main reasons I finally built the darkroom (besides being of the age to have disposable income) is the realization that it's about the process. It's not about what I produce, but the process of creating something. It uses different parts of my brain and heart. And the door is shut and it's quiet!

1000% agreed. I have many hobbies, interests, and passions and while some of them may have a product they all have a process and it is the process that both attracted me to it and keeps me motivated and engaged in it.
 
Photrio.com contains affiliate links to products. We may receive a commission for purchases made through these links.
To read our full affiliate disclosure statement please click Here.

PHOTRIO PARTNERS EQUALLY FUNDING OUR COMMUNITY:


Ilford ADOX Freestyle Photographic Stearman Press Weldon Color Lab Blue Moon Camera & Machine
Top Bottom