Imacon Flextight 848 Color Banding Issue

Hensol woods

Hensol woods

  • 6
  • 2
  • 55
Harbour at dusk

A
Harbour at dusk

  • 2
  • 0
  • 48
blossum in the night

D
blossum in the night

  • 1
  • 0
  • 38
Brown crested nuthatch

A
Brown crested nuthatch

  • 2
  • 2
  • 65

Recent Classifieds

Forum statistics

Threads
198,715
Messages
2,779,769
Members
99,685
Latest member
alanbarker
Recent bookmarks
0

anywayfrom

Member
Joined
Nov 29, 2024
Messages
12
Location
USA
Format
Medium Format
Hello all,

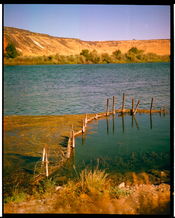
I’ve slowly been getting an Imacon Flextight 848 I have access to back in working condition. I’ve clean both light tubes, the lens, and the CCD gently with a static free cloth, but I am still getting this color banding issue, especially in skies but throughout the rest of the image as well.

I’ve included an example of some Cinestill 50D in medium format. This issue has also happened using Gold 200.

I’m suspicious that it could be a connection issue somewhere in the machine, but I wanted to post here in case someone with more experience happens to recognize the issue as I’m getting a bit out of my depth.

Thanks for you time!
 

Attachments

  • IMG_0709.jpeg
    IMG_0709.jpeg
    422.6 KB · Views: 99

mdarragh

Member
Joined
Apr 10, 2015
Messages
16
Location
Australia
Format
Large Format
You might find it worthwhile to join and post your question on the Imacom Users group.


Gerry Yaeger, who moderates the group, also has his own website with a wealth of useful information for Imacon users

 
OP
OP

anywayfrom

Member
Joined
Nov 29, 2024
Messages
12
Location
USA
Format
Medium Format
You might find it worthwhile to join and post your question on the Imacom Users group.


Gerry Yaeger, who moderates the group, also has his own website with a wealth of useful information for Imacon users


Thank you so much! I’ll join the group and see what I can find :smile:
 

koraks

Moderator
Moderator
Joined
Nov 29, 2018
Messages
22,643
Location
Europe
Format
Multi Format
Welcome to Photrio @anywayform!

I've taken your image and boosted contrast extremely in order to emphasize the defect:
1732957581795.png

The main problem appears to be on the green/magenta channel mostly, showing up as a single, broad band, and it seems to extend all across the frame. The reason why you're mostly seeing it in skies is simply because it's more apparent against the lack of any other features or color separation - it just stands out there, more. It's not isolated to skies, however.
There is some additional vertical striation that may or may not be related.

You might find it worthwhile to join and post your question on the Imacom Users group.

Thanks for posting that link - very useful indeed! A quick search on their group turns up e.g. this: https://groups.io/g/ImaconUsers/topic/101795211#msg1556
Sadly, no solution offered there.

This one seems also relevant: https://groups.io/g/ImaconUsers/topic/83759364
In that thread, there's quite some discussion about the film itself being the problem (e.g. processing-related), but that's not the case here. The pattern of your color anomaly isn't consistent with common processing defects, and moreover, you've already established that it occurs with other negatives as well. That is to say, you do in fact have a problem with this negative as well, which is in the top right corner:
1732958074546.png
(note somewhat wiggly, lighter vertical stripe about 1/4 from the left edge of this snippet).
That's a film/negative-related issue and I'd ignore it in the context of troubleshooting the scanner problem.

Maybe an initial step in problem solving is to establish the exact nature of the defect; so far in the example image we have:
1: Some dust; not really a concern
2: A processing-related problem manifesting as a lighter wiggly line running vertically through this frame; unrelated to scanning.
3: Some fairly subtle, narrow vertical banding along the entire width of the frame; likely scanner-related
4: A broad magenta/green band running vertically along the frame, which is virtually guaranteed to be scanner-related.

I'd scan some clean, known-good negatives (e.g. lab-processed C41) with large expanses of fairly even tone (skies etc.) so you get a good view on what's happening exactly.

As to potential causes, my first thoughts would go in the direction of something related to the light source for the broad magenta band, and dust on either the light source or CCD assembly for the narrow vertical stripes.
 
OP
OP

anywayfrom

Member
Joined
Nov 29, 2024
Messages
12
Location
USA
Format
Medium Format
Welcome to Photrio @anywayform!

I've taken your image and boosted contrast extremely in order to emphasize the defect:
View attachment 384413
The main problem appears to be on the green/magenta channel mostly, showing up as a single, broad band, and it seems to extend all across the frame. The reason why you're mostly seeing it in skies is simply because it's more apparent against the lack of any other features or color separation - it just stands out there, more. It's not isolated to skies, however.
There is some additional vertical striation that may or may not be related.


Thanks for posting that link - very useful indeed! A quick search on their group turns up e.g. this: https://groups.io/g/ImaconUsers/topic/101795211#msg1556
Sadly, no solution offered there.

This one seems also relevant: https://groups.io/g/ImaconUsers/topic/83759364
In that thread, there's quite some discussion about the film itself being the problem (e.g. processing-related), but that's not the case here. The pattern of your color anomaly isn't consistent with common processing defects, and moreover, you've already established that it occurs with other negatives as well. That is to say, you do in fact have a problem with this negative as well, which is in the top right corner:
View attachment 384414 (note somewhat wiggly, lighter vertical stripe about 1/4 from the left edge of this snippet).
That's a film/negative-related issue and I'd ignore it in the context of troubleshooting the scanner problem.

Maybe an initial step in problem solving is to establish the exact nature of the defect; so far in the example image we have:
1: Some dust; not really a concern
2: A processing-related problem manifesting as a lighter wiggly line running vertically through this frame; unrelated to scanning.
3: Some fairly subtle, narrow vertical banding along the entire width of the frame; likely scanner-related
4: A broad magenta/green band running vertically along the frame, which is virtually guaranteed to be scanner-related.

I'd scan some clean, known-good negatives (e.g. lab-processed C41) with large expanses of fairly even tone (skies etc.) so you get a good view on what's happening exactly.

As to potential causes, my first thoughts would go in the direction of something related to the light source for the broad magenta band, and dust on either the light source or CCD assembly for the narrow vertical stripes.

Thank you so much for your thorough post! I hadn’t even noticed the film processing issue. I saw the magenta/green issue and stopped looking very critically.

I’ll go through my negatives and find a clean example on a more standard film stock to do a test scan the next chance I get.

As for the light source potentially being the magenta band issue, I’ve cleaned the light tubes, I may take the sides off and scan to see if I can spot anything strange. On the other forum linked they still seem to be unable to source replacement tubes at a reasonable price, so if the tube is simply not working properly I suppose that may be it for this machine, although hopefully something ends up working out as it would be quite the privilege to get it up and running.

Thanks again!

I greatly appreciate your response.
 

koraks

Moderator
Moderator
Joined
Nov 29, 2018
Messages
22,643
Location
Europe
Format
Multi Format
No problem; sorry that there's no solution just yet, but at least we can try to work together in locating potential causes.

As to the tubes: if these are the fluorescent tubes that are commonly seen in especially older scanners, I don't really see how a defect in a tube would cause this partial color anomaly. Unfortunately, I'm insufficiently familiar with how this scanner is constructed internally to make any more educated guesses. Is there a page with photos of its internals or perhaps even a service manual out there somewhere that I could have a look at? (recently @gary mulder posted a photo of the lens stage inside a Flextight scanner - I'm not sure what type he uses and if he happens to have other photos of the internal configuration)
 

Lachlan Young

Member
Joined
Dec 2, 2005
Messages
4,938
Location
Glasgow
Format
Multi Format
There's a couple of pieces of glass inside the machine that can pick up dust and cause banding - they aren't easy to get to - either a fairly full strip down or a slightly hair raising dive in with sensor swabs while running a holderless scan.
 
OP
OP

anywayfrom

Member
Joined
Nov 29, 2024
Messages
12
Location
USA
Format
Medium Format
No problem; sorry that there's no solution just yet, but at least we can try to work together in locating potential causes.

As to the tubes: if these are the fluorescent tubes that are commonly seen in especially older scanners, I don't really see how a defect in a tube would cause this partial color anomaly. Unfortunately, I'm insufficiently familiar with how this scanner is constructed internally to make any more educated guesses. Is there a page with photos of its internals or perhaps even a service manual out there somewhere that I could have a look at? (recently @gary mulder posted a photo of the lens stage inside a Flextight scanner - I'm not sure what type he uses and if he happens to have other photos of the internal configuration)
No apology needed, it's exciting to work on such cool scanners, troubleshooting is part of the thing! Here is a link to the Imacon 848 Service Manual that I've been using thus far.


The furthest I've dug in so far has been taking both side panels off to wipe down the light tubes, and taking the center panel off to wipe down the CCD.
 
OP
OP

anywayfrom

Member
Joined
Nov 29, 2024
Messages
12
Location
USA
Format
Medium Format
There's a couple of pieces of glass inside the machine that can pick up dust and cause banding - they aren't easy to get to - either a fairly full strip down or a slightly hair raising dive in with sensor swabs while running a holderless scan.

Interesting, I'm not opposed to a fairly full strip down. Do you know if this level of teardown goes beyond what is shown in the Imacon 848 Service manual?


Thanks!
 

koraks

Moderator
Moderator
Joined
Nov 29, 2018
Messages
22,643
Location
Europe
Format
Multi Format
Ah, thanks; that helps already. It would be very useful if you could manage to follow the instructions on page 5-1 and post the RGB plot that you obtain this way. The banding problem may show up here. Either way, it might help to track down the issue.
 
OP
OP

anywayfrom

Member
Joined
Nov 29, 2024
Messages
12
Location
USA
Format
Medium Format
Ah, thanks; that helps already. It would be very useful if you could manage to follow the instructions on page 5-1 and post the RGB plot that you obtain this way. The banding problem may show up here. Either way, it might help to track down the issue.

That's a great idea! Unfortunately I'm not seeing the "Monitor" option on my maintenance menu. I'm thinking its a software difference as I'm using a 2011 Macbook Pro to run FlexColor 4.8.13. I'm digging around to see if there's another way to pull it up on my version of the software. I'll update once I've found a solution!
 

Lachlan Young

Member
Joined
Dec 2, 2005
Messages
4,938
Location
Glasgow
Format
Multi Format
That's a great idea! Unfortunately I'm not seeing the "Monitor" option on my maintenance menu. I'm thinking its a software difference as I'm using a 2011 Macbook Pro to run FlexColor 4.8.13. I'm digging around to see if there's another way to pull it up on my version of the software. I'll update once I've found a solution!

The service manual method (Pg 5-1) to get the monitor option to show up works fine on a similar vintage iMac.

The bits of glass in question are just below where the neg carrier travels. They can be reached with a sensor swab from the front if you set it running on a blank scan. While this was explained by the person who still maintains these machines, only do this at your own risk!!! Getting them out requires a much fuller strip-down than the linked service manual.
 
OP
OP

anywayfrom

Member
Joined
Nov 29, 2024
Messages
12
Location
USA
Format
Medium Format
The service manual method (Pg 5-1) to get the monitor option to show up works fine on a similar vintage iMac.

The bits of glass in question are just below where the neg carrier travels. They can be reached with a sensor swab from the front if you set it running on a blank scan. While this was explained by the person who still maintains these machines, only do this at your own risk!!! Getting them out requires a much fuller strip-down than the linked service manual.

Ah, I was getting caught up on how typing "d" made the detail window pop up.

Here's my diagnostic read out:

Screen Shot 2024-12-02 at 10.05.26 PM.png


It doesn't look terrible, but I may be misreading it.

I also quickly DSLR scanned the original negative and converted it with negative lab pro which I'll include here just for posterity.

IMG_0743.jpg
 
OP
OP

anywayfrom

Member
Joined
Nov 29, 2024
Messages
12
Location
USA
Format
Medium Format
You need to type "debg" in the main program window. The monitor option only appears after you've done this.

I was getting thrown off by the Detail window opening. Below is my read out, which doesn't look too concerning, but I may be wrong.

Screen Shot 2024-12-02 at 10.05.26 PM.png


I was also able to DSLR scan the original negative today, and there are imperfections, but I'm not seeing that wall of green from the Imacon scans. I don't think the magenta on the sides is quite visible on the Imacon scans. I scanned using a DSLR/Light Table/old Epson medium format mask. Maybe it was user error, but I've scanned like this before without issue.

IMG_0743.jpg


Let me know what you think!

Thanks again.
 
OP
OP

anywayfrom

Member
Joined
Nov 29, 2024
Messages
12
Location
USA
Format
Medium Format
The service manual method (Pg 5-1) to get the monitor option to show up works fine on a similar vintage iMac.

The bits of glass in question are just below where the neg carrier travels. They can be reached with a sensor swab from the front if you set it running on a blank scan. While this was explained by the person who still maintains these machines, only do this at your own risk!!! Getting them out requires a much fuller strip-down than the linked service manual.

Thank you! I'll keep doing some troubleshooting and if I hit dead ends I'll see if I can feel this process out.
 

koraks

Moderator
Moderator
Joined
Nov 29, 2018
Messages
22,643
Location
Europe
Format
Multi Format
With the dSLR scanning setup, you apparently have some light bleeding along the edges of the film. That's a different matter; let's set that aside for now.

The Flextight sensor plot doesn't look perfect to me:
1733214519851.png

Note how red and green bump upwards somewhere halfway the plot. This will make it impossible to get the same color calibration across the entire image area. Whether this deviation is big enough to present problems, I can't say. Color negative is a rather low-contrast image, so any slight scanning problem will amplify in post processing when contrast is increased dramatically to fit the normal tonal scale. I can imagine that a small deviation could thus work out as a fairly big/visible problem.

I wonder if you could use the 4x5 holder and mount your strip of medium format film on either side of it, and scan it as a 4x5" frame. This should ensure that all the scanning would happen to the left or the right of that bump in your sensor plot. You could even experiment with shifting the strip of film around to see if the color band somehow aligns with that odd bump in your sensor plot. Note that you may/will have to mask the open part of the 4x5" frame to eliminate stray light problems. For this test, the reduced effective resolution you'll end up with should be no problem.
 
OP
OP

anywayfrom

Member
Joined
Nov 29, 2024
Messages
12
Location
USA
Format
Medium Format
With the dSLR scanning setup, you apparently have some light bleeding along the edges of the film. That's a different matter; let's set that aside for now.

The Flextight sensor plot doesn't look perfect to me:
View attachment 384620
Note how red and green bump upwards somewhere halfway the plot. This will make it impossible to get the same color calibration across the entire image area. Whether this deviation is big enough to present problems, I can't say. Color negative is a rather low-contrast image, so any slight scanning problem will amplify in post processing when contrast is increased dramatically to fit the normal tonal scale. I can imagine that a small deviation could thus work out as a fairly big/visible problem.

I wonder if you could use the 4x5 holder and mount your strip of medium format film on either side of it, and scan it as a 4x5" frame. This should ensure that all the scanning would happen to the left or the right of that bump in your sensor plot. You could even experiment with shifting the strip of film around to see if the color band somehow aligns with that odd bump in your sensor plot. Note that you may/will have to mask the open part of the 4x5" frame to eliminate stray light problems. For this test, the reduced effective resolution you'll end up with should be no problem.

Wow, that’s very interesting. So C41 exacerbates the issue, maybe it’s a good thing I’m scanning C41 so I found out more quickly.

I unfortunately only have a custom medium format holder, this machine didn’t come with any holders and I only had enough disposable money to grab a long medium format one.

I may plan on buying the 4x5 holder in the future but I’ll have to wait at least through the holiday season.

I don’t suppose there’s a chance that recalibrating the white balance would do anything? I don’t have the Hasselblad approved insert for that but I read you can get away with a very nice white piece of paper.

For now, since I can’t quite afford a 4x5 holder, I may go out and shoot a roll of the most even conditions I can find, including some sky, and then send it to a very reputable lab for development as my chemicals are currently exhausted, and then I could try scanning those. I am a bit suspicious of the film stock Cinestill 50D and maybe the dev I got also.

I suppose we’ll see what happens!
 

koraks

Moderator
Moderator
Joined
Nov 29, 2018
Messages
22,643
Location
Europe
Format
Multi Format
Recalibrating is definitely something worth a shot.
I am a bit suspicious of the film stock Cinestill 50D

Why would this be? I'm not aware of any notable quality concerns apart from the inherent lack of anti-halation.

Maybe for now you're better off 'scanning' with the digital camera. Looks like you've got that process under control reasonably well and it's certainly a whole lot faster than the Flextight.

Btw, I've borrowed an old Flextight from a friend so I might be able to do some testing later on. I'm currently waiting for a SCSI adapter and cable for my PC to arrive; it's a bit uncertain I'll get the combination to fire up, but let's see. The scanner came with an old but functional WinXP laptop so worst case I can use it with that, but I'd rather just hook it up to my regular desktop.
 
OP
OP

anywayfrom

Member
Joined
Nov 29, 2024
Messages
12
Location
USA
Format
Medium Format
Recalibrating is definitely something worth a shot.


Why would this be? I'm not aware of any notable quality concerns apart from the inherent lack of anti-halation.

Maybe for now you're better off 'scanning' with the digital camera. Looks like you've got that process under control reasonably well and it's certainly a whole lot faster than the Flextight.

Btw, I've borrowed an old Flextight from a friend so I might be able to do some testing later on. I'm currently waiting for a SCSI adapter and cable for my PC to arrive; it's a bit uncertain I'll get the combination to fire up, but let's see. The scanner came with an old but functional WinXP laptop so worst case I can use it with that, but I'd rather just hook it up to my regular desktop.

I forgot to mention that my 50D is technically expired, although I believe it’s always been cold stored. I bought it directly from cinestill on sale.

I think I’ll stick to DSLR scanning for now, the ease of use is rather nice and for 6x7 I can take two shots of the frame and merge them in Lightroom to maximize detail. The Imacon is tempting because of the incredible detail you get, but I also need to make sure I’m focusing on the photography itself as well. 😂

That’s awesome! I hope it’s able to work with your pc with little issue, that would be ideal! I was starting to look into that when I remembered that I had my ancient MacBook laying around so I went that route.

I’m looking forward to updates as your parts arrive!

Thanks again for all your help and input on this!
 

_T_

Member
Joined
Feb 21, 2017
Messages
415
Location
EP
Format
4x5 Format
For 6x7, isn't the Flextight limited to 3200dpi? That's not much more an epson flatbed. A camera can definitely outperform that in terms of detail with the right equipment and technique.
 
OP
OP

anywayfrom

Member
Joined
Nov 29, 2024
Messages
12
Location
USA
Format
Medium Format
For 6x7, isn't the Flextight limited to 3200dpi? That's not much more an epson flatbed. A camera can definitely outperform that in terms of detail with the right equipment and technique.

I think you’re correct there, I also scan 645, but I definitely see DSLR scanning getting close in some areas. At work I have access to a Nikon D850, although I’m excited to eventually try my personal Lumix S5II with pixel shifting and stitching to see if I can get some really great looking images.
 

Lachlan Young

Member
Joined
Dec 2, 2005
Messages
4,938
Location
Glasgow
Format
Multi Format
For 6x7, isn't the Flextight limited to 3200dpi? That's not much more an epson flatbed. A camera can definitely outperform that in terms of detail with the right equipment and technique.

The Imacon/ Hasselblad scanner design, despite some grossly dishonest clickbait on the internet, delivers inherently very sharp scans (for the record, several other high end CCD flatbeds use essentially identical sensor/ lens packages, but with an additional mirror in the optical path and/ or XY lawnmowering & stitching) - Epson scanners don't deliver adequate sharpness at all (they're really just questionably interpolated 2x1200ppi, offset by 1/2px). A really good camera scan can pretty much equal a high end CCD scan within the limits of system precision - which is a two way street btw. It's not hard to get well over 3200ppi on 120 out of an Imacon, it just requires some common sense and a willingness to stitch 3 files in Photoshop.

And as this hasn't been drummed into people clearly enough, outright resolution doesn't matter one jot if it isn't adequately sharp and free of detail obscuring noise. Epson and the other consumer flatbeds have got away with substandard products for decades because most users either did not know any better and/ or the materials they were scanning were so lacking in baseline technical proficiency that the sharpness inadequacy did not seem to matter.
 

Lachlan Young

Member
Joined
Dec 2, 2005
Messages
4,938
Location
Glasgow
Format
Multi Format
With the dSLR scanning setup, you apparently have some light bleeding along the edges of the film. That's a different matter; let's set that aside for now.

The Flextight sensor plot doesn't look perfect to me:
View attachment 384620
Note how red and green bump upwards somewhere halfway the plot. This will make it impossible to get the same color calibration across the entire image area. Whether this deviation is big enough to present problems, I can't say. Color negative is a rather low-contrast image, so any slight scanning problem will amplify in post processing when contrast is increased dramatically to fit the normal tonal scale. I can imagine that a small deviation could thus work out as a fairly big/visible problem.

I wonder if you could use the 4x5 holder and mount your strip of medium format film on either side of it, and scan it as a 4x5" frame. This should ensure that all the scanning would happen to the left or the right of that bump in your sensor plot. You could even experiment with shifting the strip of film around to see if the color band somehow aligns with that odd bump in your sensor plot. Note that you may/will have to mask the open part of the 4x5" frame to eliminate stray light problems. For this test, the reduced effective resolution you'll end up with should be no problem.

The big bump is mostly indicating where the dust is sitting - from recall from when I last ran a monitor on an X5, the red might be running a tiny bit high here overall (no indication as to when this particular scanner was last serviced/ checked/ CCD calibrated) - but either way the main thing with Flexcolor is that it is not spectacular at understanding CN if you let it do the inversions - instead scanning as a positive with film rebate used as the white point setting & doing everything else after that point in Photoshop will make a dramatic difference.
 
Photrio.com contains affiliate links to products. We may receive a commission for purchases made through these links.
To read our full affiliate disclosure statement please click Here.

PHOTRIO PARTNERS EQUALLY FUNDING OUR COMMUNITY:


Ilford ADOX Freestyle Photographic Stearman Press Weldon Color Lab Blue Moon Camera & Machine
Top Bottom