Good evening boys and girls!
I had the need to add some warmth to my prints recently, but I could not have been bothered with mixing up selenium or other toner, nor I had the money for it. Then I stumbled on an old and somewhat forgotten recipe for a really nice sepia-ish toner (read on to learn why it is -ish), that everyone can make and use with ease. It is called hypo-alum toner and as the name tells, it consists of hypo and potassium alum.
Take some warm water, lets say 50 degrees centigrade, 750ml will do, and dump 300g of regular hypo in it. Shake and stir until it is completely dissolved. Then toss 25g of potassium alum in it and again, stir and shake until it is completely mixed in. The solution will turn milky and will smell of rotten eggs (not as badly as some describe) as the alum is decomposing hypo. This is normal.
The toner is now ready to use technically, but it acts as a strong reducer, so if you were to happen to dump it on a really good print, you would hate yourself for that since it would start to bleach it out. This is because the toner is not ripened yet and there are two ways to accomplish that:
- BRING FORTH THE SACRIFICIAL PRINT, meaning that you will toss some scrap prints and paper in it until the solution is saturated with silver and bleaching stops, shouldnt take a lot.
- Dump a gram or so of silver nitrate in the solution. Toner is ready to use right after that.
Also, it is said that addition of potassium iodide will make the tone warmer. I had none at my disposal so I used regular medicinal iodine, about 10-20 drops.
Now, the toning itself. The solution is best used warm. As warm as your prints can take. It can take hours upon hours to tone a print at room temperature, the goo is very slow working. I started at 50 degrees and had no tempering bath since my biggest tray was used for toning. You will see no changes at first but check in every 5 or 20 minutes, depending how warm the solution is.
The exact tone depends on the paper used - I tried 4 of them.
Slavich Bromekspress 1 turned purplish-sepia, quite pleasant and vintage looking.
Fotobrom turned yellow, not very pleasant but artistic.
Berjoshka (some soviet RC) turned the most beautiful chocolate brown, yet the shadows retained almost all of their blackness and density.
Fomatone RC warmtone turned also quite nice warm sepia-brown, with a small hint of purple in the midtones.
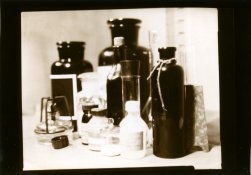
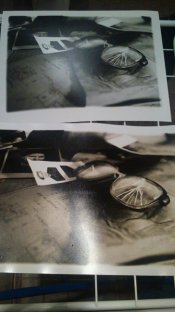
Attached are two samples. The first is Berjoshka scanned but the scan does the print no justice. It has far better tones when observed with eye. The second is a comparative shot of the Fomatone paper - before and after.


Great thing about this toner is that you dont have to be spot-on with the time, it takes time to work so you can relax and just check back on the prints periodically. Neither is there bleaching or other pre-treatment involved. And you don't have to take into account reducing or darkening effects of the toner, if it is seasoned. Go on, give it a shot!
I had the need to add some warmth to my prints recently, but I could not have been bothered with mixing up selenium or other toner, nor I had the money for it. Then I stumbled on an old and somewhat forgotten recipe for a really nice sepia-ish toner (read on to learn why it is -ish), that everyone can make and use with ease. It is called hypo-alum toner and as the name tells, it consists of hypo and potassium alum.
Take some warm water, lets say 50 degrees centigrade, 750ml will do, and dump 300g of regular hypo in it. Shake and stir until it is completely dissolved. Then toss 25g of potassium alum in it and again, stir and shake until it is completely mixed in. The solution will turn milky and will smell of rotten eggs (not as badly as some describe) as the alum is decomposing hypo. This is normal.
The toner is now ready to use technically, but it acts as a strong reducer, so if you were to happen to dump it on a really good print, you would hate yourself for that since it would start to bleach it out. This is because the toner is not ripened yet and there are two ways to accomplish that:
- BRING FORTH THE SACRIFICIAL PRINT, meaning that you will toss some scrap prints and paper in it until the solution is saturated with silver and bleaching stops, shouldnt take a lot.
- Dump a gram or so of silver nitrate in the solution. Toner is ready to use right after that.
Also, it is said that addition of potassium iodide will make the tone warmer. I had none at my disposal so I used regular medicinal iodine, about 10-20 drops.
Now, the toning itself. The solution is best used warm. As warm as your prints can take. It can take hours upon hours to tone a print at room temperature, the goo is very slow working. I started at 50 degrees and had no tempering bath since my biggest tray was used for toning. You will see no changes at first but check in every 5 or 20 minutes, depending how warm the solution is.
The exact tone depends on the paper used - I tried 4 of them.
Slavich Bromekspress 1 turned purplish-sepia, quite pleasant and vintage looking.
Fotobrom turned yellow, not very pleasant but artistic.
Berjoshka (some soviet RC) turned the most beautiful chocolate brown, yet the shadows retained almost all of their blackness and density.
Fomatone RC warmtone turned also quite nice warm sepia-brown, with a small hint of purple in the midtones.
Attached are two samples. The first is Berjoshka scanned but the scan does the print no justice. It has far better tones when observed with eye. The second is a comparative shot of the Fomatone paper - before and after.


Great thing about this toner is that you dont have to be spot-on with the time, it takes time to work so you can relax and just check back on the prints periodically. Neither is there bleaching or other pre-treatment involved. And you don't have to take into account reducing or darkening effects of the toner, if it is seasoned. Go on, give it a shot!


