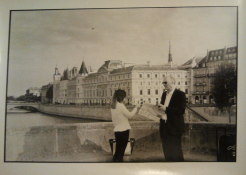
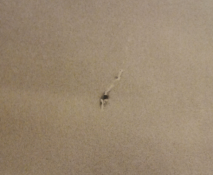
Fomapan 400 - 35mm film. Somehow I managed to damage a negative, it happens to me vary rarely, but here it is. What to do? Brushing? Or first with sharp scalpel put this black dot out, and then brush?
Is that a hole in the emulsion, or the backing?
I've got some efke25 that the lab put through a roller-machine, which then promtply peeled off bits of the backing (then he blamed the 'old crappy film'). Needless to say I started developing my own from that point.
So I'm definitely interested in hearing ways to fix the backing too, if that's the problem.
Or would you rather fix the print than the neg? Maybe dodge out the area, then some airbrushing? (thankfully it's in the clouds)
Take a wooden toothpick and sharpen it to a fine point Dip it in tincture of iodine. Be careful you just want the wood to be saturated with no visible liquid. Hold the toothpick to the spot until it is bleached then refix the negative. The toothpick may have to be remoistened several times. You can do the same thing with a print. Here you do not want to completely bleach the spot but make it fit in with its surroundings.
Yes, hole in emulsion. I would like to repair the print - it is safer than negative.
This negative is not so important to me - but it is good exercise .
Take a wooden toothpick and sharpen it to a fine point Dip it in tincture of iodine. Be careful you just want the wood to be saturated with no visible liquid. Hold the toothpick to the spot until it is bleached then refix the negative. The toothpick may have to be remoistened several times. You can do the same thing with a print. Here you do not want to completely bleach the spot but make it fit in with its surroundings.
I will definitely try this on the print - thanks for input . Soon I will be ordering some chemicals from Moersch, I know he has small 100ml bleach bottle.
Unlike bleaching, scraping the spot from the print leaves noticeable surface damage. I'd either bleach the print and use Spotone (or a substitute) to fill in the light area, or opaque the damage in the negative and reprint.
Unlike bleaching, scraping the spot from the print leaves noticeable surface damage. I'd either bleach the print and use Spotone (or a substitute) to fill in the light area, or opaque the damage in the negative and reprint.
This. I use a small brush similar to the one I use for spotting prints, and then use fairly concentrated bleach and apply it locally where the spot is.
When I have bleached it long enough to have less density than the surrounding area in the print, I wash and re-fix the print carefully.
Then I use spotting dye to fill in the density, same as any other white spot.
It takes a little bit more work, but is certainly doable. After a few times it's almost second nature.
Take a wooden toothpick and sharpen it to a fine point Dip it in tincture of iodine. Be careful you just want the wood to be saturated with no visible liquid. Hold the toothpick to the spot until it is bleached then refix the negative. The toothpick may have to be remoistened several times. You can do the same thing with a print. Here you do not want to completely bleach the spot but make it fit in with its surroundings.
This is by far the best method for dealing with black spots on prints . Though I use a small brush. The toothpick sounds a lot better. You can do this while you are fixing the print. Iodine works really fast and it is strong. I have found it to be easier and better than Ferri.
For dealing with negative defects, I use a Sakura Pigma Micron super ultra fine point pigment marker. I have found the marker to work far better than Spotone. You are trying to get all the texture of the defect gone, so it is better to print the spot white then retouch it. I also use the marker on the non-emulsion side so it can be reversed if necessary.
Opaque is a great idea. You can print the neg with the white opaqed area, spot it then copy the photo. I've copied some BW prints with BW film and the results aren't bad. But it will never be as good as the damaged neg though.
Photrio.com contains affiliate links to products. We may receive a commission for purchases made through these links. To read our full affiliate disclosure statement please click Here.


 .
.