How to print? - nighttime long exposure

Flow of thoughts

D
Flow of thoughts

  • 3
  • 1
  • 50
Rouse st

A
Rouse st

  • 5
  • 3
  • 72
Plague

D
Plague

  • 0
  • 0
  • 52
Vinsey

A
Vinsey

  • 4
  • 1
  • 88

Recent Classifieds

Forum statistics

Threads
199,164
Messages
2,787,296
Members
99,829
Latest member
Taiga
Recent bookmarks
1

c41

Member
Joined
Jul 21, 2016
Messages
236
Location
Aus
Format
Analog
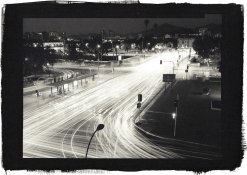
I'm in the process of trying to print a long exposure I took over Monument Valley during a moonless winter night.
I've never really printed night scenes before, let alone long exposures with star trails.
Any tips on how to make the print really work?

I've tried going as dark as feels right with the sky and dodging the ground so its more visible. Does it seem enough? Shoudld the sky be as black as it was when I stood there in the freezing cold(!) I'm finding it more difficult than a normal print as I'm not 100% sure how I could make it look and how to try to make the star trails as visible as possible.

These phone shots are angled to minimise the still visible reflections, these are of a test print I've selenium toned and just put in a frame to give an idea how it might look on the wall. It's gloss Ilford fiber paper. Any pointers much appreciated, thanks.


koraks

Moderator
Moderator
Joined
Nov 29, 2018
Messages
23,395
Location
Europe
Format
Multi Format
How you print something is really a personal choice. Having said that, I'd personally boost the contrast a lot to make it pop. I'd probably go for a pitch black sky at the top of the frame with near-white star trails, and also hold back the foreground a bit to lift its tones while keeping the deepest shadows in those monuments right at dmax. So essentially quite like how Adams printed Moonrise in its final state.
 

jimjm

Subscriber
Joined
May 2, 2007
Messages
1,228
Location
San Diego CA
Format
Multi Format
I'd agree with koraks, first try printing overall at a harder grade to improve the contrast (assuming you're using VC paper). Then generously burn in the sky, blending from black at top to lighter gray at bottom.
Dodge the areas of the ground during the base exposure where you want to retain detail, maybe using a dodging mask cut to fit the shape of the ground and cliffs.
It looks like you have enough detail in the ground to get what you want out of it.
This is a tough one, given that there was no moon out and I assume no other sources of illumination for the ground. I would guess the density of the ground in the negative is not much more that the sky itself?

I know fiber paper isn't cheap, so you don't always want to waste it trying different techniques. Often I'll work out my contrast settings and burning/dodging plan on RC paper, then translate that to fiber. The times and contrast levels won't match initially, but once you find your base exposure time and contrast level on fiber, the time ratios for burning/dodging should be pretty close to what you did on RC. Plus, I find RC has less of a dry-down effect and obviously dries quicker than FB, so you get to assess the results quicker.
If you have a chance to pick up Tim Rudman's book "The Photographer's Master Printing Course", there's a lot of great techniques in there. Good Luck!
 

ic-racer

Member
Joined
Feb 25, 2007
Messages
16,561
Location
USA
Format
Multi Format
You might try bleach ("Farmer's Reducer").
I used bleach on this night scene to bring up the white areas which were originally gray (not unlike your print) prior to bleach. Ignore the marks of imperfect technique, I was using the image in another thread on bleaching.


Bleach Rocks.jpeg
 
Last edited:

Sirius Glass

Subscriber
Joined
Jan 18, 2007
Messages
50,411
Location
Southern California
Format
Multi Format
Do what they said.
 

Vaughn

Subscriber
Joined
Dec 13, 2006
Messages
10,121
Location
Humboldt Co.
Format
Large Format
Yeah -- what they said! It should feel the way you want it to feel. If you wanted to mess with the negative, you could try a little intensification to bump up the areas of greatest exposure -- which looks to be the star trails. Rapid selenium toner at 1:4 or so, to completion.

The sky does not have to be pure black. Santiago, Chile (10 minute exposure, 5x7 platinum print). This was taken a few weeks after the summer solstice...I waited until people in the apartments in the upper left to turn their lights on....probably around 11pm.
 

Attachments

  • SantigoPM.jpg
    SantigoPM.jpg
    591 KB · Views: 102
Last edited:

Donald Qualls

Subscriber
Joined
Jan 19, 2005
Messages
12,318
Location
North Carolina
Format
Multi Format
If your exposure is long enough (an hour or so on a full moon, full dark to just before astronomical dawn at new moon) you'll pick up enough sky glow to see density in the negative from the black parts of the sky. That goes double if you catch any dusk or dawn light, or if the Moon, Venus, or Jupiter get into or near your frame.
 
Joined
Dec 10, 2009
Messages
6,297
Format
Multi Format
Yeah -- what they said! It should feel the way you want it to feel. If you wanted to mess with the negative, you could try a little intensification to bump up the areas of greatest exposure -- which looks to be the star trails. Rapid selenium toner at 1:4 or so, to completion.

The sky does not have to be pure black. Santiago, Chile (10 minute exposure, 5x7 platinum print). This was taken a few weeks after the summer solstice...I waited until people in the apartments in the upper left to turn their lights on....probably around 11pm.
Wow. That's a nice print and shot. Like pretty much what everybody else said, more contrast. Make the sky black and the stars white as possible. Right now, the sky and stars are a grey mass.
 
OP
OP

c41

Member
Joined
Jul 21, 2016
Messages
236
Location
Aus
Format
Analog
Thanks everyone, that's given me a lot to consider.
I'm absolutely prepared to use as much fiber paper as it takes. These are only 8x10" prints so it's not exorbitant costwise.

I'll start with bumping the contrast and sky exposure up to see if that helps bring out the star trails then consider those other suggestions.
I am liking the serenity of the unlit Mittens now I've considered the image a bit more, I don't think I'll go too much further dodging them.

I do have a few negatives of the exact same scene with widely varied levels of exposure. It was too dark and far far too cold to get past best guesses with the Rolleiflex but I'm happy they all have the key ingredients present so I have plenty to work with. It was a very dark night, the lights of the settlement visible center frame on the horizon weren't visible to the naked eye.
Thanks again for your thoughts all.
 
Photrio.com contains affiliate links to products. We may receive a commission for purchases made through these links.
To read our full affiliate disclosure statement please click Here.

PHOTRIO PARTNERS EQUALLY FUNDING OUR COMMUNITY:


Ilford ADOX Freestyle Photographic Stearman Press Weldon Color Lab Blue Moon Camera & Machine
Top Bottom