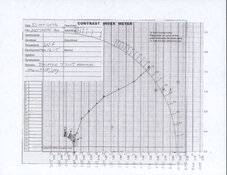
• Welcome to Photrio!
    Registration is fast and free. Join today to unlock search, see fewer ads, and access all forum features.
    Click here to sign up

How to measure approximate film speed with a step wedge?

MCB18

Subscriber
Allowing Ads
Joined
Jan 16, 2023
Messages
1,533
Location
Colorado
Format
Medium Format
Planning to buy a Kodak step wedge, and am wondering how to get approximate film speed. I don’t have a densitomiter so unfortunately an H&D curve is out of the question, but from my understanding I should still be able to get a better idea of the actual speed of films I’m using.

The 2 methods I’ve seen are to put the film under an enlarger and contact print. However, with the slow film speed of the film I am testing, I suspect I need several seconds of exposure in my enlarger, which is almost certainly beyond the point of reciprocity failure, which is bad.

The other is to put the wedge in direct contact with the film and expose it to a white subject in-camera. This one is simple, I don’t have a way to fit the wedge in my camera.

Any other ideas or suggestions?

Thanks!
 
The idea of film speed measurement using a step tablet is to administer a known quantity of exposure through the step tablet to the film/paper. Lacking either a well-characterized light source or a means to administer light from the source onto the sample through the tablet, you're stuck.
 
Theoretically what you are trying to do is a good idea, but as you have discovered it's difficult to do in practice. You don't mention which type of Kodak step table you are using or what film format you use, and those make a difference, as well.

Instead, you can use a grey card and expose the film at different film speeds. But it's best to determine the development time of the film first. How do you determine that? It depends of what paper you are using and how you expose and develop it.

On a scale of 1 to 10 (EZ to COMPLEX) how accurate do you want your ISO to be?
 
Your enlarger should be fine. When I tested various 100 ISO films, I got good results with 2.5 or 5 Lux (depending on the film) at 0.8 seconds. For that, the enlarger head was pretty high above the film + steo wedge.

Of course, the lower you go, the more light you'll get. My suggestion would be to figure out how much Lux you want/need, and move the head while measuring the light until you reach your number.
 
Theoretically what you are trying to do is a good idea, but as you have discovered it's difficult to do in practice. You don't mention which type of Kodak step table you are using or what film format you use, and those make a difference, as well.
I am planning on getting a calibrated no.2 Kodak photo tablet, and I can cut the film to 120 and LF.

Instead, you can use a grey card and expose the film at different film speeds. But it's best to determine the development time of the film first. How do you determine that? It depends of what paper you are using and how you expose and develop it.

On a scale of 1 to 10 (EZ to COMPLEX) how accurate do you want your ISO to be?
I have a speed and a few dev times that I think is good, just trying to figure out if it’s in the ballpark. If I had access to a densitomiter getting a super accurate ISO might be something I would look into, but until then “generally close” is fine.

Your enlarger should be fine. When I tested various 100 ISO films, I got good results with 2.5 or 5 Lux (depending on the film) at 0.8 seconds. For that, the enlarger head was pretty high above the film + steo wedge.

Of course, the lower you go, the more light you'll get. My suggestion would be to figure out how much Lux you want/need, and move the head while measuring the light until you reach your number.
Problem is this is an EI 3 film…
 
Assuming you don't have a meter of some sort to use, since you only want a good approximation, just use your eyeball.

Since you have the development details set, all you need to do is take a few shots of a grey card -- or suitable substitute -- and vary the exposure.

Given that it is an ISO 3 film, it's probably fairly high contrast.

Start by taking an exposure at the ISO 3 setting, then -1f (under-expose the equivalent of a stop), then 2, then 3 , then four, then five. Develop and look at the negatives. Where do you lose the ability to see the difference between the exposed film and the unexposed edge? Was it 3, 4 or 5? Then fine-tune between those two exposures by 1/2f or 1/3f depending on your gear. With the ISO at 3, you will know what the approximate C.I. is at that development time. If you want a flatter C.I. then move the ISO down as much as you want.

By stopping down, you are effectively creating dark shadows, and when you can barely make out a very dark shadow, that's the bottom of your C.I. curve at that ISO.
 
You can shoot a ring around. Set up a test scene, open shadow, gray card, a zone scale if you can print one from a download, and human model. If possible, a swath of black cloth with texture and a swath of white cloth with texture. Set camera on tripod, shoot a frame starting at least 3 stops down, then one for next stop. One frame at film box speed and 3 over. So, for ISO 100, start at ISO, 12, 25, 50 100, 200, 400, 800. Develop in your standard developer at factory recommend time. Then use the step wedge to find printing time for your standard paper. Cut paper into strips to match the step wedge, then at F 8 expose one strip at 2 seconds, record time on back before development. The repeat at 4, 6, 8, 16, 32, 64 seconds. Develop standard time for your developer, fix and wash then allow to dry to find time that gives best results, that will be your standardized time. Then print your negatives using that time to find the ISO that provides you with shadows with detail, Zone III, highlight with detail Zone VII, Zone V from the gray card and Zone VI for Caucasian skin tone, Zone IV for darker skin tones. To tweak you can adjust your development times or dilutions.
 
I think I am just going to try and contact print onto the film with my enlarger. I found that assuming EI 3 and 1 sec exposure with a 5.6 aperture, I need an EV of ≈4, which from my understanding is pretty dim and should be achievable with my enlarger. Worst case I just leave it alone, what I’m doing now just guessing and seeing what happens seems to work ok. Honestly this is just for my own curiosity since I happen to have the opportunity to get a step wedge.
 
I found that assuming EI 3 and 1 sec exposure with a 5.6 aperture, I need an EV of ≈4
Wouldn't that be the EV indicated by a light meter if you were to expose the film through a lens? Note that this is not the same as the intensity of the light that you'll project onto the contact printing frame with your enlarger.
 
Wouldn't that be the EV indicated by a light meter if you were to expose the film through a lens? Note that this is not the same as the intensity of the light that you'll project onto the contact printing frame with your enlarger.
Honestly no clue, guess the only way to find out is to just test it.
 
Honestly this is just for my own curiosity since I happen to have the opportunity to get a step wedge.

A step table is a great tool to have for determining exposure & development of paper. But paper is designed to be exposed by an enlarger, not film.
 
But paper is designed to be exposed by an enlarger, not film.

For testing with a step wedge it is.

He's following Kodak's Basic Photographic Sensitometry Workbook

 
A step tablet in contact with film under an enlarger is a good way to test development time. Slow film is unlikely to exhibit reciprocity law failure given a few seconds exposure.

Step wedge itself can act as a densitometer. Compare the resulting negative to the step wedge (e.g., take a phone photo of it on a light box side by side with your test negative and share the picture here. We could tell you what it means).
 
A film with an EI of 3 sounds like a specialty film. The ISO 6 standard is only for black and white pictorial films. Aerial and litho films, for instance, use different standards to determine their speeds. I recommend reviewing the speed method that relates to the film and its intended usage.

It shouldn't be too difficult to get you close to a good exposure for the test, but it's not realistic to expect anything other than relative speeds without a known, dependable light source. The expense of a calibrated Kodak step table in you case probably isn't necessary.

To get you into the ball park with exposure, using the conditions for ISO 6, the Hm for a EI 3 film would be 0.80 / 3 = 0.267 lxs. If you want that to fall around the 2.70 density on the step tablet, you will need 134 lxs of exposure.
 
I think I’m just gonna take the approach of “throw stuff at the wall and see what sticks”. The step tablet was $25, and I already have a darkroom and enlarger, if something useful comes of this that’s great, if not all I lost was a little bit of my time and film.
 
Assuming you don't have a meter of some sort to use, since you only want a good approximation, just use your eyeball.

Since you have the development details set, all you need to do is take a few shots of a grey card -- or suitable substitute -- and vary the exposure.

Given that it is an ISO 3 film, it's probably fairly high contrast.

Start by taking an exposure at the ISO 3 setting, then -1f (under-expose the equivalent of a stop), then 2, then 3 , then four, then five. Develop and look at the negatives. Where do you lose the ability to see the difference between the exposed film and the unexposed edge? Was it 3, 4 or 5? Then fine-tune between those two exposures by 1/2f or 1/3f depending on your gear. With the ISO at 3, you will know what the approximate C.I. is at that development time. If you want a flatter C.I. then move the ISO down as much as you want.

By stopping down, you are effectively creating dark shadows, and when you can barely make out a very dark shadow, that's the bottom of your C.I. curve at that ISO.

Note: if you're trying to vary the exposure through camera settings, such as shutter speed and aperture,your results are subject to a great deal of variation, exactly what trying to use a step wedge is eliminating. If you have trouble fitting a step wedge into your camera or into your holder, try tapiing it to a window and take a close-up shot of that.
 
To get you into the ball park with exposure, using the conditions for ISO 6, the Hm for a EI 3 film would be 0.80 / 3 = 0.267 lxs. If you want that to fall around the 2.70 density on the step tablet, you will need 134 lxs of exposure.
Thanks, I was kind of hoping this would be offered by someone who knew (i.e. - not me: I just know of it, haha)! In hindsight, I should have just tagged you into the thread right away, my apologies.

I think I’m just gonna take the approach of “throw stuff at the wall and see what sticks”.
Sounds fine to me, really. Since you're indeed working with these speciality films (@Stephen Benskin, you're right; look at e.g. what @MCB18 offers for sale - it's things like imagesetter film rolled into 120 etc.), you're not really looking at regular curve shapes to begin with. This means that whatever 'ISO' speed you attribute to the film, will have limited meaning as it doesn't really compare well with normal camera film. Based on how people decide to develop it, for instance, but also what their tolerance for open shadows is, effective EI's based on personal evaluation can differ over a range of many stops. I understand / assume you want to give a kind of ballpark figure for others who end up using your films. For that purpose, the 'throw at a wall, see what sticks' approach IMO would be just fine, especially if you include a few examples and notes on how you metered, exposed and developed the images. Added to that, you can of course still produce H+D curves using your step tablet. The only drawback is that you may not be able to put an absolute value on the horizontal axis, and as a result, not be able to determine an ISO speed that way. But it would still show curve shape under your testing conditions, which will certainly be useful to people.
 
Note: if you're trying to vary the exposure through camera settings, such as shutter speed and aperture,your results are subject to a great deal of variation, exactly what trying to use a step wedge is eliminating. If you have trouble fitting a step wedge into your camera or into your holder, try tapiing it to a window and take a close-up shot of that.

My suggested approach can also be used to figure out if you happen to have some sort of serious problem with your camera gear, like shutter speeds way off -- or messed up aperture settings.

The OP was looking for an easy, good estimate, ball park approach. I use a similar method using 35mm film in a Pen F half-frame (without and shutter speed or aperture problems) and can get an entire 20 exposure 1/2-step line of exposures on a 1x10" sheet of paper -- without using a step table. All I need is a grey card for the exposures, and I can plot the entire C.I. slope very easily.
 

Filling In

H
Filling In

  • 1
  • 2
  • 39
Painted Hills # 3.jpg

H
Painted Hills # 3.jpg

  • 4
  • 0
  • 86

Recent Classifieds

Forum statistics

Threads
203,208
Messages
2,851,431
Members
101,725
Latest member
Eric35mm
Recent bookmarks
0
Photrio.com contains affiliate links to products. We may receive a commission for purchases made through these links.
To read our full affiliate disclosure statement please click Here.

PHOTRIO PARTNERS EQUALLY FUNDING OUR COMMUNITY:


Ilford ADOX Freestyle Photographic Stearman Press Weldon Color Lab Blue Moon Camera & Machine
Top Bottom