How to get craquelure patterns in prints?

Val

A
Val

  • 3
  • 0
  • 56
Zion Cowboy

A
Zion Cowboy

  • 5
  • 3
  • 60
.

A
.

  • 2
  • 2
  • 100
Kentmere 200 Film Test

A
Kentmere 200 Film Test

  • 5
  • 3
  • 155
Full Saill Dancer

A
Full Saill Dancer

  • 1
  • 0
  • 128

Forum statistics

Threads
197,781
Messages
2,764,186
Members
99,469
Latest member
glue
Recent bookmarks
0
Joined
Oct 4, 2018
Messages
188
Location
Europe
Format
35mm
Hello,

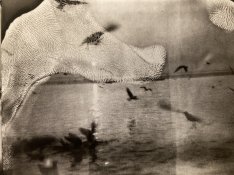
I'm looking for a particular effect in prints. I don't know the name of this effect , but you could call it craquelure. Like sometimes appear on old paintings.

I guess the effect is done by developing the print and alter the development in ways that it produces irregularities on the surface. It feels as if the image was destroyed for a part.

You can see it in the work of Michael Ackerman and others.

On the photos below you can see these craquelure also sudden shifts from darkness to light.
 

Attachments

  • IMG_0088-min.jpg
    IMG_0088-min.jpg
    1.3 MB · Views: 185
  • IMG_0089-min.jpg
    IMG_0089-min.jpg
    1.1 MB · Views: 197

gone

Member
Joined
Jun 14, 2009
Messages
5,505
Location
gone
Format
Medium Format
The scans don't look like painting craquelure. If that's the look you want, you'll have to emulate the way painting craquelure occurs. Normally, it's caused my the varnish, paint and paint surface all shrinking at different rates over very long periods of time. Obviously, one lifetime is probably not long enough to have this happen, so you'll have to figure out a way that gives a similar look (probably won't look exactly like you want either).

The print would have to be mounted to a hard surface like maybe wood and stuck there hard permanently. Then you could experiment w/ different techniques to achieve that look. It may be possible to put some clear coating on it that dries hard and quick, because eventually you are going to need a hammer or piece of wood to tap the print surface all over in the hopes of cracking it.

There may be other ways, it's going to be tricky work for sure.
 

Nitroplait

Subscriber
Joined
Jul 13, 2020
Messages
787
Location
Europe (EU)
Format
Multi Format
Cracks in paintings occurs typically when different materials reacts differently on environmental factors, for example the oil paint is old and brittle and doesn't follow the expansion and extraction of the lined canvas due to humidity and temperature.
I worked in a gallery many years ago and one of the artists used a hairdryer/heatgun to stress his artworks surface to create cracks and other effects.

I know that you can create unpredictable effects in film emulsion if you expose it to ice cold water during the washing, so I imagine that the emulsion on fiber based paper could be manipulated by exposing it to extremes as well.

There is certainly a lot to be explored for the curious mind.
 

pentaxuser

Member
Joined
May 9, 2005
Messages
19,661
Location
Daventry, No
Format
35mm
i don't look for cracks like in paintings. I had no other word to describe it.

OK If we have misunderstood what you meant then it will help if you can show us a picture of what you mean

pentaxuser

Post script: This would appear to be possible with Photoshop which may be your best option
 
Last edited:

jnamia

Member
Joined
Apr 13, 2022
Messages
185
Location
local
Format
Multi Format
have you thought about / tried double exposing or combination printing ? after another look it looks like that might be what was done.
 

pentaxuser

Member
Joined
May 9, 2005
Messages
19,661
Location
Daventry, No
Format
35mm
have you thought about / tried double exposing or combination printing ? after another look it looks like that might be what was done.

Yes now I look more closely at the OP's pics of what he means that does look to be what he wants. Something was lost in translation in the word used to describe what he showed us

Translation into the right word/phrase is never easy

pentaxuser
 

gone

Member
Joined
Jun 14, 2009
Messages
5,505
Location
gone
Format
Medium Format
If it were me, I'd try a few of these techniques because they're fast and easy to do. They also have a bolder impact when hung on the wall. You want to play around w/ this as if you were a little kid.

A- cut or tear the print into small, irregularly shaped pieces and glue it back together. We do this w/ pottery or broken plates all the time, it can give a wonderful mosaic effect. Some people color the connecting areas, black will hold the design together but any color works.

B- cut or tear the print into similar shapes like square or rectangular and glue them back together randomly, or shuffle them into different combinations.

C- cut or tear the print into larger pieces and glue magnets to the back. Let the gallery goers rearrange them as they wish.

D- cut or tear the print into irregular pieces, close your eyes and drop them. Where they land, that's where you want to connect them. It's the John Cage idea of randomness and chance. He thought it was Zen, but it's from the Tao really.
 
Last edited:

pentaxuser

Member
Joined
May 9, 2005
Messages
19,661
Location
Daventry, No
Format
35mm
Well it looks like we all have different ideas of what the OP wants to do. I hadn't given any thought to your 4 options, momus, I must admit

Sounds like time the OP told us what he actually wants to achieve:smile:

pentaxuser
 

Sirius Glass

Subscriber
Joined
Jan 18, 2007
Messages
50,196
Location
Southern California
Format
Multi Format
Well it looks like we all have different ideas of what the OP wants to do. I hadn't given any thought to your 4 options, momus, I must admit

Sounds like time the OP told us what he actually wants to achieve:smile:

pentaxuser

And I do not think it has to do with tearing things into pieces.
 

jnamia

Member
Joined
Apr 13, 2022
Messages
185
Location
local
Format
Multi Format
Yes now I look more closely at the OP's pics of what he means that does look to be what he wants. Something was lost in translation in the word used to describe what he showed us

Translation into the right word/phrase is never easy

pentaxuser

yea. looks like residue from chemistry left on film that was printed with something behind it. a puddle will leave that sort of shape and residue when it dries. or maybe it was rephotographed on a piece of glass on black fabric or paper barely a tonal variation ( banding effect ) would impregnate the negative with that sort of image, exposure would determine how white the residue was against the image behind it... a #4 filter would be about right on VC paper... both image look like the same thing .. OP not very hard if you experiment a little by bracketing your exposures and how you are combination printing...
 

Don_ih

Member
Joined
Jan 24, 2021
Messages
7,425
Location
Ontario
Format
35mm RF
The two images at the top look like the result you'd get printing to rc paper and then placing a hot clothes iron or similar on the back of the print. The resin coating on the front crinkles like that when it gets hot.
 

jeffreyg

Subscriber
Joined
Jun 12, 2008
Messages
2,602
Location
florida
Format
Medium Format
You might be able to make a mask (digital) with the effect you want and print it on Pictorico then print through it. Also check some of the work Robert Heineckin did. I have one of his prints of a TV dinner. I believe he crumpled a wet print, added color and coated the prints with a clear acrylic so they would retain the shape.


DREW WILEY

Member
Joined
Jul 14, 2011
Messages
13,760
Format
8x10 Format
The classic method depended on reticulation of the emulsion back when real thick-emulsion sheet films like Super-XX were still around. My brother would pass the film back and forth between two trays during development, one containing hot developer, the other cold water, until the whole emulsion predictably had a dry lakebed mud-crack effect all over it. I don't know if that is possible with today's thinner emulsion films; but one could experiment with something relatively thick like HP5 or Tri-X sheet film. That's a different kind of look anyway than the creepy crawling slime mold effect in the poster's example, reminiscent of some old B horror movie like what the Blob would leave behind. For that, go back to the early Surrealist tricks of schmoozing overly heated, nearly melting PAPER emulsion against a smooth surface, and peel it away.
 
Last edited:

koraks

Moderator
Moderator
Joined
Nov 29, 2018
Messages
21,147
Location
Europe
Format
Multi Format
You can get this kind of effect if you take to sheets of transparent glass and press some paint between them. Separate both glass panes by pulling them apart and you're left with this kind of crazed-look pattern. You could then dry the paint and use the glass as an overlay on top of the paper. Alternatively you could do it directly on the paper by replacing one of the sheets of glass with paper, but you'd have to experiment a bit to find a type of paint that will wash off cleanly from the paper.
 

jonmon6691

Member
Joined
Oct 6, 2021
Messages
95
Location
Portland Oregon
Format
4x5 Format
Not exactly the same look, but pretty similar, it's one I've been struggling to avoid, but I get significant crystallization of New Cyanotype sensitizer near the edges and corners of my prints even when I take care to prevent pooling. This leads to interesting crystal patterns on the periphery of the print which are admittedly cool looking and give a certain old fashioned look, but I'd prefer to be able to control the process rather than be at its whim
 
Photrio.com contains affiliate links to products. We may receive a commission for purchases made through these links.
To read our full affiliate disclosure statement please click Here.

PHOTRIO PARTNERS EQUALLY FUNDING OUR COMMUNITY:


Ilford ADOX Freestyle Photographic Stearman Press Weldon Color Lab Blue Moon Camera & Machine
Top Bottom