How to fix a photo for printing

Do-Over Decor

A
Do-Over Decor

  • 1
  • 0
  • 28
Oak

A
Oak

  • 1
  • 0
  • 26
High st

A
High st

  • 7
  • 0
  • 63
Flap

D
Flap

  • 0
  • 0
  • 26

Recent Classifieds

Forum statistics

Threads
199,217
Messages
2,788,025
Members
99,835
Latest member
HakuZLQ
Recent bookmarks
0

OptiKen

Member
Joined
Oct 31, 2013
Messages
1,055
Location
Orange County
Format
Medium Format
I took a close-up, low light picture of my cat at ground level and would like to print it but there are two artifacts I would like to correct first. The problem is I have no idea where to even start fixing it in the darkroom. There is a white line running up from carpet thru the cat for a couple of inches which is actually a close up of a thread that got in the way. Also, in the top left corner is a bright circle of a light that was captured in the shot.
How can those be corrected in the darkroom?
attachment.php
 

Attachments

  • muffin.jpg
    muffin.jpg
    99.7 KB · Views: 259

MattKing

Moderator
Moderator
Joined
Apr 24, 2005
Messages
53,262
Location
Delta, BC Canada
Format
Medium Format
1) careful cropping to exclude them;
2) careful burning in - not to eliminate them, but rather to make them less obvious.

A card with a small hole makes it easier to burn in small areas. You need to burn in each area separately. A longer exposure time will make it easier to do this.

You will need to practice a fair bit to get good at this. Essentially, you learn to feather in small additions to the density on the print.

Until you have done this a bit, most likely you will have problems with the edges of the target area showing unwanted darkening as well.

Once you become good at burning (and dodging, and masking, and flashing), it is extremely satisfying.

Paradoxically, once you get good at these darkroom manipulations, you will find yourself exposing more carefully in camera to help avoid the need.

In the case of this photo, I would crop.
 

snapguy

Member
Joined
Jan 1, 2014
Messages
1,287
Location
California d
Format
35mm
burning in

Burning in those two areas should not be much of a problem. You may go through a few sheets of paper until you get it exactly how you like it. Also, the face of your feline friend does not seem to be in too sharp a focus. I might suggest you try using a more contrasty grade of print paper to get more apparent sharpness. The devil, as usual, is in the details.
 
Joined
Jan 21, 2003
Messages
15,708
Location
Switzerland
Format
Multi Format
There isn't anything really meaningful in the lower half of the picture. I would crop the bottom half off, and some from the right and left to get rid of that really bright white spot in the upper left. Whatever is left of the white area you retouch with ink once the print is all finished, same as you would for smaller dust spots.

Then practice dodging and burning of various elements in the picture to bring forward what's important about the picture, the cat's face.

I think the negative was probably kinked in the developing reel somehow, which is often how those crescent shaped marks show up. But I could certainly be wrong.
 

Hatchetman

Member
Joined
May 27, 2011
Messages
1,553
Location
Chicago, IL
Format
Multi Format
Those kinks are often exacerbated by scanning. (as are most film imperfections it seems). That bottom part *may* not be as bad as it seems.
 

gone

Member
Joined
Jun 14, 2009
Messages
5,504
Location
gone
Format
Medium Format
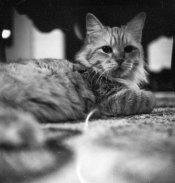
Nice cat. Good suggestions to fix your issues, which thankfully are pretty minor. Easy to re shoot the shot too. This is the reason why I normally shoot many versions of the same shot when photographing something like this (our cat is a favorite subject too, and a patient poser). Is that Tri-X? I like the tones. The composition worked out. My eye goes to the lower right, over to the tail area on the left, and is directed right to the face, where the black background keeps it there. The light areas that frame the face on either side are perfect for keeping the attention on the eyes, and add balance (two light areas, two dark areas). One of the best ways to make a composition work is to have a repeating pattern and/or tonal value. Not a lot, and not contrived, but it will really nail the thing.

I wouldn't crop it. While as Thomas said, there may not be anything meaningful in the lower half, it's absolutely necessary for compositional balance. I see so many good shots ruined by lousy compositions. The libraries have books on basic compositional techniques in paintings. Avoid the photography books on the subject, as they usually have not a clue on this. Some people have composition hard wired and don't need the help, but it's good to know how to fix things when they need fixing. There's not a lot going on in traditional Asian art either in many areas of the image, but negative space is just as important as positive. The main thing you have going for you is that the four corners are darkened. Again, this gives a peaceful balance, and keeps the eye in the print, w/o wandering outside of it. Our attention will always go to the eyes in a portrait, which is fine, usually, if it's in the center, but on yours, my eye goes from the face, then sloooowly to the approximate center of the image where it rests, and there is a gentle tension between the eyes and that center resting area, which is perfect. Even though my mind wants my eye to go back to the face a little, it rests gently in that center darkish area area just before the lighter face, and from there, w/o focusing on any one area, I can see the whole image as an abstract of shape and tone. Good square, compositional portraits, cat or otherwise, are hard to do. Don't screw it up.

Photographs are nearly always seen as 2 dimensional, w/o depth like a painting, but you have a definable foreground, middle ground, and background. That is not that easy to get, especially in such a "simple", one subject image, as you have there.
 
Last edited by a moderator:
OP
OP
OptiKen

OptiKen

Member
Joined
Oct 31, 2013
Messages
1,055
Location
Orange County
Format
Medium Format
Is that Tri-X? I like the tones.

Thanks for the kind words re: my cat. She's special.
The film used was Rera Pan 127 100ASA developed in Rodinal 1:50. It was shot with a Yashica 44LM TLR with close-up lens attached at about 18" distance under the coffee table at night. I believe I had it set at f4.0 for 1 second.
 

HowieP

Member
Joined
Dec 15, 2012
Messages
63
Location
Long Island
Format
35mm
Ken, I really like your cat too and I really like the composition of the photograph as is. When I enlarge the picture to the size of my computer screen, however, the out-of-focus effect is just a bit above of what I would consider acceptable. This may sound like heresy but, if I were you, I would process this digitally. The digital sharpening works better than changing the contrast via analog methods and the thread and white spot can be cloned out more easily. Also there is a hair, probably a scanning residue, to the left of the cat's head that is more amenable to digital correction.
 
Joined
Jan 21, 2003
Messages
15,708
Location
Switzerland
Format
Multi Format
If you lived closer to me I'd offer to print the negative for you.

It's probably a matter of taste, but I still opine that the lower 1/3 to 1/2 offers nothing of value to the photograph. It is blur and grain only, and it makes the size of the cat seem surreal. Massively distorted. I've been brought up with the idea to boil the photograph down to what is essential about it. It's a portrait of a cat. How does out of focus and grainy fuzzy carpet add to it? That's what I'm trying to set forth. More focus needs to be directed to the face of the cat, to draw attention there. Half the face is in shade and it is in dire need of being brightened up.
The mark on the bottom is unfortunate, but it is not the only reason I'd crop the bottom off. My composition suggestion has nothing to do with text book. It has to do with keeping it as simple as possible, and eliminating parts of the picture that are not relevant to the subject matter.

Anyway, no sense in flogging a dead horse.

The bright spot in upper left can be burned in using white light, since the surrounding area is all black anyway. Or it can be painted with spotting paint when the print is finished.
 

cliveh

Subscriber
Joined
Oct 9, 2010
Messages
7,554
Format
35mm RF
I'm sure this is not the best picture you can take of such a beautiful cat. Bin it and start again.
 
OP
OP
OptiKen

OptiKen

Member
Joined
Oct 31, 2013
Messages
1,055
Location
Orange County
Format
Medium Format
Digitally repairing and preparing this photo for printing is something that I've already done and while a nice picture, it's not one that I would want to hang on my wall. I was asking how to prepare or repair this in a traditional darkroom because I have just started wet printing and wanted to know what can be done in the darkroom to correct the flaws. I will now try to print it using your suggestions for my own education and practice.
 

bdial

Subscriber
Joined
Jan 2, 2005
Messages
7,474
Location
North East U.S.
Format
Multi Format
It's a good negative to practice techniques with.
As mentioned, the spot on the left can be burnt down to match the dark area pretty easily.
I would cut a small hole in a sheet of paper (a fully exposed and developed sheet is ideal). Expose the print then place the masking sheet between the lens and the paper so that the bright spot is at the hole, move the paper up or down so that you get the entire bright spot. Give it a ton of exposure with the paper moving a bit. You may also need to "paint" the dark area with light to completely hide the spot.
I agree with Thomas that the easiest way to deal with the streak on the bottom is to just crop it. But if you want to build your skills, I'd print it down to a middle grey by masking it with a similar technique as the bright spot, except that you will be painting the streak with light, and you won't be adding a lot of exposure.
You will probably need a smaller hole, however. Then try some spot tone to add some cat like texture. This would more or less be the same technique you use in photoshop, except that you are suppling the missing image, rather than copying it from somewhere else in the picture.

There are other things you could try, and what works the best will end up to be your personal choice. Experiment and learn, you may want to buy a box of paper first. :smile:
 

tkamiya

Member
Joined
Oct 3, 2009
Messages
4,284
Location
Central Flor
Format
Multi Format
Here's what I would probably try:

The bright spot on left edge is inside a maximum black area. So if you burn that area or even make a mask and shine a light through it to maximum black, it will disappear.
As far as the thread is concerned, I'd be more inclined to touch it up after the print. Because it is thin, the edge is sharply defined, and top half of the thread in middle gray, it'll be difficult to burn it in and make it disappear. It will be tricky but I think it's more realistic than try to do it in darkroom.
 
Photrio.com contains affiliate links to products. We may receive a commission for purchases made through these links.
To read our full affiliate disclosure statement please click Here.

PHOTRIO PARTNERS EQUALLY FUNDING OUR COMMUNITY:


Ilford ADOX Freestyle Photographic Stearman Press Weldon Color Lab Blue Moon Camera & Machine
Top Bottom