How to eliminate vignetting in pinhole photos?
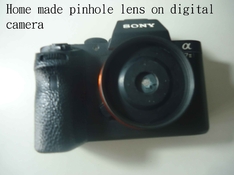
The diameter of the pinhole is approx 0.4mm, in aluminum foil.
The pinhole is approx 1.5~2mm from the camera's lens mount.
The size of the image is about that of 22~23mm wide angle.
The issue:
1.Vegnitting on both sides of the image.
2.Fade greysh tone on top and bottom side.
How to eliminate the vignetting, please?
Thanks.
Kuenp