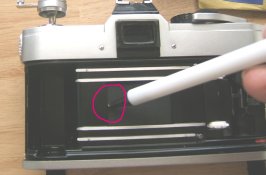
I like the Canon FT QL and FTb cameras, but many suffer from light leaks and shutter capping. The seals on the back are the usual culprits on the light leaks. If the back needs seals, this is easy to fix w/ some felt at the hinge joint on the side, and some crochet yarn laid into the channels of the body (untangle the yarn and use just one thread from the yarn). But on this FTb, the light leak was due to the shutter curtain being slack and not returning to it's seat. Sometimes it would work properly and disappear behind that edge where the pen is pointing, other times it would stop before going the full travel. I found the problem by shining a light into the mirror box and looking into the back of the open camera in a dark closet. The curtain travels from right to left, and is supposed to go inside the black metal edge of the film opening (shown in the photo below where the pen is pointing to). It wasn't returning all the way and the light was streaming in from that side.

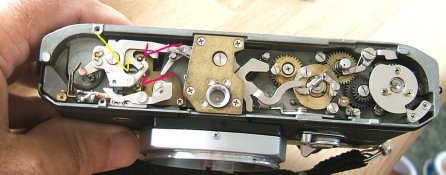
There is a lot of erroneous information on how to cure shutter capping on the web, and I was snipe hunting for a long time before I found this fix: If you take the 3 small screws out of the bottom of the camera, the bottom plate comes right off. Inside, once you cock the shutter to uncover them, these two screws w/ the red arrows are the shutter adjustment screws. The screw w/ the yellow arrow is the one that needs to be loosened to adjust them. It is sealed w/ lacquer paint, but I chipped away at it w/ a tiny screwdriver and got it loose. It holds a small arm that fits into the gears of the two shutter adjusting nuts and keeps them from backing out when they're tensioned.

Once it was loose, I gave the adjusting screws a half turn or so, enough for the shutter curtain to go inside the film gate area where it was supposed to be, then gave them another 1/4 turn for good measure. Firing the shutter many times convinced me that the curtain was now reliably returning all the way beyond the film opening. You really need a slotted screwdriver w/ a prong like end to get around the shaft in the middle of the adjusting screws, but I simply pushed them around w/ a screwdriver by hooking it into the gears and pushing them around. Next, I snugged down the retaining screw in the middle, and gave everything that might move a little dab of acrylic paint to hold things in. After the adjustment, the shutter curtains were more taut (but not overly so) and the exposures were better on my next roll of film. I soaked everything in some lighter fluid to clean it up (it was really dirty before these pics), and gave the most likely places a small dab of light, synthetic bike chain oil.
This is about a 5 on a scale of 10 for difficulty, and most people w/ good eyes and some decent screwdrivers can do it. Spending some time puzzling it out before hand will be of assistance. Here's a neg from before the fix, and the second shot is how the whole roll came out after the fix.


There is a lot of erroneous information on how to cure shutter capping on the web, and I was snipe hunting for a long time before I found this fix: If you take the 3 small screws out of the bottom of the camera, the bottom plate comes right off. Inside, once you cock the shutter to uncover them, these two screws w/ the red arrows are the shutter adjustment screws. The screw w/ the yellow arrow is the one that needs to be loosened to adjust them. It is sealed w/ lacquer paint, but I chipped away at it w/ a tiny screwdriver and got it loose. It holds a small arm that fits into the gears of the two shutter adjusting nuts and keeps them from backing out when they're tensioned.

Once it was loose, I gave the adjusting screws a half turn or so, enough for the shutter curtain to go inside the film gate area where it was supposed to be, then gave them another 1/4 turn for good measure. Firing the shutter many times convinced me that the curtain was now reliably returning all the way beyond the film opening. You really need a slotted screwdriver w/ a prong like end to get around the shaft in the middle of the adjusting screws, but I simply pushed them around w/ a screwdriver by hooking it into the gears and pushing them around. Next, I snugged down the retaining screw in the middle, and gave everything that might move a little dab of acrylic paint to hold things in. After the adjustment, the shutter curtains were more taut (but not overly so) and the exposures were better on my next roll of film. I soaked everything in some lighter fluid to clean it up (it was really dirty before these pics), and gave the most likely places a small dab of light, synthetic bike chain oil.
This is about a 5 on a scale of 10 for difficulty, and most people w/ good eyes and some decent screwdrivers can do it. Spending some time puzzling it out before hand will be of assistance. Here's a neg from before the fix, and the second shot is how the whole roll came out after the fix.


Last edited by a moderator:


