• Welcome to Photrio!
    Registration is fast and free. Join today to unlock search, see fewer ads, and access all forum features.
    Click here to sign up

how i do this frames in the darkroom

Recent Classifieds

Forum statistics

Threads
203,138
Messages
2,850,420
Members
101,692
Latest member
eviosl
Recent bookmarks
3

Linopacino

Member
Allowing Ads
Joined
May 2, 2011
Messages
5
Format
35mm
hy there, i have a question, im working so long on this and just dont find the right way to get the right result.

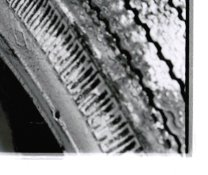
I just would like to ask you guys, how i do this frames in the darkroom. like on this picture?

Dead Link Removed

i just have no idea how i have to do it.. would be awesome if you can tell me.

thank you alot.

Linopacino
 
Looks like the printer filed the negative carrierer frame down to show the film rebate, only do it if A you want every print to look like that or B you can get hold of a spare negative carrier for your enlarger,
Richard
 
i have a few negative carriers and a i grind it a little bit on the edges and corners, but didnt got that result.

is there another solution to get this frames?
 
The black edge isn't too tough.

Roughly;

You will need paper and easel larger than the whole thing you want. Maybe 11x14 for 8x10.

Make a mask from cardboard to give you the outside edge roughness. Make the mask's outer edges so that the easel's frame will center it.

Make another mask to cover the area where the main print will fall.

Make a print of the edge of 35mm film on single weight paper.

Set up the enlarger and negative for the print.

Put in your paper, lay on the masks and center them.

Lay the edge print in place.

Turn on the lights in the darkroom for a moment.

Pull the mask off of main print area.

Expose with the enlarger.

Develop.
 
Shouldn't the holes in the rebate print black, and the rebate strip being free of any image should print black as well. Also to get the black border around the photo you would need to first expose the photo, then cover it with a mask and then expose the border. This photo looks like it was done in photoshop, not with an optical printer.
 
Shouldn't the holes in the rebate print black, and the rebate strip being free of any image should print black as well. Also to get the black border around the photo you would need to first expose the photo, then cover it with a mask and then expose the border. This photo looks like it was done in photoshop, not with an optical printer.

I agree that the example was done in PS.

You are right that the rebate will print black, that's why I suggested printing a single weight paper print of the edge, basically making a paper neg.
 
im really sure that this thing isnt done in photoshop. because i know at this time the photographer only worket with analog film. but i think you guys have much more experience in this.

what is the best way to cut or rip the cardboard for the edge-frame?

okey i hope i got it.. just to repeat the whole process..

1. make a mask for the negativ so that i have a little bit of a black frame there.

2. expose the negativ on the photopaper

3. make another mask for the "outter" frame and put in in the place where the negativ was before.

4. expose that "outter-frame-mask" on the photopaper

5. Develop.

thit i understand it right?
sorry my english isnt so good..

but thank you guys so much! i will try this, this week!
 
filed out negative carrier will create that effect. Also, making a matt negative with rough edges will do something similar. My students do it all the time.
 
thank you for your answere.

what really would help is a photo of the construction.
but i think thats too much of help :wink:
 
This is something that you will just need to play with.
 
okey, i will try it out this week!
i will put up some results here if i have some :wink:
 
It may be that this is simpler than the posters above indicate.

It looks to me like the sprocket holes at the bottom are exposed in the way that one would expect from a filed out carrier. The top sprocket holes are different, but look somewhat similar to the effect I get when I print full frame with an Omega D series carrier. The edges of the images in those full frame prints are partially distinct - made up partly (I think) of flare from the edge of the carrier and partly from light transmitted/diffracted at the very edge of the negative/carrier interface.
 
i have a few negative carriers and a i grind it a little bit on the edges and corners, but didnt got that result.

is there another solution to get this frames?

You did not file enough. You have to whack it out pretty good. When you print, don't let the easel blades frame the picture. Let the edges of the negative carrier opening frame the picture.

I think this is the best presentation for 35mm because it is something that cannot be done in photoshop.
 
The upper sprocket holes are clear, like the original negative would be. Direct printing through the clear rebate gets you black on paper. To print a clear rebate you need an intermediate positive.
 
The upper sprocket holes are clear, like the original negative would be. Direct printing through the clear rebate gets you black on paper. To print a clear rebate you need an intermediate positive.

Mark:

Here is an example of a cropped corner of a scanned proof print which I think shows what I was posting about above. The print is full frame out to the edge of the carrier. See how the (bottom right corner) image in the negative bleeds in a faint way into the edge. It looks almost like a ghost image.
 

Attachments

  • corner1a.jpg
    corner1a.jpg
    530 KB · Views: 241
Mark:

Here is an example of a cropped corner of a scanned proof print which I think shows what I was posting about above. The print is full frame out to the edge of the carrier. See how the (bottom right corner) image in the negative bleeds in a faint way into the edge. It looks almost like a ghost image.

I've seen that in MF negs regularly, not so much in 35mm.
 
beseler has a negative carrier for full frame printing for 35mm film, along with the standard carrier.

This technique was the rage in the 70's and then fill out of favor, and then came back and then; well like other things it comes around every so often.

I think it works great for some images not so well for others. Just a personal opinion, as some Hate it.
 
I would say if this is done analogue then borders could be developed on a sheet of glass with whatever materials you wanted, contact printed, and then photographed on lith film or high contract film. The result would be different boarder negatives to print before the image that could also be scaled up or down to fit the desired size. I think Bartlett popularized this technique.
 
Photrio.com contains affiliate links to products. We may receive a commission for purchases made through these links.
To read our full affiliate disclosure statement please click Here.

PHOTRIO PARTNERS EQUALLY FUNDING OUR COMMUNITY:


Ilford ADOX Freestyle Photographic Stearman Press Weldon Color Lab Blue Moon Camera & Machine
Top Bottom