Home made bounce flash adaptor for Vivitar 285

Tyndall Bruce

A
Tyndall Bruce

  • 0
  • 0
  • 22
TEXTURES

A
TEXTURES

  • 4
  • 0
  • 47
Small Craft Club

A
Small Craft Club

  • 2
  • 0
  • 46
RED FILTER

A
RED FILTER

  • 1
  • 0
  • 37
The Small Craft Club

A
The Small Craft Club

  • 3
  • 0
  • 43

Recent Classifieds

Forum statistics

Threads
198,903
Messages
2,782,781
Members
99,742
Latest member
stephenswood
Recent bookmarks
1

Steve Smith

Member
Joined
May 3, 2006
Messages
9,109
Location
Ryde, Isle o
Format
Medium Format
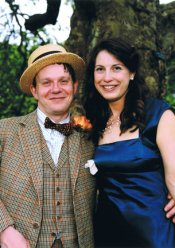
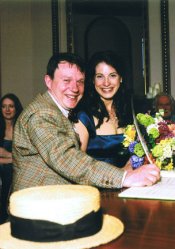
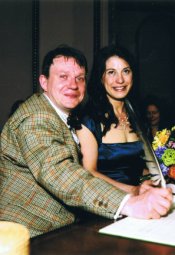
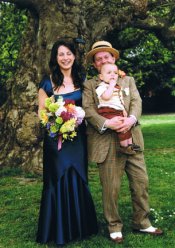
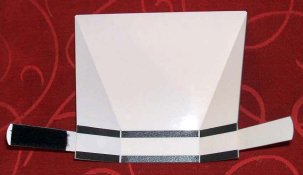
As I wanted to experiment with bounce flash (and I have some formal wedding portraits to take this weekend) I decided to make a bounce flash adaptor to use on a fill flash. This is based on the Lumiquest products.

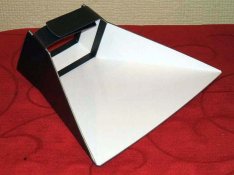
I have used a sheet of heavy weight gloss inkjet 'photo' paper as the reflector. Laminated to the rear of that is a stiffener made from 0.25mm thick polyester and double sided adhesive. This is all laminated to a dark grey self adhesive 1mm foam similar to that used to replace camera light seals (I have a few acres of this spare if anyone wants any).

Some strips of the same foam are used as locators to hold the adaptor in the right place and some self adhesive Velcro on the tabs to hold it in place complete the package.

Oh yes, it helped that I have the use of a laser cutter at work! It could easily be made with a straight edge, a scalpel and a steady hand though.

I have instructions and CAD files for anyone interested. Send your request to: steve.smith.stuff at gmail dot com (just turn that into a proper e-mail address).

My thanks to Arigram for giving me the idea of trying out bounce flash.


Steve.
 

Attachments

  • Flat.jpg
    Flat.jpg
    52.4 KB · Views: 171
  • Folded.jpg
    Folded.jpg
    67.3 KB · Views: 168
  • On Camera.jpg
    On Camera.jpg
    66.6 KB · Views: 180
Last edited by a moderator:

arigram

Member
Joined
Sep 21, 2004
Messages
5,465
Location
Crete, Greec
Format
Medium Format
It looks very well made, good job!
I've made some experiments with my LumiQuest Promax system.
It includes every possible kind of flash light diffuser:
The base is the 80-20. A bounce like the above, but with holes cut into, as to allow most of the light to pass through to a ceiling and reflect a small amount of it to the subject (80%-20%).
It has velcro on it so you can attach further accessories:
With a white "card" it turns to a regular bounce, like your own Steve. It also has gold and silver.
Plus, you can also cover the front with a soft plastic material to turn it into some kind of softbox.

My experiments showed that the direct to ceiling and 80-20 are the softest and give out the nicest light. Plus it can give you some soft catchlights.
Coupled with a strong flashgun and TTL, you don't need to worry much about power loss if you are not pushing your subject matter and have a ceiling above your head.
If you don't, the white card is good enough, but it sure makes the light stronger and definitely more direct. I don't think I'll need the silver and gold unless I am going for some effect with color film, which would be a rare circumstance.
The "softbox" doesn't seem to make much difference.
So, you have three main choices:
- Direct the whole gun towards the ceiling
- Direct part of it with a bouncer and part with the ceiling
- Direct most of it with a bouncer

Apart from the actual use of the bouncer, it should have a compact and folding
design so you can carry it always with you.
 

panastasia

Member
Joined
Jun 8, 2007
Messages
624
Location
Dedham, Ma,
Format
Med. Format Pan
Steve, nice work!

I use the white ceiling for bouncing the flash, like arigram said, the illumination is soft and catchlights are better, but not all ceilings are white or low enough. Direct (or indirect) lighting from the camera position will give those starry-eyed catchlights, even when using a light modifier. For everything but faces you made a great tool. For formal wedding portraits I would position the flash unit w/modifier on a separate tripod angled at 45 deg, raised higher than the camera, and use the ceiling bounce (2nd flash unit) at the camera position for fill light.

Paul
 
OP
OP
Steve Smith

Steve Smith

Member
Joined
May 3, 2006
Messages
9,109
Location
Ryde, Isle o
Format
Medium Format
For formal wedding portraits I would position the flash unit w/modifier on a separate tripod angled at 45 deg, raised higher than the camera, and use the ceiling bounce (2nd flash unit) at the camera position for fill light.

Thanks for the advice.

In this case I don't have a ceiling as I will be outside (weather permitting). I don't have a flash powerful enough to bounce off of the sky!

I am hoping for some nice slightly hazy light as we have had here today and to use the flash just to fill in any shadows.

Would I be right in thinking that I should try to arrange people with the sun to one side at about 45 degrees and have the fill over the other side or possibly just keep it on the hand grip?

I am not doing a full traditional wedding service - this isn't going to be anything like a traditional wedding!


Steve.
 

panastasia

Member
Joined
Jun 8, 2007
Messages
624
Location
Dedham, Ma,
Format
Med. Format Pan
Thanks for the advice.

In this case I don't have a ceiling as I will be outside (weather permitting). I don't have a flash powerful enough to bounce off of the sky!

I am hoping for some nice slightly hazy light as we have had here today and to use the flash just to fill in any shadows.

Would I be right in thinking that I should try to arrange people with the sun to one side at about 45 degrees and have the fill over the other side or possibly just keep it on the hand grip?

I am not doing a full traditional wedding service - this isn't going to be anything like a traditional wedding!


Steve.

Use your new gizmo for the fill light straight on from the camera position if your using the sun as the key light from one side. Positioning is all important, sun at a 45 degree angle sounds right - a basic key light position for portraits - then fill in some of the shadows. Practice with the new unit first. Weddings can be stressful at times, I don't do them anymore. You sound like you know what you're doing, good luck!

Paul
 
Last edited by a moderator:
OP
OP
Steve Smith

Steve Smith

Member
Joined
May 3, 2006
Messages
9,109
Location
Ryde, Isle o
Format
Medium Format
Thanks again for the advice. That's more or less what I was planning to do but it's good to have my ideas confirmed.

When my friend asked me to do this I told him that I decided a long time ago to never do a wedding. My father was a part time wedding photographer and I know how stressful it can be from his stories.

Anyway, I told my friend that in his case I would make an exception to my 'rule' as he only wanted a few shots after the service and a few more at the reception.

The ceremony is in a public building rather than a church and the reception is at a local park with a marquee set up.

To give you an idea of what the day will be like - he is one of this lot: http://www.prom-prom.com/pierotters.html (the one in the middle with a ukulele).

It's going to be a very theatrical and musical affair. After the 'proper' ceremony which is for close family only there is going to be a mock staged ceremony for everyone else.


Steve.
 

MattKing

Moderator
Moderator
Joined
Apr 24, 2005
Messages
53,003
Location
Delta, BC Canada
Format
Medium Format
Steve:

If you have a choice, try to find a place where the background is simple, and the people are in the shade.

"Open Shade" light is soft, but directional, and people are more relaxed (no squinting).

Open Shade light can be a bit blue, but fill flash will help with that.

Matt
 

Terry Again

Member
Joined
Jul 1, 2008
Messages
53
Location
St' joseph M
Format
35mm
Steve,
Have you had the shoot yet? How did it turn out? Just curious?
 
OP
OP
Steve Smith

Steve Smith

Member
Joined
May 3, 2006
Messages
9,109
Location
Ryde, Isle o
Format
Medium Format
The wedding I made this for was in May last year. Here are a few pictures:
 

Attachments

  • Jake01-t.jpg
    Jake01-t.jpg
    85.4 KB · Views: 102
  • Jake02-t.jpg
    Jake02-t.jpg
    97.8 KB · Views: 117
  • Jake03-t.jpg
    Jake03-t.jpg
    100.9 KB · Views: 96
OP
OP
Steve Smith

Steve Smith

Member
Joined
May 3, 2006
Messages
9,109
Location
Ryde, Isle o
Format
Medium Format
And a few more:
 

Attachments

  • Jake07-t.jpg
    Jake07-t.jpg
    73 KB · Views: 113
  • Jake08-t.jpg
    Jake08-t.jpg
    70.2 KB · Views: 95
  • Jake09-t.jpg
    Jake09-t.jpg
    93.7 KB · Views: 103

mikebarger

Member
Joined
Jan 16, 2005
Messages
1,937
Location
ottawa kansas
Format
Multi Format
I use a 283 and a press photographers bounce card. I use a file card ( does anyone use these for filing anymore?) and bend it at a 45. I then rubber band it on the end of the 283 right at the 45 degree crease.

If there is a ceiling some bounces off the ceiling, but a big chunk bounces off the white card. Pretty small and cheap.

Mike
 
OP
OP
Steve Smith

Steve Smith

Member
Joined
May 3, 2006
Messages
9,109
Location
Ryde, Isle o
Format
Medium Format
If there is a ceiling some bounces off the ceiling, but a big chunk bounces off the white card.

I found with mine that if I point the flash head straight up, some light bounces off the card and some goes straight up and bounces of the ceiling.

For outside use where there are no convenient ceilings, I angle the flash head forward a bit and that sends a little bit more light towards the subject.

The scans I posted earlier are not great as they were quickly done to give the couple an idea of what they were going to get. I am pleased with the actual prints to the point where I didn't mind showing them to my father - a wedding photographer from the early 1960s to the mid 1990s!!

For anyone who wants to know the technical details:

Camera: Mamiya RB67 Pro-SD
Lens: 90mm K/L
Film: Fuji NPS 160 rated at EI 125
Flash: Vivitar 285 with flash bounce adaptor as is the subject of this thread
Exposure: Manual, mainly f11 1/125 with fill flash set to whatever colour automatic setting gave a two stop under-exposure (obviously not for indoor shots).


Steve.
 
Photrio.com contains affiliate links to products. We may receive a commission for purchases made through these links.
To read our full affiliate disclosure statement please click Here.

PHOTRIO PARTNERS EQUALLY FUNDING OUR COMMUNITY:


Ilford ADOX Freestyle Photographic Stearman Press Weldon Color Lab Blue Moon Camera & Machine
Top Bottom