Highlight and Shadow Neg methods

Brentwood Kebab!

A
Brentwood Kebab!

  • 0
  • 0
  • 0
Summer Lady

A
Summer Lady

  • 0
  • 0
  • 0
DINO Acting Up !

A
DINO Acting Up !

  • 0
  • 0
  • 0
What Have They Seen?

A
What Have They Seen?

  • 0
  • 0
  • 0
Lady With Attitude !

A
Lady With Attitude !

  • 0
  • 0
  • 0

Recent Classifieds

Forum statistics

Threads
198,755
Messages
2,780,465
Members
99,698
Latest member
Fedia
Recent bookmarks
2

Bob Carnie

Subscriber
Joined
Apr 18, 2004
Messages
7,735
Location
toronto
Format
Med. Format RF
As some may know I am working on multiple hit printing with negatives I am producing on my Lambda.

I have a rather complicated question that may be quite simple, for now I can do what I am asking but in a very complicated way that I will leave for another day.

So here is my question or better said what I am trying to do.
I want to isolate the Highlight region, 3/4 tone and higher and the shadow region 1/4 tone and lower, of a given greyscale image file in PS .
I then want to send this section only over to my lambda to make separate negatives for the highlight or shadow area.

The purpose is to use as an accent negative which would be registered with my main negative and I would do , one, two or three hits onto paper , much like when I use split printing and do multiple hits with different filters to affect different areas of the negative.

Is there a easy way to do this in Photoshop, that I am missing? I have worked a complicated method with selections and masks but I am wondering if there is a simple way that is beyond my grasp or knowlege of photoshop.
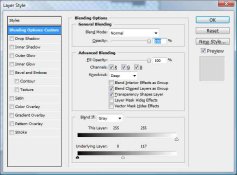
I suspect it could be some kind of application using Blend If , but I am not experienced enough using Blend If to know if this would be the way.

I have Looked into the Tony Kuyper luminosity masks but I have not read enough into them to have a good opinion whether this is the answer.

Any takers???
 

keithwms

Member
Joined
Oct 14, 2006
Messages
6,220
Location
Charlottesvi
Format
Multi Format
Hi Bob. Of course, we can use the selection tool with "contiguous" unchecked and easily transfer highlight or shadow regions to another file. Are you saying you need more precise level separation than that?

One other thought is to embed a tone scale and select that level or set of levels on a tone scale bar and then excise those regions.

Image subtraction would perhaps be more precise.

Do you need a more precise way to extract levels than these kinds of methods?
 

Ben Altman

Member
Joined
Jan 19, 2007
Messages
205
Location
Ithaca, NY a
Format
Large Format
Hi Bob,

Here's one way. I'm sure there are others and probably better.

Make a copy with Duplicate Image.
On the duplicate, using curves, set each end of the curve to the cut-off value you want, so the curve line is straight and horizontal. You now have a file exactly the size of the original image and it is flat gray.
Use Apply Image, with source set to the copy, to apply the copy to the original. Use blending mode Darken to isolate dark tones, Lighten to isolate light tones.
You now have a file which is all gray except the tones you want.
Select the flat gray areas with, say, the Magic Wand.
Edit Fill with white or black as needed.

Best, Ben
 

R Shaffer

Member
Joined
May 9, 2007
Messages
436
Location
Santa Cruz,
Format
Multi Format
You can use blending mode to do this very easily.

You'll need an image with a single layer ( I think ). Make a duplicate of the background layer and then turn off the background layer. Create a new solid fill layer. If you make it black then you'll be transparent at the tones you don't want. If you make it white, then the tones you don't want will all be white.

Right click the fill layer and select blending mode. In the blending mode dialog, under Advanced Blending --> Knockout --> Deep ( is none by default ).

Below that you'll see Blend if: On the 1st slider called "this layer" slide the left (black ) slider all the way over to the right.

On the second slider called "Underlying Layer" if you slide the left ( black ) slider to the right you can watch the highlights vanish from the image. If you slide the right ( white ) slider to the left the shadows vanish from the image.

I would do this with a 100 step wedge to play with and figure out what values you want. Be forewarned I have not used this to do what you are suggesting, but it will definitely remove either highlights or shadows. You may need some overlap at the transition, then again, maybe not. I attached a screen shot of the dialog for disappearing the highlights.
 

Attachments

  • Highlights.jpg
    Highlights.jpg
    53.7 KB · Views: 84
OP
OP
Bob Carnie

Bob Carnie

Subscriber
Joined
Apr 18, 2004
Messages
7,735
Location
toronto
Format
Med. Format RF
None of them are the way I have been trying and I will try all and report back on which way works best for my needs.

thanks a bunch
 

Ben Altman

Member
Joined
Jan 19, 2007
Messages
205
Location
Ithaca, NY a
Format
Large Format
Hi Bob,


After a bit more thought I realized there's a quicker version of my suggested technique.
Simply open a Curves layer and set the curve horizontal as before (same value at each end) at the level you want to clip at. Hit OK.
Change blending mode to Darken or Lighten as appropriate.
Target the background layer and select the flat gray part of the image with Magic Wand at tolerance zero.
Edit >Fill the selection with Black or White.
Turn off the Curve Layer.

Edit: not sure if this works properly on top of adjustment layers - have not tried that experiment. You may need to work with a flattened copy of your file to avoid funky results.

Tell us how it goes...

Best, Ben
 
Last edited by a moderator:

donbga

Member
Joined
Nov 7, 2003
Messages
3,053
Format
Large Format Pan
None of them are the way I have been trying and I will try all and report back on which way works best for my needs.

thanks a bunch

I'm a little surprised no one has mentioned the use of Photoshop Threshold Masks. This maybe the technique I think you are seeking. Google or do some research and I think you may find threshold masks potentially effective, especially if you are going to output them to film with a high DMAX.

OTOH, you may wish to pay for some Masking software. There are several packages out there and they are big productivity boosters and would probably pay for their cost quickly.

Good luck,

Don
 

timparkin

Member
Joined
Sep 2, 2006
Messages
212
Format
35mm
You could just use curves like this.. (I'm working on a min-biography of Shinzo Maeda hence using one of his pictures)

shadow-highlight.jpg
 

donbga

Member
Joined
Nov 7, 2003
Messages
3,053
Format
Large Format Pan
You could just use curves like this.. (I'm working on a min-biography of Shinzo Maeda hence using one of his pictures)

Curves are used at the heart of Threshold Masking. One can be precise or combine with an inverted mask and brush to produce a more interpretive version. There are a lot of ways to do this. Thanks for the examples.

If I were running a shop like Bob I wouldn't hesitate to use products like Topaz ReMask or onOne Mask Pro4.

Don
 
OP
OP
Bob Carnie

Bob Carnie

Subscriber
Joined
Apr 18, 2004
Messages
7,735
Location
toronto
Format
Med. Format RF
Thank you all for the replies, I am getting a bunch here and on LLF and Luminous Landscape.
I promise to try them all , do the work , make the prints and report my results. this may take awhile but though a slow worker, I am open to all ideas and not afraid of putting in
the time , or resources to get what I want.

Bob
 
Photrio.com contains affiliate links to products. We may receive a commission for purchases made through these links.
To read our full affiliate disclosure statement please click Here.

PHOTRIO PARTNERS EQUALLY FUNDING OUR COMMUNITY:


Ilford ADOX Freestyle Photographic Stearman Press Weldon Color Lab Blue Moon Camera & Machine
Top Bottom