• Welcome to Photrio!
    Registration is fast and free. Join today to unlock search, see fewer ads, and access all forum features.
    Click here to sign up

Help with Fujimoto (Lucky) 450M-C Enlarger

Recent Classifieds

Forum statistics

Threads
201,763
Messages
2,829,713
Members
100,930
Latest member
WBM
Recent bookmarks
1

Tony Egan

Subscriber
Allowing Ads
Joined
Oct 29, 2005
Messages
1,295
Location
Sydney, Australia
Format
Multi Format
Hi - hoping someone with one of these enlargers can help with the purpose of the two knobs at the top of this enlarger.
1. Scale: Min to Max. What does this do?
2. Focus vs Print switch? What happens when this is engaged from focus to print?

I have done a fairly exhaustive search of internet and can't see any instruction manuals for sale or download. If someone has a manual they are prepared to share I would be grateful. Also, any recommended colour filter settings for Ilford multigrade grades would also be appreciated. Thanks in advance for your help.
 

Attachments

  • Fujimoto.jpg
    Fujimoto.jpg
    197.8 KB · Views: 565

Molli

Member
Joined
Dec 28, 2009
Messages
1,023
Location
Victoria, Australia
Format
Multi Format
I'm probably not going to be much help. I did a little rumaging around on various sites, including some archived Japanese sites, and probably came across the same scarcity of information that you did. Andrew O'Neill's name popped up on a coupole of forums, including APUG, as the owner and fan of a couple of 450MD. How different the colour head might be, I don't know, but you might PM him (sorry, "Start A Conversation") and pick his brain.
As far as the Focus and Print dial goes, I just had a play with my timer and foot switch which both have these buttons/dials and I've never made use of them. For the sake of experimentation (and because I like to press buttons to find out what goes "BANG!"), I had a play and, when both dials are set to the focus setting, the timer still counts down, but the light stays on. Evidently I'd not tried them in conjunction with each other in the past, ergo, they did nothing. So, presumably, that's what your "Focus" setting will do.
As to the filter settings, I only came across one reference to a Fujimoto enlarger which mentions colour head filtration and the user was told to use the Kodak settings for Ilford Multigrade Paper.

There. A lot of words telling you not a lot. Sorry!
 

John Koehrer

Member
Allowing Ads
Joined
Apr 3, 2004
Messages
8,277
Location
Aurora, Il
Format
Multi Format
Typically the focus/print switch turns the lamp on to focus. At print, the lamp should be off until
your timer is activated.

I also like to press buttons until something goes "BANG" Sometimes the magic smoke escapes though.
 

Mick Fagan

Subscriber
Allowing Ads
Joined
Sep 13, 2005
Messages
4,434
Location
Melbourne Au
Format
Multi Format
Tony the focus/print is to turn you timer off and turn the enlarger light on, for focusing.

I would suggest the scale dial is a dimming thingy to reduce the intensity of the display when you are working in the dark. Going on a very long memory of working once only with a Lucky colour head enlarger here.

With regard to a filtration guide where one can select two filters, Yellow and Magenta in a mixture to come up with say grade 2, then effortlessly change both dials until you get grade 2½ and not needing to adjust time, it doesn't really happen like that.

I have dialed my enlarger in by obtaining what to me is acceptable grades of paper, from grade 1½ through to grade 4. Once I am working in the darkroom and have an acceptable print at grade 2 and the next neg on the roll requires grade 2½. I leave the grade 2 filtration in, slide the neg holder half out, turn off all room lights, then take a density reading (I use a colour analyser for this) then I change the filtration to grade 2½ remove the neg carrier still out and with all lights out, take another density reading. There is always a difference, I know with my enlarger and going up from grade 2 to grade 2½ in filtration I need an extra 1/16 of extra exposure. If this is your first experience with a colour head, then you are in for a treat.

My suggestion would be to start using the Kodak scale, as from memory, that was the one I used with the single Lucky enlarger I had a crack at using once only.

Mick.
 
OP
OP
Tony Egan

Tony Egan

Subscriber
Allowing Ads
Joined
Oct 29, 2005
Messages
1,295
Location
Sydney, Australia
Format
Multi Format
Thanks for the help so far. I had to get a few new power plugs before I could operate the enlarger which is now up and running. As suggested, the "scale" turns the brightness up and down on the colour dials. The "focus vs print simply" neutralizes any filter settings back to white light. There is no connection to a timer. Other enlargers I have used have had a lever for this feature that retracts the colour filter blades.

Mick, I already have a few colour heads and have posted elsewhere that they are a complete waste of time and money for variable contrast printing! I have a 6x7 LPL and Beseler 45D which has been converted to a (home hardware) 8x10 enlarger! I wanted flexibility to have a diffuser up to 4x5 along with a Durst 138 condenser which is my primary all purpose enlarger. For $200 the Fujimoto was irresistible and it's in great condition and built like a tank.

I may take a deep breath and try one more time to use the colour head for VC printing rather than the filter under the lens trick. I'll do a few readings and see what time adjustments might be necessary without resorting to new test strips for every contrast change.
 
OP
OP
Tony Egan

Tony Egan

Subscriber
Allowing Ads
Joined
Oct 29, 2005
Messages
1,295
Location
Sydney, Australia
Format
Multi Format
I put my Minolta IV light meter with a flat incident reading diffuser under the lens with various filter settings and got these results:
Mick, compared to your readings, there was no measurable difference between Grade 2 and 2 1/2 but the jump to grade 3 indicates 50% more time. Easter long weekend coming up means I might just test this and see how accurate it is. I got these Kodak settings from a very old card that's been pinned to my darkroom wall for 25 years so would also be interested if you have any major differences from your sources. Cheers
 

Attachments

  • Fujimoto factors.JPG
    Fujimoto factors.JPG
    29.9 KB · Views: 386

Mick Fagan

Subscriber
Allowing Ads
Joined
Sep 13, 2005
Messages
4,434
Location
Melbourne Au
Format
Multi Format
Tony, I have used single filter settings with a colour head, but believe that is a waste of the possibility awaiting the use of two filters at once.

Essentially, the use of two filters at once allows you to seamlessly switch between grades of contrast without having to change exposure time, to a point this is true, but for super accurate exposure this is not quite true. Which is why I posted what I did earlier in this thread.

The beauty of using two filters at once, or even single filter filtration, can and does allow you to add or detract ¼ or 1/8 increments in contrast. This may sound ludicrous, but my experience with high key printing and colour head filters, is their ability to add a contrast kick of almost immeasurable difference, but nonetheless a noticeable difference in the print. Works the same with a dedicated B&W VC head, only better.

If one has been working with single ½ grade step filters under the lens and know it well, switching to a colour head seems to be a lot of extra work for extremely little gain. In some instances switching to a colour head is a definite gain, but there is a learning curve, although I would suggest for you, a smallish learning curve.

Using a colour head with two filters for VC B&W printing was probably the best thing to happen in my darkroom, the fact I could use the same enlarger to print colour was a bonus. I don't print colour any more and although I am sometimes tempted, I doubt I'll ever print colour again.

Page three of this Ilford PDF on VC printing with various colour head filtration types, would be where I start. The Kodak filtration settings are what I would have a go with.

http://www.ilfordphoto.com/Webfiles/2006130201152306.pdf

Mick.
 
OP
OP
Tony Egan

Tony Egan

Subscriber
Allowing Ads
Joined
Oct 29, 2005
Messages
1,295
Location
Sydney, Australia
Format
Multi Format
Thanks for the link to the Ilford sheet Mick. I'll stick this one on the wall as well. I believe I have tried the dual filter approach many years ago but still found significant exposure time changes were necessary but I may have gained a little more patience since then and a lower aversion to testing and taking good notes!
 

Mick Fagan

Subscriber
Allowing Ads
Joined
Sep 13, 2005
Messages
4,434
Location
Melbourne Au
Format
Multi Format
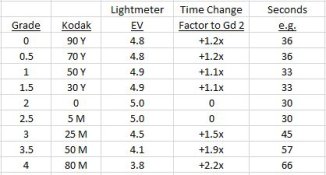
Tony, if you combine F Stop printing times with the changes of contrast that you alter from a test print, you can be very accurate, very quickly. I scoured the net for an F stop printing chart, but pretty much they are all very hard to use in a darkroom when you are printing lickety split. The best one I have come across was in Way Beyond Monochrome, however, that is as busy as anything for virtually everything I do, I want simplicity and speed.

I made my own F Stop printing time chart using 1/8 stop increments, by halving those times I then have 1/16 increments. Within reason the finest time gradations I generally do are in 1/16 of a stop. It is as simple as anything, if for instance I am printing with a base exposure of 10 seconds and the negative is so good I do not need to do anything else except control density, but wish to add a poofteenth more contrast. I'll add say 1/8 of a grade of contrast, which is certainly very easily doable with a colour head using two filters, but I also know I'll need another 1/16 of a stop density increase to allow for the very slightly different filtration, but also to give the highlight a push or pull. My time will be an extra 1/16 of a stop at 10.4 seconds, I could make no filtration changes, but also wish for a very slight density change. If so, I would add 1/32 of a stop of exposure, which would be 10.2 seconds

I'll find a better copy, or make a better copy than the one on my darkroom wall that is at least 20 years old, then get it scanned, then pop it up here if you would like?

Once you have a feel for your enlarger and the way very minor filtration changes alter density, this almost becomes second nature.

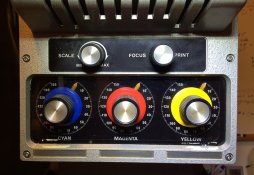
Your light meter with the flat incident cover is quite good, but I know from experience, a proper darkroom density meter will be better. But what you have is certainly not a slouch. I myself have the original Color Star (Lici) colour analyser, which not only measures all three channels at once, but does density readings that have to be seen to be believed. It is deadly accurate, if used as I explained earlier. Up with the best industrial density meters costing thousands of US dollars many decades ago.

Mick.
 
OP
OP
Tony Egan

Tony Egan

Subscriber
Allowing Ads
Joined
Oct 29, 2005
Messages
1,295
Location
Sydney, Australia
Format
Multi Format
I've successfully made a few prints using the two filter settings. The difference in exposure times for contrast change have been calculated and in most cases the difference is not that much different to dry down adjustments so I may have to retract my previous dismissal of colour head contrast controls! I also lucked upon on an instruction manual which I will share here in case anyone else stumbles upon this post. (let me know if you want a higher res version)
 

Attachments

  • Lucky_Fujimoto Enlarger 450M-C small.pdf
    487.9 KB · Views: 745

Mick Fagan

Subscriber
Allowing Ads
Joined
Sep 13, 2005
Messages
4,434
Location
Melbourne Au
Format
Multi Format
Good to hear that you are getting a handle around VC printing with a colour head. It really is a great way to print, although a dedicated B&W VC head is better, there isn't too much in it. The best B&W VC heads I have ever used are the original Ilford units fitted to a swathe of Beseler enlargers we were running. A colour head, once you understand their variables, is a reasonably close match, plus, there is the possibility of using the third colour for neutral density.

You may find that using the 4x5" light mixing box all of the time, is preferable to switching to the smaller light mixing box when you use smaller formats. When enlarging I sometimes switch from 4x5 to 35mm from one negative to the next, I haven't changed my mixing box for decades. As a bonus, leaving the larger mixing box in allows for longer exposing times with the smaller formats, which can be helpful when one is doing very small prints.

Mick.
 
OP
OP
Tony Egan

Tony Egan

Subscriber
Allowing Ads
Joined
Oct 29, 2005
Messages
1,295
Location
Sydney, Australia
Format
Multi Format
Thanks again Mick for your help and insights. The 6x9 diffusion box didn't come with this purchase. I have found the light quite bright in any case with 6x6 film and the 4x5 mixing box. The seller only had the 6x6 neg carrier and a battered home made matt board 4x5 holder. I have just received a Kenko 35mm carrier in the mail through the oneJP site (paid as much for this as the enlarger!) Will see how I go with 35mm in the next few weeks. I don't have the recessed lens board for 50mm lens either so will need to use a 75mm initially. Cheers, Tony.
 
Photrio.com contains affiliate links to products. We may receive a commission for purchases made through these links.
To read our full affiliate disclosure statement please click Here.

PHOTRIO PARTNERS EQUALLY FUNDING OUR COMMUNITY:


Ilford ADOX Freestyle Photographic Stearman Press Weldon Color Lab Blue Moon Camera & Machine
Top Bottom