• Welcome to Photrio!
    Registration is fast and free. Join today to unlock search, see fewer ads, and access all forum features.
    Click here to sign up

Help with darkroom sink design

If You See Kay

A
If You See Kay

  • 0
  • 0
  • 21
Autumn

D
Autumn

  • 0
  • 0
  • 33

Recent Classifieds

Forum statistics

Threads
203,392
Messages
2,853,935
Members
101,817
Latest member
goodman1999
Recent bookmarks
0

Jarvman

Member
Allowing Ads
Joined
Sep 9, 2006
Messages
791
Location
Cardiff, Uni
Format
Multi Format
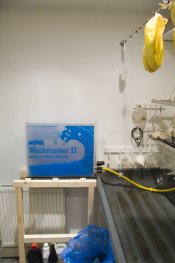
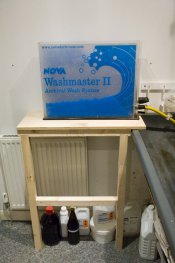
Greetings all, This week I've mostly been trying to re-jig my darkroom by building a print washer stand. I've had the washer set up in the bath before which is a PITA. What with having take dripping prints from the darkroom to the bathroom and having to remove the washer whenever anyone wants a scrub. Woe!

So far I've built a very sturdy shelf. My concern is that the shelf is completely level. It doesn't slope towards the sink for drainage. This is problematic as my print washer leaks albeit at a very slow rate. I've used acrylic glue to seal it as best I can. However, the leak persists. Ideally the shelf will be enclosed on three sides and waterproofed with yacht varnish.

Any ideas how I could alter the construction so it has a slight gradient towards the sink? Is a sloping surface that necessary if the shelf is enclosed and waterproof? The print washer outlet pours directly into my main sink.

Cheers!
 

Attachments

  • washer stand.jpg
    washer stand.jpg
    190.9 KB · Views: 236
  • washer stand 2.jpg
    washer stand 2.jpg
    196 KB · Views: 230
If the top of the stand is removable (as appears to be the case in your pictures), pack up the end furthest from the sink. If it is not removable, put something under the two legs of the stand which are furthest from the sink (EDIT: On closer examination the support seems to be screwed to the wall, so heightening the leg won't work - just drill a couple more holes to allow the whole thing to tilt). Possibly I am misunderstanding the question as these options each seem simple enough to do?

I'm jealous of your print-washer - I'm using a Kodak print-siphon in a 30" square tray, all placed in the shower for drainage!
 
Was going to raise the left leg. (There are only two legs at the front) Only problem is the thing is bolted into the wall at the back. Was thinking I could go from this already sturdy flat base and do something up-top. Hmm
 
If you don't want to make any more holes in the wall, just put the top-plank-thing on there, but propped up a bit under the side furthest from the sink? (As per idea-one, above :wink: )
 
I'd build a wood tray that's extends 1" past the print washer on 3 sides and over the edge of the sink on the one. It can be raised on the end opposite the sink for drainage.

Given that it should not be holding standing water, I don't think you need to go to the extreme of fiberglassing the inside of this tray. Epoxy type paint should be fine. In fact, even enamel paint with caulked seams should be ok.

Sound plan. Think I will give that a bash. Cheers
 
Why don't you just put something under the lefthand edge of the washer (a folded beer mat).
 
Clive, the washers are seriously heavy when full of water - they need to be supported properly or run the risk of further cracking of the tank. That was the reason for the idea of tilting the board on which the washer sits as an alternative 'angle'.
 
For waterproofing I highly recommend using a two-pack epoxy as used for boat building/finishing. OK, it's expensive, but if you build up 2-3 layers you will only do it once!! I built my sink out of 20mm external ply, with the box glued together with high performance silicon glue (I think it's silicon based - comes in a mastic gun tube and says it will bond anything to anything and be waterproof) and then screwed every 100mm. 2 good coats of epoxy and it looks like it should last for ever.
 
Photrio.com contains affiliate links to products. We may receive a commission for purchases made through these links.
To read our full affiliate disclosure statement please click Here.

PHOTRIO PARTNERS EQUALLY FUNDING OUR COMMUNITY:


Ilford ADOX Freestyle Photographic Stearman Press Weldon Color Lab Blue Moon Camera & Machine
Top Bottom