Help diagnosing an issue with reversal processing B&W negatives?

End Table

A
End Table

  • 0
  • 0
  • 37
Cafe Art

A
Cafe Art

  • 8
  • 3
  • 172
Sciuridae

A
Sciuridae

  • 6
  • 3
  • 172
Takatoriyama

D
Takatoriyama

  • 6
  • 3
  • 169

Recent Classifieds

Forum statistics

Threads
197,658
Messages
2,762,497
Members
99,430
Latest member
colloquialphotograph
Recent bookmarks
0

Pentaxian

Member
Joined
Jan 13, 2022
Messages
12
Location
Alabama, United States
Format
35mm
I've recently gotten back in to photography. So far, I've shot two rolls of Rollei 80s film and reversal processed them. The second roll turned out a tad better, but I've still got to work out some issues with the process.

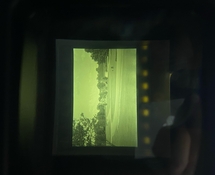
Problem one: The shadowed areas in some shots are clear. They look how you'd expect shadows to look if the film was processed as a negative. The rest of the image turned out how you'd want reversal processed film to turn out: as a positive image. I bracketed exposures, and the clear shadows are much more prevalent in the underexposed slides.

Problem two: The contrast seems to be a bit too low, The mid tones seem muddy to me. Highlights might be a tad too dark, too.

Problem three: There seems to be a bit of fog in the film.

I feel like nailing down the exposure is the solution to Problem One. Maybe there's not enough exposure in the shadows and what is there is lost during the bleach bath, leading to clear shadows instead of dark shadows

Would Problem Two be a developing issue? Develop longer to increase contrast?

Problem Three might be the developer? My first roll was worse, and I thought it might have been fogging from not being in a perfectly dark room while loading my film tank (after my eyes adjusted to the darkness, I could see a tad bit of light seeping in around the door). For roll 2, I used a different bathroom at night, and I could see no light seeping through the door even after my eyes adjusted. The fog exists on roll 2, as well, though

My reversal Process
Step 1: Rinse with water for 3 mins

Step 2: First Developer. I used Dektol 1:10. Continuous agitation for 10 minutes

Step 3: Stop bath for 1 minute

Step 4: Water Rinse. Fill enough water to cover the film and let it sit for 1 minute

Step 5: Bleach. Potassium permangante and sodium bisulfate for 4 minutes

Step 6: Rinse (same as step 4)

Step 7: Clear Bath. Sodium Metabisulfite for 2 minutes

Step 8: Rinse (same as step 4)

Step 9: Re exposure. Take film out of the film tank and hold the reel to the light for 5 minutes. I rolled and flipped the film around the entire time. Light source was LED bulbs in the restroom. Not sure of the lumens, but (iirc), they are 40 watt equivalent bulbs. I might have another box hiding somewhere in the house, and I'll look for it and check for sure

Step 10: Second developer. Dektol 1:2 for 3 mins with constant agitation

Step 11: Rinse (same as step 4)

Step 12: Fixer. LegacyPro fixer. 5 mins, with agitation for 10 seconds at the start of each minute

Step 13: Wash. Fill tank with water, agitate a bit, dump. Repeated multiple times

Step 14: Rinse aid solution

Step 15: dry, inspect, and mount (assuming there's any worth mounting :D )

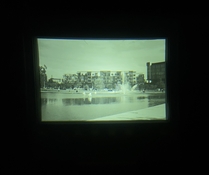
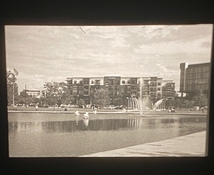
Edit (forgot to attach images): One is an underexposed shot showing clear shadows. Second is a pic of a different shot from the roll in a little slide viewer.
 

Attachments

  • 1.jpg
    1.jpg
    511.9 KB · Views: 75
  • 2.jpg
    2.jpg
    537 KB · Views: 74
Last edited:

DeletedAcct1

Member
Joined
Sep 24, 2020
Messages
869
Location
World
Format
35mm
Insufficient bleaching first. Basically what you've got is a positive image under a negative one. Check your bleach for exhaustion or check it for correct formula. Check also for beisulfate purity, where you get it?
Can you tell us more of you chemical baths composition?
The first developer is too weak, and for too long for the Rollei 80s. Do you use any silver halide solvent?
The fixing bath must be 1+9.
Stop bath is unnecessary.
Water rinses are too short.
Bleach time is too short probably, but tells us first of the bleach bath composition.
 
Last edited:
OP
OP
Pentaxian

Pentaxian

Member
Joined
Jan 13, 2022
Messages
12
Location
Alabama, United States
Format
35mm
Insufficient bleaching first. Basically what you've got is a positive image under a negative one. Check your bleach for exhaustion or check it for correct formula. Check also for beisulfate purity, where you get it?
Can you tell us more of you chemical baths composition?
The first developer is too weak, and for too long for the Rollei 80s. Do you use any silver halide solvent?
The fixing bath must be 1+9.
Stop bath is unnecessary.
Water rinses are too short.
Bleach time is too short probably, but tells us first of the bleach bath composition.

The bleach is a two-part solution. Part A is 4 grams of potassium permanganate and water to make 1 liter. Part B is 55 grams of sodium bisulfate and water to make 1 liter. They are mixed in equal parts just prior to developing.

Clearing bath is 30 grams sodium metabisulfite and water to make 1 liter.

I did not use any silver halide solvent, but maybe I should consider it. The person that wrote the instructions I Found claims it’s not necessary, but that person could be wrong.

Also, I’ll give using a stronger first developer. Maybe Dektol 1:5 or so.

Oh, also. All of the water I mixed the chemicals with is distilled eater, and processing temps were 20C

Thanks for taking the time to respond :smile:
 

DeletedAcct1

Member
Joined
Sep 24, 2020
Messages
869
Location
World
Format
35mm
The bleach is a two-part solution. Part A is 4 grams of potassium permanganate and water to make 1 liter. Part B is 55 grams of sodium bisulfate and water to make 1 liter. They are mixed in equal parts just prior to developing.

Clearing bath is 30 grams sodium metabisulfite and water to make 1 liter.

I did not use any silver halide solvent, but maybe I should consider it. The person that wrote the instructions I Found claims it’s not necessary, but that person could be wrong.

Also, I’ll give using a stronger first developer. Maybe Dektol 1:5 or so.

Oh, also. All of the water I mixed the chemicals with is distilled eater, and processing temps were 20C

Thanks for taking the time to respond :smile:

I'd try Dektol 1:1 or 1:2 at maximum and reduce fd time to 6-8 minutes, adding 0,3g hypo in 300ml of developer solution, at 20°C.
The bleach concentration is fine. Watch out for sodium hydrogen sulfate impurities. If it has chlorine in it the bleach becomes a rehalogenating bleach and massive dmax loss results. Plus, keep agitating the bleach step all the time.
Please report back.
 
OP
OP
Pentaxian

Pentaxian

Member
Joined
Jan 13, 2022
Messages
12
Location
Alabama, United States
Format
35mm
I'd try Dektol 1:1 or 1:2 at maximum and reduce fd time to 6-8 minutes, adding 0,3g hypo in 300ml of developer solution, at 20°C.
The bleach concentration is fine. Watch out for sodium hydrogen sulfate impurities. If it has chlorine in it the bleach becomes a rehalogenating bleach and massive dmax loss results. Plus, keep agitating the bleach step all the time.
Please report back.

Ok, I'm back with some results. In this example, I used a roll of Rollei 400s.

Step 1: Rinse with distilled water

Step 2: First Developer. 500ml of Dektol, diluted 1:3. Also, I added 2 grams of sodium thiosulfate. Continuous agitation for 8 minutes

Step 3: Stop bath

Step 4: Water Rinse with distilled water

Step 5: Bleach. Potassium permangante and sodium bisulfate for 4 minutes (same dilutions as before)

Step 6: Rinse (same as step 4)

Step 7: Clear Bath. Sodium Metabisulfite for 2 minutes (same dilution as before)

Step 8: Rinse (same as step 4)

Step 9: Re exposure. Take film out of the film tank and hold the reel to the light for 5 minutes. I rolled and flipped the film around the entire time. Light source was LED bulbs in the bathroom. 60 watt replacement LED bulbs (800 or so lumens, iirc)

Step 10: Second developer. Dektol 1:2 for 3 mins with constant agitation

Step 11: Rinse (same as step 4)

Step 12: Fixer. LegacyPro fixer. 5 mins, with agitation for 10 seconds at the start of each minute

Step 13: Wash. Fill tank with water, agitate a bit, dump. Repeated multiple times

Step 14: Rinse aid solution

Step 15: dry, inspect, and mount (assuming there's any worth mounting :D )


I have useable slides this time. Useable as in they can be projected. Since this was a test roll, I wasn't horribly concerned with being careful with the soft emulsion caused by the permanganate bleach, so there's some flakes and scratches. Now that I'm more comfortable with getting projectable slides, I'll spend some time perfecting the process.

I'm surprised at the level of grain. I know the projection is kind of small, but I expected much chunkier grain from the film. That seems to be a plus. Downside from the 400s film is the lack of contrast. I've read that the faster films will have less contrast. I wonder if that's something that can be adjusted with development? Or is the film's contrast pretty much what it is with this process? If so, I assume saving the 400s for contrastier scenarios is the way to go?

First attachment is from a handheld slide viewer. Second is a projection from my kodak slide projector. I'm aware the cell phone photos of slides are potato quality.
 

Attachments

  • 1.jpg
    1.jpg
    397.8 KB · Views: 60
  • 2.jpg
    2.jpg
    733.4 KB · Views: 59
OP
OP
Pentaxian

Pentaxian

Member
Joined
Jan 13, 2022
Messages
12
Location
Alabama, United States
Format
35mm
I've also developed a roll of the 80s. Contrast seems to be much higher. It's still hanging in my restroom closet, and I'm kinda tired from work, so I'll probably post examples from that roll tomorrow. Same developing process as the 400s
 

Ivo Stunga

Member
Joined
Apr 3, 2017
Messages
1,162
Location
Latvia
Format
35mm
Came to basically verify what @Alessandro Serrao stated

The shadowed areas in some shots are clear. They look how you'd expect shadows to look if the film was processed as a negative. The rest of the image turned out how you'd want reversal processed film to turn out: as a positive image.
Insufficient Bleaching, resulting in a solarization-like behavior. To fix this you either increase bleach strength, bleaching time or agitation frequency to move fresh chems on film. Continuous agitation seems to be a must. You can actually place the effect to your liking - longer/more complete bleaching will move this effect deeper and deeper in shadows until bleaching is complete and effect doesn't occur anymore.

Problem two: The contrast seems to be a bit too low, The mid tones seem muddy to me. Highlights might be a tad too dark, too.

Problem three: There seems to be a bit of fog in the film.
Underdeveloped.

I did not use any silver halide solvent, but maybe I should consider it. The person that wrote the instructions I Found claims it’s not necessary, but that person could be wrong.
This very much depends on individual emulsions. There are emulsions that don't need this additional activity and some that need, and some that need quite a lot - like tabular grain films.
Considering the underdevelopment, you might want to add some.

Don't forget about agitation: increased agitation frequency increases contrast and chemical activity by moving exhausted developer away from film, introducing fresh. And vice versa - a contrast control tool.
If you didn't do continuous agitation at bleach stahe, do this to increase bleaching activity and bleach to completion.
 

Philippe-Georges

Subscriber
Joined
Apr 11, 2005
Messages
2,659
Location
Flanders Fields
Format
Medium Format
In the below attached pdf file you can see what and how I reversal processed B&W film in my Colenta machine (which I called DDM).
The process is a light variation on the former AGFA-Gevaert Dia-Direct system.
To my experience, the film that responded the best on it was ILFORD's Delta 100.

I am not pretending that your procedure is wrong, nor am I pretending that mine is better, I give it to you as a suggestion...
Out of completeness, I attach the original Dia-Direct data sheet too (sorry for it is in Flemish/Dutch).

DIA-DIRECT p1.JPG
DIA-DIRECT p2.JPG
 

Attachments

  • DDM.pdf
    52.4 KB · Views: 162
OP
OP
Pentaxian

Pentaxian

Member
Joined
Jan 13, 2022
Messages
12
Location
Alabama, United States
Format
35mm
Thanks for all the insight, everyone. I mounted what I thought were the best pics from the Rollei 80s roll. The sun is shining through the only window in the only room with enough room for my projector, so it'll be a couple of hours before I can look at them properly. Till then, I'm gonna go outside and roast some coffee. Be back later with the best roll I've processed so far :smile:
 
OP
OP
Pentaxian

Pentaxian

Member
Joined
Jan 13, 2022
Messages
12
Location
Alabama, United States
Format
35mm
These are crappy phone camera shots of my batch of Rollei 80s. I’m thinking of getting an inexpensive scanner off Amazon. That’ll work better for sharing pics


I feel like I’ve got the exposure down and the process nailed down, mostly. I need to work on keeping the emulsion safe. I’m using legacy pro hardening fixer, but I’m still getting a few scratches and emulsion flaking off. It’s contained mostly to the sprocket holes, but I did end up with a tiny flake in the sky of one of the shots. I’m sure just being more careful will solve most of those issues

Edit: ok so the pics are too large to upload. I’ll do it from my computer when I get home :D
 

Ivo Stunga

Member
Joined
Apr 3, 2017
Messages
1,162
Location
Latvia
Format
35mm
Try bleaching a tad less if emulsion damage occurs.
 
Photrio.com contains affiliate links to products. We may receive a commission for purchases made through these links.
To read our full affiliate disclosure statement please click Here.

PHOTRIO PARTNERS EQUALLY FUNDING OUR COMMUNITY:


Ilford ADOX Freestyle Photographic Stearman Press Weldon Color Lab Blue Moon Camera & Machine
Top Bottom