Help calibrating RH Designs Analyser Pro

Oak

A
Oak

  • 0
  • 0
  • 8
High st

A
High st

  • 5
  • 0
  • 46
Flap

D
Flap

  • 0
  • 0
  • 21

Recent Classifieds

Forum statistics

Threads
199,215
Messages
2,787,978
Members
99,838
Latest member
HakuZLQ
Recent bookmarks
0

FujiLove

Member
Joined
Jun 13, 2014
Messages
543
Location
UK
Format
Multi Format
I ran into some problems calibrating my analyser pro yesterday. Wondering if anyone can help shed some light on where I'm going wrong?

I've been using the analyser successfully with the built-in settings for Ilford Multigrade IV paper (I'm using satin resin coated paper) but I thought I'd try and improve the performance by calibrating it with my enlarger.

Materials and set-up:

Durst M707 colour enlarger (with the colour filters swung out of the way)
Ilford Multigrade under-lens filters
Ilford MGIV RC paper (fresh two weeks ago)
Ilford Multigrade developer and fix (freshly opened yesterday)

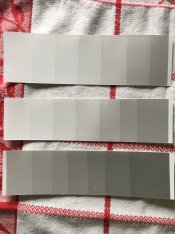
I followed the instructions in the manual and by raising the enlarger head and stopping down the lens obtained an initial measurement of just under 17 seconds. I set the step size to 1/4th second for the first three soft grades and ran a grade 00 test strip. This looked as I would expect, so I continued with grades 0 and 1. Again all fine (top and middle test strips in the attached photo are grades 00 and 0). As suggested in the manual, I changed to 1/6th second for grades 2 and 3 which also looked good.

However, I ran into problems when I tried a grade 4 test strip. I switched to a 1/12th second step size, and grade 4 gave me an exposure time of just over 50 seconds. This seemed a bit high, which was confirmed when looking at the test (bottom strip in the photo). As you can see it's a lot darker than the other two and none of the exposures match the calibration tile.

I had another look though the manual and spotted the note about reducing the exposure by one stop when using a colour enlarger. I did this (by hitting the reduce exposure button twelve times) and ran another test. This one came out completely blank. I.e. all white. I ran a second test with a new piece of paper, in case I'd exposed the back by mistake, but again, same blank test strip.

Queston 1: Thinking about this today, I presume I've misinterpreted the note in the manual about colour enlargers, and they are actually talking about when you use the built in filters in colour enlargers. Is that correct, or am I still missing something?

Question 2: If the above is correct, any idea what's going wrong and what to do about it?

Question 3: To get a lighter print, could I reduce the exposure by half a stop (six clicks of the exposure button) and compensate for that by subtracting 6 from the correction factor?

Question 4: Should I be running all seven test strips using 1/4th second steps to begin with, and only use the finer steps if I want to improve the accuracy later, or am I okay doing what I have been and changing them between grades?

Any pointers would be much appreciated.
 

Attachments

  • test-strips.JPG
    test-strips.JPG
    975.1 KB · Views: 402

R.Gould

Member
Joined
Apr 22, 2010
Messages
1,752
Location
Jersey Chann
Format
Multi Format
You don't need to calibrate the analyser/pro for RC MG 4 as it comes ready calabrited for the paper, that is the defaut setting on all channels, for further calibration info just go to the RH designs website where there is a wealth of information, if the analyser is used then go to offset mode and press clear and the default MG$ 4etting will be restored then go to contrast mode, press clear and factory settings for MG4 will be restored, if new then simply use straight from the box on any channel and MG4 is set, I own and use one of these instruments and the factory setting is spot on, for other papers look at the settings on the RH website, they are spot on, use Agfa for Adox paper, and if you want to try Ilford MG classic I can give you the setting's, for Ilford MG300 use the same settings for Ilford WTFB paper, again spot on, good luck, the analyser/pro is the best bit of darkroom gear I have ever used, paid for itself ten times over in saved paper Just to add, when using a color enlarger without the color filters then do not reduce the exposure, that applies to dialed in filters,I would suggest that you try printing using the in built calibration for MG4 and see how you get on,
Richard
 
Last edited:

removedacct3

Member
Joined
Mar 19, 2009
Messages
628
Location
-
Format
Multi Format
However, I ran into problems when I tried a grade 4 test strip. I switched to a 1/12th second step size, and grade 4 gave me an exposure time of just over 50 seconds. This seemed a bit high, which was confirmed when looking at the test (bottom strip in the photo). As you can see it's a lot darker than the other two and none of the exposures match the calibration tile.

I do not own a Analyser Pro, but a ZoneMaster II. I suspect the calibrating procedure is more or less the same.

The calibration manual of the ZoneMaster II explicitly states that for grade 4 and 5 you need to adjust the time one stop lower before continuing your calibration. Please have a look at page 6 of the calibration manual. Reading the manual I can be confusing but your adjust the exposure time _without_ a -1 stop correction while doing the comparisons.

Good luck,
Marcel

http://www.rhdesigns.co.uk/darkroom/Calibration_Manual_v52.pdf
 
OP
OP

FujiLove

Member
Joined
Jun 13, 2014
Messages
543
Location
UK
Format
Multi Format
I do not own a Analyser Pro, but a ZoneMaster II. I suspect the calibrating procedure is more or less the same.

The calibration manual of the ZoneMaster II explicitly states that for grade 4 and 5 you need to adjust the time one stop lower before continuing your calibration. Please have a look at page 6 of the calibration manual. Reading the manual I can be confusing but your adjust the exposure time _without_ a -1 stop correction while doing the comparisons.

Good luck,
Marcel

http://www.rhdesigns.co.uk/darkroom/Calibration_Manual_v52.pdf

Thanks Marcel, but I'm not sure what you're saying...that I should reduce the exposure for grades 4 & 5, or I shouldn't? If yes, then that contradicts Richard's advice above.

Even more confused now!
 
OP
OP

FujiLove

Member
Joined
Jun 13, 2014
Messages
543
Location
UK
Format
Multi Format
You don't need to calibrate the analyser/pro for RC MG 4 as it comes ready calabrited for the paper, that is the defaut setting on all channels, for further calibration info just go to the RH designs website where there is a wealth of information, if the analyser is used then go to offset mode and press clear and the default MG$ 4etting will be restored then go to contrast mode, press clear and factory settings for MG4 will be restored, if new then simply use straight from the box on any channel and MG4 is set, I own and use one of these instruments and the factory setting is spot on, for other papers look at the settings on the RH website, they are spot on, use Agfa for Adox paper, and if you want to try Ilford MG classic I can give you the setting's, for Ilford MG300 use the same settings for Ilford WTFB paper, again spot on, good luck, the analyser/pro is the best bit of darkroom gear I have ever used, paid for itself ten times over in saved paper Just to add, when using a color enlarger without the color filters then do not reduce the exposure, that applies to dialed in filters,I would suggest that you try printing using the in built calibration for MG4 and see how you get on,
Richard

Thanks Richard. Good to know you found the factory settings work perfectly well. The Analyser is new, and I have found the pre-set values to be absolutely fine with the Ilford MGIV paper. I decided to run the calibrations after reading other people post on here to say the performance of their analysers improved after calibration.

I guess there's no reason for me to run them right now, but regardless, it doesn't explain why I'm seeing such a dark test strip with grade 4.
 

removedacct3

Member
Joined
Mar 19, 2009
Messages
628
Location
-
Format
Multi Format
Thanks Marcel, but I'm not sure what you're saying...that I should reduce the exposure for grades 4 & 5, or I shouldn't? If yes, then that contradicts Richard's advice above.

Yes, you should reduce the exposure, but you shouldn't label it as '-1' when calculating the offset.
 
OP
OP

FujiLove

Member
Joined
Jun 13, 2014
Messages
543
Location
UK
Format
Multi Format
Yes, you should reduce the exposure, but you shouldn't label it as '-1' when calculating the offset.

Ah, I see what you mean. Problem is, when I did that my test strip was blank.
 

Bill Burk

Subscriber
Joined
Feb 9, 2010
Messages
9,327
Format
4x5 Format
The finer steps are really only needed for higher grades because the differences you can see in gray happen much faster in the higher grades.

As you found, with the higher grades, a whole stop can take you off the paper completely.
 

removedacct3

Member
Joined
Mar 19, 2009
Messages
628
Location
-
Format
Multi Format
When calibrating a new-to-me paper I leave the step-size to 1/4 for all grades. Once I have my rough offset values I re-calibrate using a smaller step-size of higher grades.
 

R.Gould

Member
Joined
Apr 22, 2010
Messages
1,752
Location
Jersey Chann
Format
Multi Format
I have used this machine for at least 15 years, maube longer, mine is version 2, but the calibration and settings remain the same, I use a meopta opemus 6, using Ilford above the lens filters, and I have never calibrated my analyser, I use Kentmere paper,adox MCC and Ilford MGclassic FB paper+ MG 300, using the settings on the RH site for the Ilford WT fiber, and my prints are fine, the settings for MG Classic I found after a google search, I suppose I could go though the calibratin process, but as my system is working fine, You say you find the factory settings are fine for you using white light and under the lens filter so my advice would be to make prints rather than spending time in your darkroom calibrating the instrucment, I think the instructions for decreacing exposure Etc are for using the enlarger dialing in the grades using the colour filters, using the white light and MG filters you should be fine as you are, the only slight problem you might encounter is using difusion rather than condenser, but the analyser should take that ito account when measuring, Use it as is if you are happy with the results,
Richard
 
OP
OP

FujiLove

Member
Joined
Jun 13, 2014
Messages
543
Location
UK
Format
Multi Format
You don't need to calibrate the analyser/pro for RC MG 4 as it comes ready calabrited for the paper

Just thinking again about what you said about it being calibrated to Ilford MGIV paper...I'm pretty sure the test strip for grade 4 above actually shows that my system isn't calibrated properly. If it was, the middle tile of the grade 4 test strip would be roughly the same as the ones for grades 00 to 3, but instead it's much darker. Think I need to get back in the darkroom and run another set of tests and see if I can figure out what's going wrong.
 

R.Gould

Member
Joined
Apr 22, 2010
Messages
1,752
Location
Jersey Chann
Format
Multi Format
In my Instruction book it states the analyser/pro comes ready calibrated for MG4 RC, I have printed on MG4 using the factory calibration, perfect, It also states on the RH website that the analyser as standard is calibrated for the MG4 RC, instead of going back and trying to re calibrate for MG4 why not simply try making some prints? that will give you you answer quicker than any amount of testing, after all, you said earlier that you had used it for printing and were happy with the results, so as long as you are happy with the results then simply use it, if you need more info about anything to to with it then go to the RH designs website, Dr Ross, although now retired, and handed over making to SDS, is keeping his website open as a resource for users of the equipment, there is a wealth of imformation up there including videos of how to use and calibrate the equipment,after all he wasone of the inventors of it, and to me your test strips look perfect, exactly what I would expect. the same as any test strips I have ever made with the analyser, so I say don't waste any more paper just enjoy using the machine to make prints, and then if you are not happy with the prints then look at RH website
Richard
 

Ozxplorer

Member
Joined
Aug 29, 2004
Messages
229
Location
Gold Coast, Australia
Format
Multi Format
It also states on the RH website that the analyser as standard is calibrated for the MG4 RC
Richard, I have discovered not all Ilford MGIV papers are of equal speed hence the factory set calibration, while mostly adequate, does not yield consistent results. Generally my paper stock is sourced ex B&H New York in anticipation of manufacturer batch freshness but I nevertheless calibrate each batch as I received it... my developer of choice is Dekrol - another attempt on my part for consistency. One thing the OP can check is that when making the exposure adjustment for the higher grades is to ensure the 1stop variation is properly recorded... I have caught myself, at times, using the -12 and/or +12 compensation incorrectly thereby not achieving the required test strip density.
 

StrangestStranger

Subscriber
Joined
Nov 17, 2012
Messages
64
Location
The Old Dominion
Format
Multi Format
Yes, use the 1/4 step for initial calibration of all grades. And, don't worry about being too precise. If you feel you need a finer calibration, then move to 1/6 or 1/12 step. You only need to make the exposure adjustment for grades 4 and 5 if you are using the filters from a dichroic color filter head. If you are using white light (all the dichroic filters set to 0) and using and MG filter in the light path, then you don't need to make the exposure adjustment. Also, remember that all the PAP channels are set to the same default calibration for MGIV RC paper. So, when you determine your adjustments from the tests, they are offset from that original calibration.
 
OP
OP

FujiLove

Member
Joined
Jun 13, 2014
Messages
543
Location
UK
Format
Multi Format
I have discovered not all Ilford MGIV papers are of equal speed hence the factory set calibration, while mostly adequate, does not yield consistent results.

Yesterday I went back in the darkroom and ran the calibrations once more from scratch. Again, I found that if I used the same exposure for the grade 4 and 5 test strip, none of the exposures matched the light calibration tile—they are much too dark. Dropping the exposure by a stop again resulted in a completely white test strip with no tone. So I ran the test strip again and reduced the exposure by half a stop. This gave me a usable test strip with a tone matching the calibration tile. The manual says to alter the calibration values by +/- 12 for a change of one stop, so I compensated with +/- 6 in my figures.

The interesting thing is that although I'm using Ilford MG IV paper and filters, the paper needed significant calibration, especially the higher grades. Grade 00 is the only one that's correct. Grades 4 and 5 are more than half a stop out.

You only need to make the exposure adjustment for grades 4 and 5 if you are using the filters from a dichroic color filter head

I'm using Ilford under-lens filters, and based on my experience last night, that's not true. No adjustment to exposure resulted in an unusable test strip (way too dark—see my attached photo).

I also produced the step-wedge tests last night (haven't examined them in detail yet). They all look usable, so I'll punch them into the Analyser later. I'll then dig some negatives out that I've already printed with the uncalibrated settings and see how it compares. Will report back.
 

R.Gould

Member
Joined
Apr 22, 2010
Messages
1,752
Location
Jersey Chann
Format
Multi Format
Richard, I have discovered not all Ilford MGIV papers are of equal speed hence the factory set calibration, while mostly adequate, does not yield consistent results. Generally my paper stock is sourced ex B&H New York in anticipation of manufacturer batch freshness but I nevertheless calibrate each batch as I received it... my developer of choice is Dekrol - another attempt on my part for consistency. One thing the OP can check is that when making the exposure adjustment for the higher grades is to ensure the 1stop variation is properly recorded... I have caught myself, at times, using the -12 and/or +12 compensation incorrectly thereby not achieving the required test strip density.
UYnless MG$ has changed in rescent years as I havn't used it for a few years, prefering Kentmere for RC, I don't know what is happening, but I used my Analyser straight from the box with the factory setting for a few years with MG4 and found it to be fine, I have never calibrated my system,I have takem my settins from the RH website, and my prints are pretty much perfect, very occosinally I have slightly adjusted the setting, but 99% of the time the analyser is spot on with any paper, including MG4, mine is the older, second version of the analyser, I guess I have been using it for 15 to 20 years with no problems and found MG4 spot oneven with grades 4/6
Richard
 
OP
OP

FujiLove

Member
Joined
Jun 13, 2014
Messages
543
Location
UK
Format
Multi Format
UYnless MG$ has changed in rescent years as I havn't used it for a few years, prefering Kentmere for RC, I don't know what is happening, but I used my Analyser straight from the box with the factory setting for a few years with MG4 and found it to be fine, I have never calibrated my system,I have takem my settins from the RH website, and my prints are pretty much perfect, very occosinally I have slightly adjusted the setting, but 99% of the time the analyser is spot on with any paper, including MG4, mine is the older, second version of the analyser, I guess I have been using it for 15 to 20 years with no problems and found MG4 spot oneven with grades 4/6
Richard

There are several variables which could be the difference between your experience and mine: emulsion changes, and the filters used are two that come to mind. I've heard that film and paper manufacturers regularly tweak their emulsions, so that could be an issue. Also my under-lens filters are second hand and a few years old. I don't know whether they 'degrade' over time, but I guess that's possible? My test strips clearly show my Analyser was't calibrated to my paper out of the box.
 

R.Gould

Member
Joined
Apr 22, 2010
Messages
1,752
Location
Jersey Chann
Format
Multi Format
The under the lens filters, even a few years old shouldn't be a problem, I used above the lens filters that were 20 years old, bought some new ones and couldn't tell the difference between old and new in testing, printing same neg on same paper using same settings just old and new filter, I can't see Ilford making any changes to the paper that would effect the way it works without some sort of announcement, and in an earlier post you said that you were happy with the results without calibrating for the paper, so again I would say simply try printing on the MG4 with the analyser as is and see how you get on, if you were happy with the outcome without calibrating then why are you so unhappy now ?, I have NEVER spent time calibrating my instrument, for any paper I have used, I have got the settings mostly from the RH designs website, or for the newer MG Classic, I found them on the internet, and I have NEVER found them out, you seem to be having problems calibrating the analyser, so if you realy want to carry on go to the rh designd site at rhdesigns.co.uk where there is more imformation on these tools including advanced help to calibrate them Before you go any further I urge you to go and check the site out
Richard
 
OP
OP

FujiLove

Member
Joined
Jun 13, 2014
Messages
543
Location
UK
Format
Multi Format
The under the lens filters, even a few years old shouldn't be a problem, I used above the lens filters that were 20 years old, bought some new ones and couldn't tell the difference between old and new in testing

Thanks - that's good to know.

if you were happy with the outcome without calibrating then why are you so unhappy now ?

I'm not unhappy at all. But I am relatively new to using the Analyser and don't know anyone else who is using one and who I could take a look at their workflow and prints. Therefore it seemed sensible to run calibration to ensure the Analyser was accurate and working as it should. This process has conclusively shown that it is not accurate for me out of the box, so it has been a worthwhile exercise. Obviously I still need to see if it makes any difference in practice, but I imagine it would because—as I said before—several of the grades were more than half a stop out.
 

R.Gould

Member
Joined
Apr 22, 2010
Messages
1,752
Location
Jersey Chann
Format
Multi Format
The grade difference could be 1/2 grade be entirely due to the fact that your enlarger. being a colour head, is a diffusion head and that makes a difference, it is explained at RH designs website, take a look, all the calibrations are based on a condenser head, a diffusion head is slightly softer, try this your test strips, as far as I can tell on here, look fine to me, pretty much as I would expect using this tool, maybe you could be 1/2 grade up, but very easy to correct, just increase the grade by the 1/2 stop, I know many people using the tool out of the box, thought that the times were to low/high, tried spending days in the darkroom calibrating and then found the analyser was right and they were wrong, when I first started with it I looked at the suggested exposure times/grades must be way out, tried for a week to get it right, then found I was wrong and the analyser was right, the way it reads the negative and sets the exposure times Ect are different to the way we did with test strips, I have learnt to trust it, after all, you say you are happy with the results, so why not simply learn to trust it? remember,that the offset does not enter into the NG4 calibration, none are given, If you REALLY want to find out about calibration the go to the link that takes you to the RH design sitr, click on support then go to calibration snd look at the videos on calibration by Chris Woodhouse, co inventor of the Analyser and study them, forget about the instruction book, follow the video's and calibration is a doddle, if you wanr to calibrate this then I can't think of better advice,As fabox or using r as workflow, with me I use the calibration on RH website, photos? I have several on this site in the Groups in folders,rollei,Tlrs and Leica, mamy made on MG4 or Kentmere VC select, and straight out of the box or using the calibration from RH site, the only differeence is I use a condenser head enlarger, my preference, but I urge you to study RH site for full imformation, much more detailed than the instruction book, which I foound could be misleading
Richard
 
Last edited:

Luis-F-S

Member
Joined
Sep 19, 2013
Messages
774
Location
Madisonville
Format
8x10 Format
I’ve used the unit as it came out of the box never had issues with it or saw a need to calibrate it. I’ve also never printed on RC paper and never will. I use mine on an 810 DeVere with Ilford fb paper. I’d rather print than calibrate anyway.
 
OP
OP

FujiLove

Member
Joined
Jun 13, 2014
Messages
543
Location
UK
Format
Multi Format
I urge you to study RH site for full imformation, much more detailed than the instruction book, which I foound could be misleading

Thanks again. That sounds like sensible advice. I haven't looked at the RH site since I bought the Analyser, but I'll be sue to take a good look around, especially at the calibration videos.
 

mr rusty

Member
Joined
Sep 7, 2009
Messages
827
Location
lancashire,
Format
Medium Format
You don't have to use ilford filters - you can use the filters in the colour enlarger head. You will find guide settings for various heads online. The advantage of the analyser is that it will calibrate to your own colour head filters, no matter what. Watch the video - it does make it easier

I've been away from my darkroom recently because a house refurb project has taken over my spare time, but dipped in recently to print off a particular neg. All my fixer looked like it had gone bad - sediment and bits in, but still tested OK. On with the analyser, and straight off - a decent print. Love it - brilliant bit of kit.

BTW, I'm plotting and scheming my new darkroom at the new place - I'll be back in due course.
 
OP
OP

FujiLove

Member
Joined
Jun 13, 2014
Messages
543
Location
UK
Format
Multi Format
I have NEVER spent time calibrating my instrument, for any paper I have used, I have got the settings mostly from the RH designs website, or for the newer MG Classic, I found them on the internet, and I have NEVER found them out

I finished up the calibrations, punched them into the analyser and guess what? The original, built-in values are much more accurate. LOL!

I have no idea why, and to be honest, I don't care. I'm going to shut up, take your advice and get on with printing with the Analyser! :D
 

R.Gould

Member
Joined
Apr 22, 2010
Messages
1,752
Location
Jersey Chann
Format
Multi Format
I finished up the calibrations, punched them into the analyser and guess what? The original, built-in values are much more accurate. LOL!

I have no idea why, and to be honest, I don't care. I'm going to shut up, take your advice and get on with printing with the Analyser! :D
As I said in an earlier post, when I started using the analyser/pro I would look at the times it gave me and I was sure they were wrong, I would start making test strips, gave me different numbers, I would spend a long time making the print, waste many sheets of paper, eventualy getting what I thought was a reasonabe print from a problem negative, then I would try the analyser/pro settings, as it came from the factory, on MG4, 1,just maybe 2 sheets later I would ebnd up with a prize winning print, perfect, I soon learnt to trust it, and as experiance grew, very quickly, I found out how to take control, for instance sometimes I wanted a bit more cantrast, maybe G3 rather than G2, just press a button and grade and exposure times change and a perfect print emerges, Only time you need to calibrate is if you decide to use a non standard paper that has not be tested by RH or another user, which over here is very unusual, the salibration numbers from RH cover pretty much most paper, Enjoy your time in the darkroom using your analyser/pro
Richard
 
Photrio.com contains affiliate links to products. We may receive a commission for purchases made through these links.
To read our full affiliate disclosure statement please click Here.

PHOTRIO PARTNERS EQUALLY FUNDING OUR COMMUNITY:


Ilford ADOX Freestyle Photographic Stearman Press Weldon Color Lab Blue Moon Camera & Machine
Top Bottom