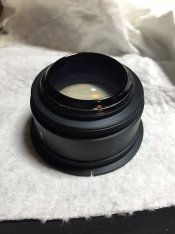
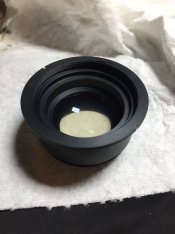
Haze between cemented elements in Mamiya-Sekor C 127mm RB67 lens

Table for four.

H
Table for four.

  • 5
  • 0
  • 37
Waiting

A
Waiting

  • 2
  • 0
  • 49
Westpier

A
Westpier

  • 1
  • 2
  • 51
Westpier

A
Westpier

  • 2
  • 0
  • 36
Morning Coffee

A
Morning Coffee

  • 7
  • 0
  • 75

Recent Classifieds

Forum statistics

Threads
197,583
Messages
2,761,474
Members
99,408
Latest member
Booger Flicker
Recent bookmarks
1

mitchamtuell

Member
Joined
Feb 28, 2018
Messages
24
Location
Georgia, USA
Format
Multi Format
Yep, you read the title right: every lens repairer's worst nightmare.

I recently came into an RB67 for pretty cheap and took it on as a hobby repair project. Finally got around to cleaning out the moldy lens yesterday. Couldn't find a disassembly guide for exactly this lens, but there were some similar ones out there and I used my intuition and got it apart just fine. Cleaned the mildew from the front element, which is just a bare glass piece not in a mount, and the rear element, which appears to be also one piece of glass in a screw mount.

The middle element (is that what to call it?) appears to consist of two pieces of glass cemented into a mount. The pictures show it from the top and bottom. There is definitely yellow haze on the internal faces of the glass. I can't find anywhere online where people talk about how to actually get this apart - everyone just says "if there's haze on the inside you're screwed and should buy another lens". I don't accept that as an answer - I want to fix it!

Does anyone know how to do this? You can see in the picture where I tried to scrape off what appears to be shiny black lacquer so I could unscrew the back piece, which I'm guessing is how it comes apart. Also tried nail polish remover. If I do get it apart, will I be able to get it back together without special calibration tools?

I don't even have a film back for the camera yet so I can't do a test to see if the yellow haze actually affects the photo, but as you can see from the picture comparing it to the rear element, the yellow tint is clearly visible so I'm guessing it will at least throw off the colors, and it appears to be darkening as well.

Thanks for any help you can give me!
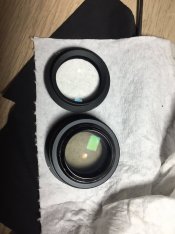
IMG_4077.jpg IMG_4078.jpg IMG_4079.jpg
 

E. von Hoegh

Member
Joined
Sep 14, 2011
Messages
6,197
Location
Adirondacks
Format
Multi Format
It appears that the mount is burnished over the glass, if so it's very problematic. Try exposing it to UV for a couple days.
 

paul ron

Member
Joined
Jan 22, 2004
Messages
2,706
Location
NYC
Format
Medium Format
which cell are you working on... the rear?

ive never seen yellowing between elements in these lenses... its a first. now im curious.
 
Last edited:

flavio81

Member
Joined
Oct 24, 2014
Messages
5,059
Location
Lima, Peru
Format
Medium Format
The middle element (is that what to call it?) appears to consist of two pieces of glass cemented into a mount. The pictures show it from the top and bottom. There is definitely yellow haze on the internal faces of the glass. I can't find anywhere online where people talk about how to actually get this apart - everyone just says "if there's haze on the inside you're screwed and should buy another lens". I don't accept that as an answer - I want to fix it!

"Haze" is not the same as "yellowing".

If the lens is transparent to the light but acts as a yellow filter, you have yellowing.

If there is a cloudish/milkish thingy on the lens that makes it become slightly opaque/translucid, and thus robs contrast, then you have haze. I never heard of haze within lens elements, only on the outer layers of the lens elements, due to oxidation or degradation of the lens coating.

While yellowing usually happens when you have radioactive lens elements, and can be cured by long exposure to UV radiation (i.e. sunlight.)
 
OP
OP
mitchamtuell

mitchamtuell

Member
Joined
Feb 28, 2018
Messages
24
Location
Georgia, USA
Format
Multi Format
It appears that the mount is burnished over the glass, if so it's very problematic. Try exposing it to UV for a couple days.

Yeah the shiny black glue stuff looks like it's right up on the glass. Might be impossible to remove.

which cell are you working on... the rear?

ive never seen yellowing between elements in these lenses... its a first. now im curious.

I guess it should be called the front cell. The back piece that unscrews is fine. Taking the lens apart from the front, we first remove a lens that comes out as just the piece of glass. Behind that is the cemented cell I'm talking about. You've never seen yellowing there? Is it normally too sealed?

"Haze" is not the same as "yellowing".

If the lens is transparent to the light but acts as a yellow filter, you have yellowing.

If there is a cloudish/milkish thingy on the lens that makes it become slightly opaque/translucid, and thus robs contrast, then you have haze. I never heard of haze within lens elements, only on the outer layers of the lens elements, due to oxidation or degradation of the lens coating.

While yellowing usually happens when you have radioactive lens elements, and can be cured by long exposure to UV radiation (i.e. sunlight.)

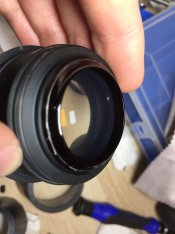
Maybe I'm getting my terms mixed up - you can probably tell I'm new at this! I would say the cell looks distinctly cloudy, as well as yellow. Viewed from the right angle, you can see texture to the yellow buildup on the glass. I took it back apart and tried to get a better picture. You can see a slight dotted texture to the "haze" around the rim. In reality that texture can be seen all over the glass.

Do you think sunlight/UV will help?
IMG_4114.JPG
 

E. von Hoegh

Member
Joined
Sep 14, 2011
Messages
6,197
Location
Adirondacks
Format
Multi Format
Yeah the shiny black glue stuff looks like it's right up on the glass. Might be impossible to remove.


I guess it should be called the front cell. The back piece that unscrews is fine. Taking the lens apart from the front, we first remove a lens that comes out as just the piece of glass. Behind that is the cemented cell I'm talking about. You've never seen yellowing there? Is it normally too sealed?


Maybe I'm getting my terms mixed up - you can probably tell I'm new at this! I would say the cell looks distinctly cloudy, as well as yellow. Viewed from the right angle, you can see texture to the yellow buildup on the glass. I took it back apart and tried to get a better picture. You can see a slight dotted texture to the "haze" around the rim. In reality that texture can be seen all over the glass.

Do you think sunlight/UV will help?
View attachment 198611
The "shiny black glue stuff" is blacking laquer, it does not retain the glass in the mount. "Burnished" means the metal of the mount is formed tightly to the glass, very difficult to undo succesfully.
UV can't hurt, but if the cement is degrading it will need to be recemented in which case it would make economic sense to get another lens.
 
OP
OP
mitchamtuell

mitchamtuell

Member
Joined
Feb 28, 2018
Messages
24
Location
Georgia, USA
Format
Multi Format
The "shiny black glue stuff" is blacking laquer, it does not retain the glass in the mount. "Burnished" means the metal of the mount is formed tightly to the glass, very difficult to undo succesfully.
UV can't hurt, but if the cement is degrading it will need to be recemented in which case it would make economic sense to get another lens.
Ah I see. Hopefully scratching off some of it won't be a problem... Do you think the yellowing could be caused by degrading cement? How would a repairer even go about taking it apart to recement, assuming cost is no issue?
 

E. von Hoegh

Member
Joined
Sep 14, 2011
Messages
6,197
Location
Adirondacks
Format
Multi Format
Ah I see. Hopefully scratching off some of it won't be a problem... Do you think the yellowing could be caused by degrading cement? How would a repairer even go about taking it apart to recement, assuming cost is no issue?
I cannot tell from the pictures. And stop scratching at the paint before you damage the glass, removing it will accomplish nothing.
As for cost, you need to speak to the technician. Qualitatively, far more than the lens is worth.
 
OP
OP
mitchamtuell

mitchamtuell

Member
Joined
Feb 28, 2018
Messages
24
Location
Georgia, USA
Format
Multi Format
I cannot tell from the pictures.
As for cost, you need to speak to the technician. Qualitatively, far more than the lens is worth.
I am not seriously considering paying someone to fix this. I don't have the money right now and like you say it wouldn't be worth it anyway. What I'm asking is what would I be paying the tech to do, so I can try to do it myself.
 

E. von Hoegh

Member
Joined
Sep 14, 2011
Messages
6,197
Location
Adirondacks
Format
Multi Format
I am not seriously considering paying someone to fix this. I don't have the money right now and like you say it wouldn't be worth it anyway. What I'm asking is what would I be paying the tech to do, so I can try to do it myself.
You will need a lathe and the skill to use it. Do you have those? Then you cut the burnished part off, without damaging the glass. Separate, clean, and recement the elements, then you have to machine threads on the mount and machine a threaded retaining ring to hold the glass in. The glass elements have be centered relative to each other when cementing, very tiny tolerances, say a couple ten-thousandths of an inch error can cause trouble.
 
OP
OP
mitchamtuell

mitchamtuell

Member
Joined
Feb 28, 2018
Messages
24
Location
Georgia, USA
Format
Multi Format
You will need a lathe and the skill to use it. Do you have those? Then you cut the burnished part off, without damaging the glass. Separate, clean, and recement the elements, then you have to machine threads on the mount and machine a threaded retaining ring to hold the glass in. The glass elements have be centered relative to each other when cementing, very tiny tolerances, say a couple ten-thousandths of an inch error can cause trouble.
Hmm... That does sound tedious. I do know a bit about machining and kinda have access to some tools, but I have plenty of other hobby projects in the queue so I probably won't go for it. Thanks for the description, though. I'd love to see a pro do it well.

I guess my best bet at this point is to leave the cell in sunlight for a while and see what happens. I'll report back here.
 

shutterfinger

Member
Joined
Feb 25, 2013
Messages
5,020
Location
San Jose, Ca.
Format
4x5 Format
You will need a lathe and the skill to use it. Do you have those? Then you cut the burnished part off, without damaging the glass. Separate, clean, and recement the elements, then you have to machine threads on the mount and machine a threaded retaining ring to hold the glass in. The glass elements have be centered relative to each other when cementing, very tiny tolerances, say a couple ten-thousandths of an inch error can cause trouble
At some point in time a person figured out ho to do this, no one told or taught them how to do it nor did it magically fall out of the sky. Sometimes I can figure out how a mechanical device was made, should work and how to fix it and sometimes not.
Now, http://www.skgrimes.com/library/old-news/old-lenses-can-be-restored-by-re-cementing discusses how to recement lens cells, the linked article at the bottom of the page tells about using a knife to expand the rim of the lens mount so the elements can be removed.
We don't know your skills, hopefully you do. You must risk destroying the lens if doing more than soft heat (placing the lens in a preheated oven between 250°F and 300°F with the heat turned off) or placing under a strong UV light source (the giant sphere of nuclear fission a few million miles away) for a few days.
 
OP
OP
mitchamtuell

mitchamtuell

Member
Joined
Feb 28, 2018
Messages
24
Location
Georgia, USA
Format
Multi Format
At some point in time a person figured out ho to do this, no one told or taught them how to do it nor did it magically fall out of the sky. Sometimes I can figure out how a mechanical device was made, should work and how to fix it and sometimes not.
Now, http://www.skgrimes.com/library/old-news/old-lenses-can-be-restored-by-re-cementing discusses how to recement lens cells, the linked article at the bottom of the page tells about using a knife to expand the rim of the lens mount so the elements can be removed.
We don't know your skills, hopefully you do. You must risk destroying the lens if doing more than soft heat (placing the lens in a preheated oven between 250°F and 300°F with the heat turned off) or placing under a strong UV light source (the giant sphere of nuclear fission a few million miles away) for a few days.

Seems like we have similar philosophies. I don't doubt or disrespect the skill of professionals, but if they learned how to do it so can I. It's especially worth thinking this way when it's not financially practical to pay a professional! I'll check out that article, but I'm still pretty hesitant to embark on this as a project.

How will putting the lens in the preheated oven help me?

Also, the sun works by nuclear fusion, not fission :tongue:
 
Last edited:

E. von Hoegh

Member
Joined
Sep 14, 2011
Messages
6,197
Location
Adirondacks
Format
Multi Format
At some point in time a person figured out ho to do this, no one told or taught them how to do it nor did it magically fall out of the sky. Sometimes I can figure out how a mechanical device was made, should work and how to fix it and sometimes not.
Now, http://www.skgrimes.com/library/old-news/old-lenses-can-be-restored-by-re-cementing discusses how to recement lens cells, the linked article at the bottom of the page tells about using a knife to expand the rim of the lens mount so the elements can be removed.
We don't know your skills, hopefully you do. You must risk destroying the lens if doing more than soft heat (placing the lens in a preheated oven between 250°F and 300°F with the heat turned off) or placing under a strong UV light source (the giant sphere of nuclear fission a few million miles away) for a few days.
The knife blade method risks chipping the glass, and it doesn't always work. Cutting on a lathe works only if there is room within the lens for a retaining ring
Pray tell, how many lenses of this mounting type have you recemented? I've done quite a few.
 

tedr1

Member
Joined
Feb 3, 2016
Messages
940
Location
50 miles from NYC USA
Format
Multi Format
There are probably DIY tutorials online for lens repair such as this.

Once the lens is out of the cell, mark the edges for alignment later. The cement that holds the elements together can sometimes be dissolved in acetone by leaving the lens to soak for a long time (days?) in a small container of suitable size so the glass is covered in acetone. Add a cover because acetone evaporates fast. Having got the elements apart they can be cleaned.

That was the easy part.

The tools and materials needed to put it back together will have to be found.

This project offers the prospect of a lot of fun and learning and a significant risk that the lens becomes scrap.

Does the slight yellowing/haze matter that much?
 

shutterfinger

Member
Joined
Feb 25, 2013
Messages
5,020
Location
San Jose, Ca.
Format
4x5 Format
How will putting the lens in the preheated oven help me?
Heat softens the metal so it will work easier AND it softens the cement between the lens elements which may cause it to clear. Try the sun first or a UV lamp and then try the soft if the UV does not work.

Yellowing of lens from the late 1940's - early 1950's was from Thorium in the sands used to make the glass. Your lens is new enough that this is not likely.
Another possibility is its a coating changing color from age. I would not be concerned unless it causes color/tonality shift in images.
 

shutterfinger

Member
Joined
Feb 25, 2013
Messages
5,020
Location
San Jose, Ca.
Format
4x5 Format
how many lenses of this mounting type have you recemented?
I haven't had the displeasure but have cleared cloudy lens with soft heat.
I would not hesitate to to unroll a crimped lens cell if absolutely necessary or cut it off with a cutting wheel in a Dremel in a router base.
Scraping fingernails on a blackboard, opening umbrellas in the house, walking under ladders but not standing under tall trees during a lightening storm.
 

E. von Hoegh

Member
Joined
Sep 14, 2011
Messages
6,197
Location
Adirondacks
Format
Multi Format
The lens is most likely cemented with either an epoxy, or a UV curing adhesive, Canada Balsam (which will soften if heated) is possible but pretty unlikely. Solvents for epoxy/uv curing adhesive would be methyl chloride or methyl ethly ketone and can take as much as a week of soaking, a Summitar (epoxy, I think, definitely not uv in 1946 and not balsam either) took longer. Good luck, but try bleaching with UV first.
 

flavio81

Member
Joined
Oct 24, 2014
Messages
5,059
Location
Lima, Peru
Format
Medium Format
I don't know why so much fuzz about it.

I see no haze in the pictures. Thus, no reason for removing the lens. Even if there was haze, this usually occurs on the surface of the lenses. So no reason for removing the lens.

The yellowing should be taken care in the usual way. Search for "radioactive Takumar UV"
 

E. von Hoegh

Member
Joined
Sep 14, 2011
Messages
6,197
Location
Adirondacks
Format
Multi Format
I haven't had the displeasure but have cleared cloudy lens with soft heat.
I would not hesitate to to unroll a crimped lens cell if absolutely necessary or cut it off with a cutting wheel in a Dremel in a router base.
Scraping fingernails on a blackboard, opening umbrellas in the house, walking under ladders but not standing under tall trees during a lightening storm.
Presuming anything survives the Dremel treatment, how do you propose to put it back together?
 

AgX

Member
Joined
Apr 5, 2007
Messages
29,973
Location
Germany
Format
Multi Format
You will need a lathe and the skill to use it. Do you have those? Then you cut the burnished part off, without damaging the glass. Separate, clean, and recement the elements, then you have to machine threads on the mount and machine a threaded retaining ring to hold the glass in. The glass elements have be centered relative to each other when cementing, very tiny tolerances, say a couple ten-thousandths of an inch error can cause trouble.
One would not need a lathe to take off the lens group. One would not need a thread and retaining ring to hold that group again.
There are descriptions of delaminating a cemented group and recementing, both for balsam and curing cement.

The OP has nothing to lose: the lens is faulty, a commercial repair uneconomic, he has not got the money anyway (though the group repair is still not for free).
 
Last edited:

E. von Hoegh

Member
Joined
Sep 14, 2011
Messages
6,197
Location
Adirondacks
Format
Multi Format
One would not need a lathe to take off the lens group. One would not need a thread and retaining ring to hold that group again.
There are descriptions of delaminating a cemented group and reccemting, both for balsam and curing cement.

The OP has nothing to lose: the lens is faulty, a repair uneconomic, he has not got the money (though the group repair is still not for free).
It appears the lens is in an aluminum mount, and I cannot tell from the pictures exactly how the glass is retained in the mount. It appears to be burnished, i.e. the edge turned over the glass while spinning the mount slowly. I've never had any success raising the edge in an aluminum mount, only brass and not even then a few times.
 

feanolas

Member
Joined
May 17, 2011
Messages
17
Format
35mm
I have done exactly that on several Mamiya lens, it seems quite common for Mamiya rear elements. The only option I could find is to remove the thin collar on the lathe. After recementing, I glued it back in place, works pretty well actually !
 
OP
OP
mitchamtuell

mitchamtuell

Member
Joined
Feb 28, 2018
Messages
24
Location
Georgia, USA
Format
Multi Format
I have done exactly that on several Mamiya lens, it seems quite common for Mamiya rear elements. The only option I could find is to remove the thin collar on the lathe. After recementing, I glued it back in place, works pretty well actually !

Can you describe this process more in detail? Do you have pictures? I think I'm going to take a shot at it and would like to be as prepared as possible.
 
Photrio.com contains affiliate links to products. We may receive a commission for purchases made through these links.
To read our full affiliate disclosure statement please click Here.

PHOTRIO PARTNERS EQUALLY FUNDING OUR COMMUNITY:


Ilford ADOX Freestyle Photographic Stearman Press Weldon Color Lab Blue Moon Camera & Machine
Top Bottom