I thought my recent experience with this might be of interest to some around here who may be concerned about the failing lining of an otherwise nice Hasselblad body…
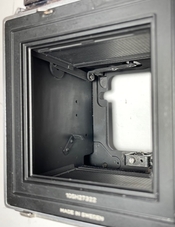
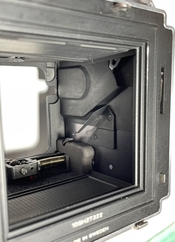
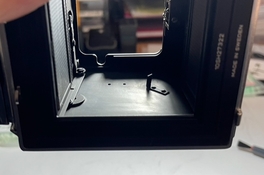
About 15 years ago, I bought a nice-looking used 501CM body to keep as a backup. The film advance was jammed for some reason and the owner was apparently keen to go digital, so it came at a very good price. Anyway, I recently decided to fix the film advance issue and use the body. While I was at it, I realised that the palpas lining was in quite bad shape and starting to shed a bit of dust. So, after some hesitation, I thought I would have a go at removing it. By all accounts, no repair person will touch that particular issue, so what to lose? Long story short, the palpas can in fact be very cleanly removed, without filling the body with dust or leaving goo behind. It can be done without damaging the thin internal walls. The camera body does not need to be disassembled at all. However, done properly and carefully, it is a tedious and time-consuming process, which explains why it would generally not be worth the time of a professional camera repairer.
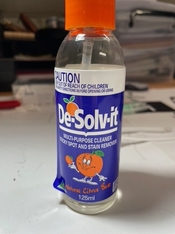
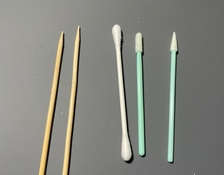
There were basically three layers to the deteriorating palpas. The top layer was quite dry black dust that is easily dislodged. Then there was a layer of soft black sludge, with a consistency a bit like damp soil. Finally there was a gooey adhesive layer. I used a long sharp bamboo skewer to plough up the top two layers, and a modified vacuum nozzle to remove any dust and debris as I produced it. With a bit of care, the tip of the skewer also worked very well to lift and roll up a lot of the bottom adhesive layer as well. A common citrus-based adhesive remover (‘De-Solv-it’ here in Australia) on the tip of a cotton bud or foam swab did an excellent job of loosening and lifting all remaining adhesive. Finally, a good wiping with isopropyl alcohol on a cotton bud removed the residue of the citrus cleaner and any remaining bits of goo.
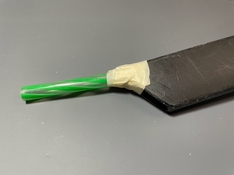
The secret was to work in small sections, vacuuming up any debris as soon as it was produced. I used a workshop dust collector nozzle with a drinking straw taped inside it. This allowed a strong and precise vacuum, but plenty of airflow around the outside of the straw meant the suction never got out of control. I also avoided using any metal tools to avoid scratching up the camera walls. Anyway, I’m very happy with how the body cleaned up. I’m sure it would be possible to make a real mess of this job, but with care it is doable.
The next job is to decide what to put inside the body in place of the palpas. Carefully cut sections of self-adhesive flocked optical paper (as used inside telescope tubes) would make a very neat job, but I am concerned about shedding of the flocking fibres over time. I am currently leaning towards some ultra-flat black Krylon paint, but will do a few experiments first.
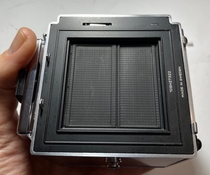
A few photographs of the cleaned camera to follow.
About 15 years ago, I bought a nice-looking used 501CM body to keep as a backup. The film advance was jammed for some reason and the owner was apparently keen to go digital, so it came at a very good price. Anyway, I recently decided to fix the film advance issue and use the body. While I was at it, I realised that the palpas lining was in quite bad shape and starting to shed a bit of dust. So, after some hesitation, I thought I would have a go at removing it. By all accounts, no repair person will touch that particular issue, so what to lose? Long story short, the palpas can in fact be very cleanly removed, without filling the body with dust or leaving goo behind. It can be done without damaging the thin internal walls. The camera body does not need to be disassembled at all. However, done properly and carefully, it is a tedious and time-consuming process, which explains why it would generally not be worth the time of a professional camera repairer.
There were basically three layers to the deteriorating palpas. The top layer was quite dry black dust that is easily dislodged. Then there was a layer of soft black sludge, with a consistency a bit like damp soil. Finally there was a gooey adhesive layer. I used a long sharp bamboo skewer to plough up the top two layers, and a modified vacuum nozzle to remove any dust and debris as I produced it. With a bit of care, the tip of the skewer also worked very well to lift and roll up a lot of the bottom adhesive layer as well. A common citrus-based adhesive remover (‘De-Solv-it’ here in Australia) on the tip of a cotton bud or foam swab did an excellent job of loosening and lifting all remaining adhesive. Finally, a good wiping with isopropyl alcohol on a cotton bud removed the residue of the citrus cleaner and any remaining bits of goo.
The secret was to work in small sections, vacuuming up any debris as soon as it was produced. I used a workshop dust collector nozzle with a drinking straw taped inside it. This allowed a strong and precise vacuum, but plenty of airflow around the outside of the straw meant the suction never got out of control. I also avoided using any metal tools to avoid scratching up the camera walls. Anyway, I’m very happy with how the body cleaned up. I’m sure it would be possible to make a real mess of this job, but with care it is doable.
The next job is to decide what to put inside the body in place of the palpas. Carefully cut sections of self-adhesive flocked optical paper (as used inside telescope tubes) would make a very neat job, but I am concerned about shedding of the flocking fibres over time. I am currently leaning towards some ultra-flat black Krylon paint, but will do a few experiments first.
A few photographs of the cleaned camera to follow.
Last edited: