• Welcome to Photrio!
    Registration is fast and free. Join today to unlock search, see fewer ads, and access all forum features.
    Click here to sign up

Has anyone wall mounted an Enlarger?

Coburg Street

A
Coburg Street

  • 1
  • 1
  • 58
Jesus

A
Jesus

  • 1
  • 1
  • 54

Recent Classifieds

Forum statistics

Threads
201,737
Messages
2,829,371
Members
100,923
Latest member
GB-A2
Recent bookmarks
0

hoffy

Member
Allowing Ads
Joined
Jan 21, 2009
Messages
3,073
Location
Adelaide, Au
Format
Multi Format
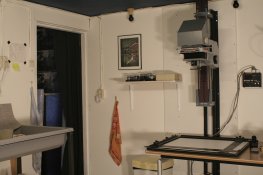
Just on 2 years ago, I got my hands on a LPL 7450 enlarger. While it was exactly what I was after, the unit is a bit heavy to move around each time I want to setup the darkroom (a laundry - the enlarger sits on a chest freezer), so what I want to do is wall mount it. The previous owner had it wall mounted and gave me the top and bottom brackets that he had manufactured. He had it mounted on a brick wall.

The wall that I would be mounted on is a cavity wall, with timber studs/noggins and plaster board. From what I can tell, there is one noggin, with the stud spacing being 600mm.

What I intend to do is build a frame out of 50mm x 25mm x 1.6mm RHS (Rectangular Hollow Section tube) and weld a 10mm floor plate to it. This way the frame will actually sit on the floor, which will take most of the weight. I would then attach the frame to the stud and noggin, where I can. The Chest freezer will then become the base board (or I will simply place the actual base board on the freezer - at least that is flat!)

Has anyone else wall mounted an enlarger? How have you gone about it? Is what I am suggesting a bit of overkill?

Cheers
 

Mick Fagan

Subscriber
Allowing Ads
Joined
Sep 13, 2005
Messages
4,434
Location
Melbourne Au
Format
Multi Format
Yep, I have.

I used the same wall mounting kit to wall mount an LPL 7700 enlarger and the first model LPL 7450.

I also run a stud wall with 600mm centres, over which I have plaster board, probably identical to your walls.

Basically look at my picture of my darkroom that I have attached. What I'm talking about is behind my current enlarger. Those pieces of MDF have been there for something like 17 years, which is when I picked up my DeVere 504.

You will see a small piece of 19mm MDF up the top, and a much larger piece down the bottom.

Between these two, I ran another piece of 19mm MDF, about 250mm to maybe 300mm in width from the top to the bottom.

I shimmed the board so it was vertical (north south) which makes it easy (ish) to align your enlarger with your moveable table.

I then attached the enlarger to the vertical 19mm MDF, aligning it to an east west vertical.

Piece of cake.

Mick.

Darkroom_Wall_P1080600.jpg
 

Ian Grant

Subscriber
Allowing Ads
Joined
Aug 2, 2004
Messages
23,409
Location
West Midland
Format
Multi Format
I've mounted enlargers on the wall in the past but always brick wall. You need to take some care as it's a cavity wall can you not drill into the breeze block behind the plaster board, depends on how cavity walls are built I guess in Australia. Here in the UK it's breeze block then cavity & insulation then brick or other outer facing so easy to drill into the breeze block and use expansion bolts. You'd still need something between the brackets and the plaster board to spread the load.

Ian
 
OP
OP
hoffy

hoffy

Member
Allowing Ads
Joined
Jan 21, 2009
Messages
3,073
Location
Adelaide, Au
Format
Multi Format
Ahh, this is an internal cavity wall, so its typically 90 x 45 mm pine between the plaster board. This is very typical in Australia, with just about every brick veneer home built like this since about 1980.

I know that on the side that I want to mount the enlarger, its plasterboard on the wall. The other side, its fibre cement
 
Joined
Mar 18, 2005
Messages
451
Location
Toronto
Format
Medium Format
I had a Durst Laborator 1000 mounted, using the Durst Uniwal apparatus. We did not have access to studs. Lepage PL adhesive was used to glue a 3/4" thick piece of wood onto drywall. Screws were put in mainly to allow the adhesive to bond. I was skeptical at first, but you could hang off that thing. I'm not exaggerating - I tried yanking it down before I put the enlarger onto the Uniwal mount. It's been up there for more than a year and seen a lot of use. We used the same approach to mounting an 8x10 enlarger. You could use the PL adhesive along with the studs you have access too and you'd be in business.

lab1000-wall-mount.jpg
 

mgb74

Subscriber
Allowing Ads
Joined
Jan 24, 2005
Messages
4,783
Location
MN and MA US
Format
Multi Format
This is what Omega sells for their 4x5 enlargers. Any decent welding shop could easily replicate; though for your straight-columned LPL you might need to be a bit further from the wall. Perhaps the one you have accomplishes the same thing.

With all due respect to those who have done so, I would not rely on screws into MDF nor would I rely on anything glued to sheetrock (plaster board). It might have adequate shear strength (ability to resist a straight down movement), but I question the tensile strength (ability to resist pulling out). In the case of gluing to sheetrock, it's not the strength of the glue, but the adherence of the paper facing to the rest of the sheetrock. With MDF, screws don't have much to bite into, though coarse thread screws are best.

In Marco's example, the wood appears to be plywood (I could be wrong) and resting on the floor. It's not clear to me how Mick attached the enlarger to the MDF to hold it's weight.

In the OP's case, I would mount a 2"x8" or 2"x10" pine board (obviously the metric equivalent available to him) across 3 studs using lag screws into the stud. Attach a plate like the one I referenced or use the one he has. Or even build a "shelf" out of 2x8. I would also anchor the enlarger column at the top.

I would also be concerned about using the freezer as a base as it will vibrate when the condenser is running (of course, you can always turn it off).

Just my 2 cents.
 

Johnkpap

Member
Allowing Ads
Joined
Aug 21, 2006
Messages
293
Location
Australia
Format
Medium Format
Hi Hoffy

I have wall mount kits for both my Durst AC 800 and my L1200, the Ac800 kit is made of 2 brackets, the l1200 has a twin rail setup and the enlarger can move up and down on it very neat, in my old darkroom I just bolted them to the concrete wall with dyna bolts, in my new darkroom (nearly finished just installing the big sink) I won't be wall mounting the ac800 too much stuffing around with alignment ect, I managed to find a base board for it when a pro lab closed its doors, this solves alot of problems with programming and setting up the AC800

As I have a base board for the l1200 I will be mounting the rail behind the enlarger so that if I decide to use my roll paper unit again i can, or if I need to do a giant print or part enlargement I can do this too.

The best way I have come up with is mounting the l1200 rail on a large bit of thick particle board which will then be glued with liquid nails and screwed to the frame points for extra support. A Durst l1200 is very heavy so I don't want it to fall off the wall.......

You should be able to do something like this or use drywall anchors they sell them at bunnings (L1200 is too heavy) LPL enlargers are a lot lighter :- Durst over engineers everything this is good as they last forever.

Good luck

Johnkpap
 
Last edited:

Mick Fagan

Subscriber
Allowing Ads
Joined
Sep 13, 2005
Messages
4,434
Location
Melbourne Au
Format
Multi Format
Ahh, this is an internal cavity wall, so its typically 90 x 45 mm pine between the plaster board. This is very typical in Australia, with just about every brick veneer home built like this since about 1980.

I know that on the side that I want to mount the enlarger, its plasterboard on the wall. The other side, its fibre cement

Yep about the same here.

If you look carefully you will see my pencil marks that outline the wall frame, which is probably 90x45mm. Follow the vertical lines downward. I did that for the entire darkroom, made fixing stuff to the walls easy as. It's a purpose built darkroom, which is the result of purchasing a 2 bedroom house and no spare bedroom for the darkroom, so, a bungalow in the back yard. The darkroom HWS also supplies the external backyard shower for the back yard sauna. :D

I would think twice about using liquid nails on MDF. Liquid Nails is a great product, but if the veneer of the MDF comes off, it could be interesting.

I found that by using MDF screws and in the case of the next sheet of MDF which actually held the vertical wall mount, I used 80mm screws that went right through the top two MDF boards and into the timber frame of the wall. Using screws to put the final board on, also allows for easy shimming. I found that when I held the board vertical I got a correct vertical measurement in the spirit level. Once I screwed the board in, the spirit level shifted a tad. Took a couple of goes,if I remember correctly.

By the way, my darkroom is a bungalow with external fibre cement walls as well.

Mick.
 

Hilo

Subscriber
Allowing Ads
Joined
Apr 19, 2011
Messages
922
Format
35mm
Durst L1000. The wall mount is long so I cut a piece out of the table . . . What took most time was to level the enlarger and the table . . .

But so worth it, as it turned this enlarger into something very special.
 

Attachments

  • doka 5.jpg
    doka 5.jpg
    941.3 KB · Views: 739
OP
OP
hoffy

hoffy

Member
Allowing Ads
Joined
Jan 21, 2009
Messages
3,073
Location
Adelaide, Au
Format
Multi Format
This is what Omega sells for their 4x5 enlargers. Any decent welding shop could easily replicate; though for your straight-columned LPL you might need to be a bit further from the wall. Perhaps the one you have accomplishes the same thing.

With all due respect to those who have done so, I would not rely on screws into MDF nor would I rely on anything glued to sheetrock (plaster board). It might have adequate shear strength (ability to resist a straight down movement), but I question the tensile strength (ability to resist pulling out). In the case of gluing to sheetrock, it's not the strength of the glue, but the adherence of the paper facing to the rest of the sheetrock. With MDF, screws don't have much to bite into, though coarse thread screws are best.

In Marco's example, the wood appears to be plywood (I could be wrong) and resting on the floor. It's not clear to me how Mick attached the enlarger to the MDF to hold it's weight.

In the OP's case, I would mount a 2"x8" or 2"x10" pine board (obviously the metric equivalent available to him) across 3 studs using lag screws into the stud. Attach a plate like the one I referenced or use the one he has. Or even build a "shelf" out of 2x8. I would also anchor the enlarger column at the top.

I would also be concerned about using the freezer as a base as it will vibrate when the condenser is running (of course, you can always turn it off).

Just my 2 cents.
OK, first things first, you can have 5 cents worth. They got rid of 2 cent pieces in Australia 20 years ago :wink:

As for using the freezer for the base board, that is something I have been doing since I set up the darkroom, as I carry my current enlarger in each time and put it on that. I have an easy solution to the vibrations - I turn the freezer off! The enlarger gets plugged into the freezer wall socket. When I finish for the session, I just unplug the enlarger and plug the freezer back in.

I am still thinking that a self standing steel frame is going to be best, with a couple of screws into the stud to keep it level. Now to measure up, buy some steel (easy said than done on a weekend) and find someone who has a welder!

I just need to be mindful/careful of the water pipes that I have just remembered run inside this cavity.....
 
Last edited:
OP
OP
hoffy

hoffy

Member
Allowing Ads
Joined
Jan 21, 2009
Messages
3,073
Location
Adelaide, Au
Format
Multi Format
And....... scrap that.

The water pipe in the wall has all of a sudden gotten me paranoid. So, it will be move in/move out each time I set up. If I take the column off the board each time, its not so bad. My next challenge is finding somewhere in the house to keep the enlarger. It gets too dusty in the shed.

Cheers and thanks for your input anyway.
 

MattKing

Moderator
Moderator
Allowing Ads
Joined
Apr 24, 2005
Messages
55,117
Location
Delta, BC Canada
Format
Medium Format
The water pipe in the wall has all of a sudden gotten me paranoid.
They have technology to map out in wall plumbing you know.
Works much like the "stud finders" you can pick up here in any hardware store.
 

Johnkpap

Member
Allowing Ads
Joined
Aug 21, 2006
Messages
293
Location
Australia
Format
Medium Format
Hi Hoffy
One question, How big is your shed? My new darkroom is in the back corner of mine, I built a room in it and
lined it with gyprock it has power and very soon plumbing for the big sink. No dust and no moving in and setting up and putting it all away again !!!

To move my Durst L1200 is a total pain you have to remove the condensers or mixing box and then you can break it into 3 big bits !!! not something I want to do every time I need to print.

Regards

Johnkpap
 

Ian Grant

Subscriber
Allowing Ads
Joined
Aug 2, 2004
Messages
23,409
Location
West Midland
Format
Multi Format
This is what Omega sells for their 4x5 enlargers. Any decent welding shop could easily replicate; though for your straight-columned LPL you might need to be a bit further from the wall. Perhaps the one you have accomplishes the same thing.

That's essentially what I had made to mount my Dursts to the wall but any local engineering shop can make one for a fraction of that price :D

Ian
 

GRHazelton

Subscriber
Joined
May 26, 2006
Messages
2,251
Location
Jonesboro, G
Format
Multi Format
While not an enlarger, I wall-mounted my Acoustic Research ES-1 record deck. While the deck is well isolated from acoustic vibration via its internal spring isolation system, my sprung floor made its use problematic at its 1.25 gram tracking force. I used a piece of nominal 1 x 6 clear pine stock which spanned two studs of the outside brick veneer wall. This was screwed with two long wood screws to each stud. The commercially available "bracket", has a floating turntable support board which can be leveled with adjustment screws, then was screwed to the 1 x 6. The result is immunity to foot-falls, even jumping up and down. Mission accomplished!

I'd imagine that a bracket made of heavy oak would be adequate for an enlarger wall mount without the expense of metal fabrication.

Now, for an enlarger on my sprung floor I'd need a similar setup for an easel platform. Of course someone with a concrete floor and a masonry walls shouldn't have floor vibration problems....vibration might be a danger signal!
 

Johnkpap

Member
Allowing Ads
Joined
Aug 21, 2006
Messages
293
Location
Australia
Format
Medium Format
Hi Hoffy

I forget sometimes that I have a rather a large shed for a inner suburb of Adelaide, there is room for 2 cars, workshop, storage and my new darkroom

I actually know of a photographer who bought a really small car so he could setup a small darkroom in the back of a shed/carport under a 2 story unit.

johnkpap
 
OP
OP
hoffy

hoffy

Member
Allowing Ads
Joined
Jan 21, 2009
Messages
3,073
Location
Adelaide, Au
Format
Multi Format
Hi Hoffy

I forget sometimes that I have a rather a large shed for a inner suburb of Adelaide, there is room for 2 cars, workshop, storage and my new darkroom

I actually know of a photographer who bought a really small car so he could setup a small darkroom in the back of a shed/carport under a 2 story unit.

johnkpap
Well, now, I didn't realise you were from Adelaide! Maybe I should use your darkroom? :wink:

I'm in an outer suburb and built my house. The garage looked big enough on paper until we actually moved in. But we were young and inexperienced - next time I'll add at least another 2 metres to the end of the garage!
 

Johnkpap

Member
Allowing Ads
Joined
Aug 21, 2006
Messages
293
Location
Australia
Format
Medium Format
Hi Hoffy
Yes if you have something you need to do that requires a larger darkroom I would be happy to let you use it, I am currently about 8 weeks from completing it
my durst enlargers can handle from 110 to 4x5 inch film, and my sink can not take trays bigger than 16x20 inches. I live in a Semi Industrial area in Welland near Hindmarsh

If you contact me off line we can chat about it maybe we can learn a thing or two from each other

Johnkpap
 

mgb74

Subscriber
Allowing Ads
Joined
Jan 24, 2005
Messages
4,783
Location
MN and MA US
Format
Multi Format
Well, now, I didn't realise you were from Adelaide! Maybe I should use your darkroom? :wink:

I'm in an outer suburb and built my house. The garage looked big enough on paper until we actually moved in. But we were young and inexperienced - next time I'll add at least another 2 metres to the end of the garage!

They (garages) shrink. Really - they do. I've build 4 garages in my lifetime and every one was smaller once used then they appeared in the plans.
 
OP
OP
hoffy

hoffy

Member
Allowing Ads
Joined
Jan 21, 2009
Messages
3,073
Location
Adelaide, Au
Format
Multi Format
They (garages) shrink. Really - they do. I've build 4 garages in my lifetime and every one was smaller once used then they appeared in the plans.
You're right there - according to the plans, my garage SHOULD have been 6m x 6m - easily enough for 2 cars (still too small in reality). We ran the tape measure over it years after the house was built and it came in at like 5.8m x 5.2. Oh well, its not like I was ever going to buy that 59 Cadillac anyway :wink: (we still fit 2 cars in there, but not much else.)

Hi Hoffy
Yes if you have something you need to do that requires a larger darkroom I would be happy to let you use it, I am currently about 8 weeks from completing it
my durst enlargers can handle from 110 to 4x5 inch film, and my sink can not take trays bigger than 16x20 inches. I live in a Semi Industrial area in Welland near Hindmarsh

If you contact me off line we can chat about it maybe we can learn a thing or two from each other

Johnkpap
Its all good. Theoretically, I should be able to print up to 16 x 20 at home, with washing being my only main concern, but yes, I will contact you via PM. Its nice to know who are local - there are a few of us around (but not so many on APUG anymore).
 
Photrio.com contains affiliate links to products. We may receive a commission for purchases made through these links.
To read our full affiliate disclosure statement please click Here.

PHOTRIO PARTNERS EQUALLY FUNDING OUR COMMUNITY:


Ilford ADOX Freestyle Photographic Stearman Press Weldon Color Lab Blue Moon Camera & Machine
Top Bottom