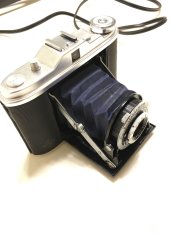
Getting a grip on a triplet with a glued front element?

TEXTURES

A
TEXTURES

  • 0
  • 0
  • 11
Small Craft Club

A
Small Craft Club

  • 0
  • 0
  • 14
RED FILTER

A
RED FILTER

  • 0
  • 0
  • 12
The Small Craft Club

A
The Small Craft Club

  • 0
  • 0
  • 12
Tide Out !

A
Tide Out !

  • 0
  • 0
  • 5

Recent Classifieds

Forum statistics

Threads
198,893
Messages
2,782,671
Members
99,741
Latest member
likes_life
Recent bookmarks
0

BHuij

Member
Joined
Oct 12, 2016
Messages
858
Location
Utah
Format
Multi Format
I've done one of these 6x6 folders before with Agfa brand Eternal Green Cement (tm). One overnight soak in denatured alcohol and the next morning it came apart with finger pressure no problem.

I just obtained another one that I'm restoring. Shutter and aperture are pristine and seem to be working perfectly (although I haven't measured shutter speed accuracy yet). So the potential for this to be a really nice backpacking camera is there.

But the removed front and mid element assembly has been soaking in 99% isopropyl alcohol for about 24 hours now. Lots of green stuff coming out, but no dice on getting it to budge yet. I've been using vice grips with cushioned jaws, but I don't think it's the right tool for the job. I have to choose between getting a grip too light to support the torque I need, or heavy enough to slightly distort the circular lens into an oblong shape, which is not conducive to unscrewing (same problem a lot of people get when trying to unscrew two stuck filters).

Is there a tool I can pick up at a local ACE or Home Depot that would allow me to get a more even grip that maintains the lense's circular shape but really gives me a solid hold? Or some technique I could use or thing I could McGyver together to hold it positively? I refuse to be defeated by an oz of glass and a few drops of "grease."
 

KN4SMF

Member
Joined
Mar 7, 2019
Messages
334
Location
US
Format
Traditional
Methylene chloride. You were only lucky the time you used alcohol. I once used methylene chloride on a Hasselblad lens and I believe it had to soak a month. That was after using acetone for a month and getting nowhere. alcohol certainly would have been worthless. I believe all told I had 3 months in that lens. but methylene chloride is the strongest of all. I don't know about green stuff coming out. I don't know why that would be. but i can assure you if you do as I say, you might even be through with the project in a week. You have to be patient and let the chemical do the job. Don't use tools; you'll be very sorry.
 
OP
OP
BHuij

BHuij

Member
Joined
Oct 12, 2016
Messages
858
Location
Utah
Format
Multi Format
The green stuff is the polymerized grease that originally served as lube. The alcohol is definitely dissolving it. Whether it's penetrating effectively into the locked up threads or not... hard to say, but as long as green stuff is still coming out, I assume the alcohol is finding new grease to dissolve.
 

Kino

Subscriber
Joined
Jan 20, 2006
Messages
7,763
Location
Orange, Virginia
Format
Multi Format
Try heating it up with a hair dryer. Of course, pour off the existing alcohol before waving a glowing element nearby!

I have found liberal application of heat to these green-goo cemented lens mounts will allow the lens to unscrew.

Just did it yesterday on a Welmy 35mm rangefinder with a totally frozen focusing mount and it unscrewed pretty easily.

Wear gloves, you have to work fast while the lens and shutter are too hot to touch with a bare hand, but not so hot to damage surrounding materials...

(edit: works for just lens elements in barrels too...)
 
Last edited:

KN4SMF

Member
Joined
Mar 7, 2019
Messages
334
Location
US
Format
Traditional
Nevermind, I'm sorry. I misunderstood. I thought you were trying to get cemented glass elements apart.
 

moto-uno

Member
Joined
Sep 28, 2009
Messages
585
Location
Burnaby, B.C
Format
Medium Format
A properly sized stainless steel hose clamp should keep it round and allow a grip to loosen it . Peter
 
OP
OP
BHuij

BHuij

Member
Joined
Oct 12, 2016
Messages
858
Location
Utah
Format
Multi Format
Here's hoping. We're up to 48 hours in the 99% Isopropyl alcohol now and it still hasn't budged. I tried hose clamps, but don't have ones small enough. So I tried some zip ties, but couldn't get them to hold. I might try that again with some rubber glued to them or something to grant more grip between the plastic and lens housing.

I have tried heat both from the oven at its lowest setting and the hair dryer. Both times the lens got too hot to touch for several minutes, but I still couldn't get any movement whatsoever.

I finally picked up some denatured alcohol tonight. Maybe it penetrates better than Isopropyl; it is what worked for me last time I did this, a few years ago. Fingers crossed.
 

Kino

Subscriber
Joined
Jan 20, 2006
Messages
7,763
Location
Orange, Virginia
Format
Multi Format
Well, as long as you are getting color from soaking, you are making progress.

I once worked on a lens cell from a TLR that I had to soak in acetone for a week before it would unscrew, but that's rather risky...
 

NedL

Subscriber
Joined
Aug 23, 2012
Messages
3,388
Location
Sonoma County, California
Format
Multi Format
I've got one with the focus stuck by Agfa eternal green cement too.... I read somewhere that lighter fluid is a good solvent for it, but haven't tried it yet.
 

TonyB65

Member
Joined
Dec 13, 2017
Messages
265
Location
Hungerford
Format
Multi Format
I've put one in a simmering pan of water on a cooker hob, it worked perfectly and warmed the grease enough to take the lens apart, clean and re-assemble.
 
OP
OP
BHuij

BHuij

Member
Joined
Oct 12, 2016
Messages
858
Location
Utah
Format
Multi Format
I may try putting it in hot water today. It just went overnight in denatured alcohol. As soon as I put my 1 year old to sleep, I’ll give it another shot. If I still can’t move it and the alcohol doesn’t have any green in it, I’ll boil the sucker.

I really think I’m to the point where I just need to get a better grip on it so I can torque it apart without crushing the roundness out of shape.
 
OP
OP
BHuij

BHuij

Member
Joined
Oct 12, 2016
Messages
858
Location
Utah
Format
Multi Format
This thing has really been a bear. It’s been more or less constantly soaking in either 99% Isopropyl or Denatured alcohol for 4 days. It’s not even discoloring the alcohol anymore. I’ve tried boiling it a few times, I’ve tried a hair dryer twice and the oven once. I’ve also tried a 3-in-1 penetrating oil.

It hasn’t moved one iota.

Any other suggestions? It was inexpensive enough that I’m not opposed to some more drastic and risky methods of separating the two elements at this point. It’s no good to me stuck together.
 

KN4SMF

Member
Joined
Mar 7, 2019
Messages
334
Location
US
Format
Traditional
Needs to be gripped in something like a lathe chuck.
 

Dan Daniel

Subscriber
Joined
Jul 4, 2009
Messages
2,885
Location
upstate New York
Format
Medium Format
I've used a hose clamp as a pry device for this kind of problem. Rubber for plumbing gaskets as a protective sleeve, a couple of layers, then a metal hose clamp. Study the clamp design for which direction would place the least pressure on the lens part. this was after heating in an oven with a pilot light overnight.
 

Kino

Subscriber
Joined
Jan 20, 2006
Messages
7,763
Location
Orange, Virginia
Format
Multi Format
Got a picture of the thing to share?

Any remote chance it is left-hand thread?
 
OP
OP
BHuij

BHuij

Member
Joined
Oct 12, 2016
Messages
858
Location
Utah
Format
Multi Format
So miracle of miracles, it finally budged today after roughly 4 days total in alcohol. I didn't have time to keep at it, but this was with finger pressure (wearing rubber gloves for grip). Didn't have time to keep at it right then, but definite progress. I threw it back in the alcohol and I'm about to try and tackle it. I'll see if I can get some pics.
 
OP
OP
BHuij

BHuij

Member
Joined
Oct 12, 2016
Messages
858
Location
Utah
Format
Multi Format
Victory. My fingers are feelin' it, but I finally got that dang lens to bend to my will.

Still stuck, but starting to budge. Note all the dings on it from tools haha. Ugly, but the threads are fine and the glass is flawless.
MQAEWif.jpg


After getting it unscrewed. The most difficult thing I've ever unscrewed in my entire life.
PwCOCLJ.jpg


Cleaned thoroughly of any trace of green, re-lubricated, glass final cleaned, and reassembled; ready to re-collimate.
jfJnsrJ.jpg


Collimated (need to verify with a roll of film, but I'm fairly confident I got it dialed in), focus ring reinstalled.
OZyjcEV.jpg


The bellows are shot of course, I am waiting on some materials to ship to make a replacement. I also need to measure the shutter speeds to see how far off they are.

All in all, this project camera is coming along, and I'm hopeful it will end up being a great backpacking camera.
 
OP
OP
BHuij

BHuij

Member
Joined
Oct 12, 2016
Messages
858
Location
Utah
Format
Multi Format
Thanks! These Vario shutters aren't terribly accurate for me historically. This one is very consistent, so usable, but 1/25 is closer to 1/15, 1/50 is right on, and 1/200 is about 1/80. That said, I usually carry FP4+ in 120, which I rate at EI 80, so the slower speeds are a plus for me. Maybe one of these days I'll find a "for parts" Isolette with a nicer shutter I can cannibalize.
 

KN4SMF

Member
Joined
Mar 7, 2019
Messages
334
Location
US
Format
Traditional
No Iris shutter is accurate. Never seen one yet that was.
 

Dan Daniel

Subscriber
Joined
Jul 4, 2009
Messages
2,885
Location
upstate New York
Format
Medium Format
So miracle of miracles, it finally budged today after roughly 4 days total in alcohol. I didn't have time to keep at it, but this was with finger pressure (wearing rubber gloves for grip). Didn't have time to keep at it right then, but definite progress. I threw it back in the alcohol and I'm about to try and tackle it. I'll see if I can get some pics.

Congratulations! Patience seems to be key? I guess considering that it took a few decades to seize up, taking a week to undo is pretty fast, actually.
 
OP
OP
BHuij

BHuij

Member
Joined
Oct 12, 2016
Messages
858
Location
Utah
Format
Multi Format
Well compared to the other one I did which was one overnight soak and then slid right apart the next morning, it was tough, but it's done.

I put a roll of TMX through it to check that my shutter speed measurements were correct and that the focus was working properly. Everything seems great, negatives look good. The Agnar lens is surprisingly sharp once you get to f/8-f/11ish.

Here's the best part: I ordered this on eBay from a seller who didn't know anything about it, including its condition or whether it was working. Figured it wouldn't be a bad idea to have a donor camera on hand in case the shutter was irreparably stuck or something, so I went to KEH. They had the perfect candidate, an Isolette I with a Vario shutter and Agnar lens listed as UGLY, with note "inoperative." It was $12, so I picked it up.

It got here today. It's an Isolette II I believe. It has a Compur-Rapid shutter and an Apotar lens, and the focusing mechanism is creamy smooth. Shutter and aperture seemed fine, so I tested the shutter speeds using my normal method with Audacity. Every single speed from 1s to 1/500th was within 1/3 of a stop or less, with most being dead on. The 1/500th measurement is admittedly pretty unreliable with the audio waveform method, but it appeared to be around 1/400. The lens has no marks on it. Bellows needs replacement of course, but that's literally every Isolette.

Now that I've done 75% of the work refurbishing the Isolette I, I accidentally ended up with a perfectly functioning one with better shutter and optics for $12. I think I know which one is going to get a new set of bellows first :D
 
OP
OP
BHuij

BHuij

Member
Joined
Oct 12, 2016
Messages
858
Location
Utah
Format
Multi Format
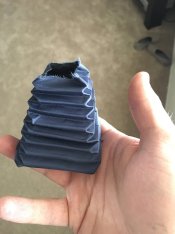
Just got the bellows on. I used two layers of polyurethane coated blackout ripstop nylon for the inner coat, regular paper for ribs, and a navy blue taffeta nylon for the outer layer to give it just a bit of decoration. Two layers of that nylon was just barely showing a tiny bit of illumination when I popped a 1:1 flash right up on it stretched tight with my eye pressed right up against it.

After installation I’m getting zero light transmission with my brightest flashlight from any angle. I will be doing a final torture test by leaning it out for a few hours in the sunlight to see if that fogs a frame of 400 speed film, which is the fastest I’ll ever really be using in it.

Fabricating the bellows wasn’t as bad as I thought it would be. Next time I’ll use something a little stiffer for ribs just so they’re a little easier to find during the folding process. I didn’t measure the total thickness of the three fabric layers + ribs, but if anything it seems a little thinner than the original bellows. Certainly no real resistance when folding up.

I have a Moskva 5 on the way that will likely need a new bellows. Glad to have the confidence that I can make and install one.

6634867C-25F5-4400-B630-FE1ECB8D5D67.jpeg E9BA2E5C-B33F-44C3-9737-6B22B8702C4F.jpeg
 
Photrio.com contains affiliate links to products. We may receive a commission for purchases made through these links.
To read our full affiliate disclosure statement please click Here.

PHOTRIO PARTNERS EQUALLY FUNDING OUR COMMUNITY:


Ilford ADOX Freestyle Photographic Stearman Press Weldon Color Lab Blue Moon Camera & Machine
Top Bottom