General Darkroom Tips/Tricks Thread

Advertisements.jpg

H
Advertisements.jpg

  • 0
  • 0
  • 0
Sonatas XII-85 (Farms)

A
Sonatas XII-85 (Farms)

  • 2
  • 1
  • 38
Water Gods Sputum

H
Water Gods Sputum

  • 2
  • 0
  • 50
Cash

A
Cash

  • 7
  • 4
  • 140

Recent Classifieds

Forum statistics

Threads
200,290
Messages
2,805,596
Members
100,197
Latest member
EdwardLuke
Recent bookmarks
0

craigclu

Subscriber
Joined
Sep 8, 2002
Messages
1,314
Location
Rice Lake, Wisconsin
Format
Multi Format
I didn't quickly find any specific area that this seemed to be a primary thread topic so I thought I'd start one. There are so many little tips that one would accumulate when working directly with others in darkroom activities and this seems to be a great, modern place to pass on those small tidbits that might enhance their darkroom experiences. Some very basic ideas that one person might take for granted as common knowledge might not have been so obvious or discovered on one's own....

Here's one to start:

When measuring dry chemicals, place the supply container, cover off, onto your scale (assuming digital), then tare. The scale will measure negative values as you remove material. This allows you to tap off your spoon on the receiving vessel and better account for clinging material and also helps to avoid mistakes of over-adding that can occur when trickling directly to the receiving vessel or spoon from the supply. It seems so obvious but when I was first shown this, it created one of those forehead flattening moments for me!

Related... I also reload for firearms target shooting. The inexpensive grain scales used for this easily handle very small quantity measuring. I keep my formulas on spreadsheets, with a side column showing the grain equivalent to grams. One gram = 15.4324 grains so if you need 0.2 grams, my recipe also shows the easily measured grain equivalent of 3.1 grains.
 
Joined
Jan 24, 2005
Messages
279
Format
Multi Format
If you don't know what side the emulsion is on with fiber matte paper lick a corner of it! the slippery side is the emulsion.

(took me a few tries when I first used matte fiber to find out where the emulsion was)
 

BWGirl

Member
Joined
May 15, 2004
Messages
3,049
Location
Wisconsin, U
Format
Multi Format
If you must put your trays on a flat counter, fold a beach towel in thirds the long way and place it under the trays. Makes it easy to rock the trays! :smile:

(Good idea, this thread!)
 

MurrayMinchin

Membership Council
Subscriber
Joined
Jan 9, 2005
Messages
5,500
Location
North Coast BC Canada
Format
Hybrid
Oxygen and light are the enemy of developers and wine bags are the solution...you know...the wine that comes in a mylar bag in a cardboard box with a brown removable spigot? Lay the box on its back, pour the developer in, put the spigot back on, open the pour spout, and push out all the air. Developer lasts forever and the hangover depends on the quality of wine.

Murray
 

Ed Sukach

Member
Joined
Nov 27, 2002
Messages
4,517
Location
Ipswich, Mas
Format
Medium Format
craigclu said:
Related... I also reload for firearms target shooting. The inexpensive grain scales used for this easily handle very small quantity measuring. I keep my formulas on spreadsheets, with a side column showing the grain equivalent to grams. One gram = 15.4324 grains so if you need 0.2 grams, my recipe also shows the easily measured grain equivalent of 3.1 grains.

Interesting... I also reload.

I've been contemplating the purchase of one of the RCBS (or...?) digital scales, for both reloading and chemistry. Something like a 1500 gram capacity to .01 gram resolution (~ 0.1 grain?) and Metric/ English switchability.

Any word on whether they are worth it?
 

Flotsam

Member
Joined
Sep 30, 2002
Messages
3,221
Location
S.E. New Yor
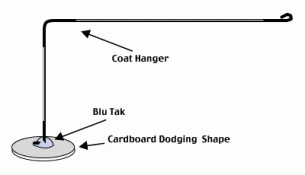
Here's a simple but useful gimmick that I came up with years ago when I was printing 10 hours a day in a custom lab. I'm still using the first one that I made.

By bending the wand so that the handle is about four inches higher than the dodging shape, not only does it throw a more out of focus shadow but the shadow of the handle moves around much more radically than the shape while dodging. No more prints ruined by wand shadow, ever.
 

Attachments

  • dodger.gif
    dodger.gif
    3 KB · Views: 646

arigram

Member
Joined
Sep 21, 2004
Messages
5,465
Location
Crete, Greec
Format
Medium Format
Enlarger wall bracket

I noticed that my enlarger shakes a bit, so I decided to buy the wall mount for it. It was expensive and it could take a month or two to be delivered but I couldn't wait that long. So I made a bracket myself to atleast hold the top of the column steadilly. The bracket of my enlarger has a plastic top with a "pocket" at the back, probably for the company's bracket. You can adapt it for your own. The only probably with it is that it limits a bit the height that the head can go up, so I might need to adjust a couple things.

As you can see, its just two L brackets and a couple extra things that you can easily find in your local hardware store. If I can find the stuff in Crete, you can!
 

Bob Carnie

Subscriber
Joined
Apr 18, 2004
Messages
7,735
Location
toronto
Format
Med. Format RF
Good thread

Here is my 2cents

When setting up to print I follow this method to have sharp corners when printing , assuming the enlarger is aligned

take neg stage out and lift arm of head and project light at the magnification you are going to work at.
place easel under light and center the blades so that all four edges are within the circle of light projected.
place negative in glass carrier ,centered as much as you can and put in enlarger.
Observe where the negative lands on the easel, If it is not dead nuts in the center , take out the carrier and move the NEG and try again untill it is centered.
Take the negative stage out again and black masking tape the back end of the glass carrier to cut out the raw light .
Put back into the enlarger, Your Bulb, negative stage, lens stage and easel are now in a row.

If you are using non glass carriers and you find that you cannot do this , Well that is the reason I use glass carriers.
 

Max Power

Member
Joined
Sep 7, 2004
Messages
598
Location
Aylmer, QC
Format
Multi Format
Sort of a darkroom trick

So, last Christmas I renovated my upstairs bathroom...I ripped out everything including a shower in the corner.

The shower had one of those Delta 'scald control' water mixing units which gives maintains a very constant temperature once all warmed up. Instead of pitching it into the recycling bin, I took the unit and installed it in my darkroom. It maintains a very constant temperature and didn't cost me a fortune as would a 'real' darkroom water panel.

Everyone knows someone who is doing a bathroom renovation; keep your eyes and ears open for a unit like this and it will be well worth the investment.

Kent
 

dschneller

Member
Joined
Nov 1, 2004
Messages
317
Location
Port Credit,
Format
Multi Format
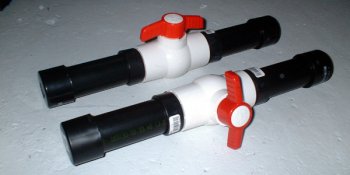
4x5 Daylight Developing Tubes

I created some 4x5 sheet developing tubes with a twist. By putting a ball value between the tubes, they are now light tight between chemical changes.

Dave
 

Attachments

  • completed2.JPG
    completed2.JPG
    63.6 KB · Views: 422

photobackpacker

Advertiser
Advertiser
Joined
Mar 21, 2005
Messages
430
Location
Minnesota
Format
4x5 Format
Flotsam said:
Here's a simple but useful gimmick that I came up with years ago when I was printing 10 hours a day in a custom lab. I'm still using the first one that I made.

By bending the wand so that the handle is about four inches higher than the dodging shape, not only does it throw a more out of focus shadow but the shadow of the handle moves around much more radically than the shape while dodging. No more prints ruined by wand shadow, ever.

Holy Pnumbra, Floatsam! A fuzzy twist!! I like it.
 

photobackpacker

Advertiser
Advertiser
Joined
Mar 21, 2005
Messages
430
Location
Minnesota
Format
4x5 Format
Ed Sukach said:
Interesting... I also reload.

I've been contemplating the purchase of one of the RCBS (or...?) digital scales, for both reloading and chemistry. Something like a 1500 gram capacity to .01 gram resolution (~ 0.1 grain?) and Metric/ English switchability.

Any word on whether they are worth it?

I, too am a shooter and reload around 20,000 shotgun shells per year. The powder scales are pretty limited - you are limited by the upper limit of the weight these scales will handle.

There are some excellent Chinese import scales on ebay that are really great. I bought one of these and am pleased with it.
 
OP
OP
craigclu

craigclu

Subscriber
Joined
Sep 8, 2002
Messages
1,314
Location
Rice Lake, Wisconsin
Format
Multi Format
A simple habit I've gotten into after seeing someone else do it.... I snip the sharp corners of the negatives I cut (any amount will do). This makes them slide easily into the sleeves without catching on the way in.
 

argentic

Member
Joined
Sep 7, 2002
Messages
317
Location
Echandelys,
Format
4x5 Format
craigclu said:
A simple habit I've gotten into after seeing someone else do it.... I snip the sharp corners of the negatives I cut (any amount will do). This makes them slide easily into the sleeves without catching on the way in.

To easily snip the corners in the dark I use a big size nailclipper. Works like a charm with 4x5, 120 and 35 mm alike.

I mounted my RH Zonemaster and Stopclock Pro on an inclined bookshelf, at eyes height above the workdesk, between two enlargers. Much easier to look at, and my desktop is less cluttered.
 

Blighty

Member
Joined
Oct 11, 2004
Messages
914
Location
Lancaster, N
Format
Multi Format
It can be tricky loading 120 film onto a paterson spiral. I take a piece of discarded 120 film (about 4~5 inches in length) and locate it in the groove below the take up point on the spiral. This stops the film buckling downwards into the spiral whilst it's being fed in. Once the film has 'caught', one simply pulls the 'discard' out of the spiral. BLIGHTY.
 
OP
OP
craigclu

craigclu

Subscriber
Joined
Sep 8, 2002
Messages
1,314
Location
Rice Lake, Wisconsin
Format
Multi Format
I was out of my normal liquid concentrate fixer this AM and went rummaging for base chemicals or something to bale me out. I found an old Kodak 1 gallon bag of hardening fixer. This reminded me of a method a friend showed me for easily mixing this quantity of powdered chemical. I used a 1 gallon glass thumb hole jug (like apple cider, etc comes in). I placed the right temp water and entire pack of chemical in and simply roll the bottle back and forth. There is very little aeration and you can easily see when it goes into suspension. The bottle is easy to decant from or in this case, I'll use it up fast enough that I'll likely just use it from the mixing jug.
 

Flotsam

Member
Joined
Sep 30, 2002
Messages
3,221
Location
S.E. New Yor
I was looking for a way to suspend wet prints over the trays or the water bath while the excess solution drained back into the trays without having to stand there holding it.

Solution:
A couple of days ago I took a cheap (under $10 ) clamp-to-the-edge-of-a-desk swing arm desk lamp that I had lying around, sacrificed the lamp part and then stuck a bolt suitable for hanging a clip though it. I use a pair of plastic locking tongs so that I can just grab a print in the tray, lock it, and hang it to drain without splashing. It swings easily and adjusts to the proper height over any tray or the water holding bath. When it isn't needed, just push it back out of the way.

A small convenience that I use dozens of times during a session
 

Max Power

Member
Joined
Sep 7, 2004
Messages
598
Location
Aylmer, QC
Format
Multi Format
I use a changeing bag to load my reels and I found that after a couple of minutes, it got kinda humid in the bag (eww, gross!) and made the loading more difficult.

To counteract this, I now throw in 5-6 dessicant packages before I start the process. It works like a charm!

I also use the dessicant packages in the ziplocks into which I put my bulk loaders before I put them into the refrigerator.

Kent
 

Flotsam

Member
Joined
Sep 30, 2002
Messages
3,221
Location
S.E. New Yor
Not a darkroom tip so much but I have found that after diveing under and out of a darkcloth a few times, my hair (what is left of it) starts to look like Nick Nolte's in his DUI mug shot. Not that I mind frightening children and being known as "That crazyman in the park that wears a black cape and stares at a three legged accordian." but static electrified hair gets bothersome.

I've found that one of those linen cycling caps, the thin beanie type, usually covered with advertising, with the small bill that is traditionally worn to the back is the perfect under-the-darkcloth cap. Light, close-fitting, absorbant and has the total mass of a small handkerchief. Easy to stuff in a pocket. They should just call them LF photographer's caps.
 

blackmelas

Member
Joined
Aug 25, 2004
Messages
374
Location
Greece
Format
35mm RF
Flotsam said:
Here's a simple but useful gimmick that I came up with years ago when I was printing 10 hours a day in a custom lab. I'm still using the first one that I made.

By bending the wand so that the handle is about four inches higher than the dodging shape, not only does it throw a more out of focus shadow but the shadow of the handle moves around much more radically than the shape while dodging. No more prints ruined by wand shadow, ever.
A couple of weeks ago I made a buy that led me to create a variation of Neal's bent handle dodging wand. I bought one of those magnets with an 18" flexible wire and handle at a hardware store. They market them for picking up dropped screw from hard to reach places. With this I create a mask or a shape for dodging and put three or four staples through the center (with the bent arms of the staples up so as not to scratch the print if using the shape as a mask). With the magnet I then can quickly pick up the mask in the middle of an exposure or exhange dodging shapes.
James
 

pgomena

Member
Joined
Jun 25, 2003
Messages
1,391
Location
Portland, Or
A trick I learned to control print developer temperatures in warm/cold darkroom conditions was to keep a quart ziplock of ice or hot water handy. Swish it through the tray a few times until your thermometer comes back to temperature. Usually only takes a few seconds and keeps developing times consistent.

Pete Gomena
 

Mongo

Member
Joined
Jan 17, 2004
Messages
960
Location
Pittsburgh,
Format
Multi Format
pgomena said:
A trick I learned to control print developer temperatures in warm/cold darkroom conditions was to keep a quart ziplock of ice or hot water handy. Swish it through the tray a few times until your thermometer comes back to temperature. Usually only takes a few seconds and keeps developing times consistent.

Pete Gomena
I do a similar thing, but I use half-filled plastic 1L soda bottles. They freeze quickly in the freezer, and can bring a few liters of water down a few degrees in a matter of minutes. I keep a couple of them all of the time, and grab a frozen one when the one I've been using has to go back into the freezer. I also keep a couple filled with hot water handy during a session in the darkroom. Works like a charm...and since they're only half full they're easy to pick and hold onto by the top.
 
Last edited by a moderator:
Joined
Dec 12, 2004
Messages
2,360
Location
East Kent, U
Format
Medium Format
One handy printing tool which some people seem not to have heard of is a piece of black paper rolled into a cone (with a hole at the bottom) for localised burning-in - preferably 2 cones of different sizes, one can be very long, just 3 or 4 inches shorter than the enlarging lens/paper distance for your favorite print size. You can of course make a similar shape with your hands, but the paper cone is much easier and more consistent.

Another thing I would not be without in the darkroom is my Hama press-to-open stainless steel print tongs. Some people love to plunge their hands into chemicals, I avoid this at all costs, saves so much hand-washing in between finishing one print and going to pick up the next sheet of unexposed paper.
 
OP
OP
craigclu

craigclu

Subscriber
Joined
Sep 8, 2002
Messages
1,314
Location
Rice Lake, Wisconsin
Format
Multi Format
I was reminded last evening of something that works for me when I'm dealing with gnarly paper in the darkroom. I use the two sided easy-release tape that 3M includes with their window insulating kits. It's very thin (about 3 mils) and my borderless easel is a perfect place to add the extra flatness for control of curled or uneven paper. A few small strips, each located at trouble points seems to last many darkroom sessions and doesn't seem to intefere with focus issues (I've rationalized that it's much better than an uncontrolled surface). It's just slightly too sticky initially and the first few sheets need to be carefully removed but they quickly settle in with just the right adhesion.
 

MurrayMinchin

Membership Council
Subscriber
Joined
Jan 9, 2005
Messages
5,500
Location
North Coast BC Canada
Format
Hybrid
I don't have a temperature controlled water supply in my darkroom, but my print washer does...well, sort of. I took an old dial thermometer and inserted it through a small incision just below where the intake hose attaches to the tap, then sealed things up with duct tape. This way I know what temperature is going in instead of what's coming out.

That 'burning in cone' caught my attention...when using a card with a hole in it, the light goes through the hole, hits the paper, bounces back up to the card, some of which then bounces back to the paper. A cone would end that!

Murray
 
Last edited by a moderator:
Photrio.com contains affiliate links to products. We may receive a commission for purchases made through these links.
To read our full affiliate disclosure statement please click Here.

PHOTRIO PARTNERS EQUALLY FUNDING OUR COMMUNITY:


Ilford ADOX Freestyle Photographic Stearman Press Weldon Color Lab Blue Moon Camera & Machine
Top Bottom