Frustrated, need help deving 4x5

IMG_0675.jpeg

H
IMG_0675.jpeg

  • 0
  • 0
  • 0
Six Arches Bridge

A
Six Arches Bridge

  • 2
  • 0
  • 455
Sonatas XII-41 (Homes)

A
Sonatas XII-41 (Homes)

  • 0
  • 1
  • 784
Singing Choir

H
Singing Choir

  • 1
  • 2
  • 953
Reparations

A
Reparations

  • 0
  • 0
  • 802

Recent Classifieds

Forum statistics

Threads
199,581
Messages
2,793,588
Members
99,957
Latest member
pluton
Recent bookmarks
0

gbenaim

Member
Joined
Nov 3, 2004
Messages
441
Format
8x10 Format
Well, it seems every time I process some 4x5 sheets, I get some sort of problem! I started out doing it in a tank, taco style, but then some of the corners wouldn't develop because they'd stick out too much. So I switched to trays, one by one, doing DBI, and that worked for a while, until I started getting uneven dev. (denser edges). So I tried doing a bunch at a time, following directions by S Simmons, MAS, and assorted forumers, and managed to get scratches smack in the middle of every one of the 5 sheets I did (did them emulsion down, 8x10 tray, 1 liter of developer). So I went back to single sheets, and managed to get both uneven development and bromide drag along the edges! I think I've covered every possible technical mistake so far!
So, what I need is your best fool-proof method, preferably tray processing as it's most easily done w DBI which I'm really liking, as well as tips on how to deal w all this frustration! Thanks,

GB
 

John Bartley

Member
Joined
Sep 12, 2004
Messages
1,386
Location
13 Critchley
Format
8x10 Format
Well, I've always like simplicity in my life, and I've found tubes to be the simplest way to develop sheet film.

here's how I build my tubes (change sizes for 8x10) : Dead Link Removed (available daytime eastern only, not at night)

As far as technique, I've found that slooowww continuous agitation is best, and the chemical choice is yours - anything that works in trays or tanks should work in tubes. I left trays to go to tubes after I found that I was getting scratches in some negs and I also found that I like working in light better than the dark.

The one drawback is speed - at one sheet per tube, it's not speedy, but I figure speed can come after quality.

cheers
 
Joined
Jan 21, 2003
Messages
15,708
Location
Switzerland
Format
Multi Format
I still like the trays, but I found that emulsion side up works great for me. I don't know if it's the Photographers' Formulary, but there is a tray, which you put in a larger tray. It's divided up so you can have many sheets in the tray at the same time, in a grid, without them overlapping (causing uneven development).
I never could get the shuffle thing right. I use a 16x20 tray with two plastic dividers that are alligned as a cross to make four 8x10 trays. Four at a time is about all I can handle and get good results.

- Thom
 

Ole

Moderator
Moderator
Joined
Sep 9, 2002
Messages
9,245
Location
Bergen, Norway
Format
Large Format
JOBO 2521 tank with 2509n spiral in an old CPE, at slow speed. Perfectly even development of up to six sheets at a time, no scratches.

I use a 2830 paper tank for 5x7", 18x24cm and 24x30cm films. Even slides come out just fine :smile:
 

David A. Goldfarb

Moderator
Moderator
Joined
Sep 7, 2002
Messages
19,974
Location
Honolulu, HI
Format
Large Format
I use various methods including trays, and I process emulsion side up. If you do DBI, you need to look at the base side, but I would still process emulsion up to avoid scratching the emulsion on the bottom of the tray.

You might also consider tanks and hangers, which have very low risk of scratching, and it's easy to do DBI with them.
 

Amund

Member
Joined
Nov 18, 2004
Messages
902
Location
Oslo,Norway
Format
Multi Format
Sounds to me like you`re giving up too easily.
I get perfect negs by developing in trays, but you have to practice to get it right.
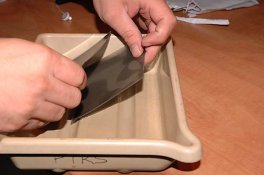
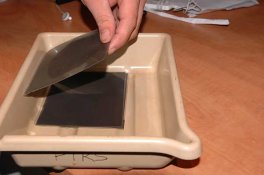
I develop up to ten sheets in a 5x7 tray. I keep the negatives together all the time, and carefully lift the stack a little and then slide the neg at the bottom up(picture 1), without touching the others. I make sure I have contact with the neg and edge of the tray(picture 2)before I carefully place it on top of the other negs again. I usually use my other hand to hold the other negs together in picture 2, bet left it out for the illustration. This way even Efke film comes out fine.
 

Attachments

  • dev-1.jpg
    dev-1.jpg
    19.9 KB · Views: 155
  • dev-2.jpg
    dev-2.jpg
    18.4 KB · Views: 137

David A. Goldfarb

Moderator
Moderator
Joined
Sep 7, 2002
Messages
19,974
Location
Honolulu, HI
Format
Large Format
And you'll notice that Amund is processing emulsion side up.
 

Monophoto

Member
Joined
Aug 27, 2004
Messages
1,689
Location
Saratoga Spr
Format
Multi Format
GB -

I started out doing tray development. That was fine, but in spite of all the precautions, there was always a risk of scratching. Then a couple of years ago I discovered sloshers. Since then, not a single scratch. And they work for DBI.

A slosher is nothing more than a plastic cradle that holds the film emulsion-side-up as you process it in a tray. Each sheet of film is in its own compartment so that they can't move against each other to cause scratches. Agitation is by lifting alternate corners of the slosher and then dropping them back down into the solution. That forces the solution to flow through the holes in the bottom and sides, and around and over the individual sheets.

You can buy a commercial slosher, but I found that it was just as simple (and less expensive) to make my own. I used 1/4" plaxiglass from Home Despot - cut it on a table saw, and use a hole saw in an electric drill to drill circular holes in the bottom. Used plexiglass cement to put the pieces together (that's a bit hard to find - but a good glass shop should have it). My six-sheet slosher fits into an 11x14 tray and uses just 800ml of solution (I use HC-110, dilution H), and I also made a two-sheet version that fits in an 8x10 tray.
 

juan

Member
Joined
May 7, 2003
Messages
2,707
Location
St. Simons I
Format
Multi Format
It seems to me that the simplist way would be for you to do brush development in the trays that you have. I use a hake brush from the art supply store, but any soft bristled brush should do. Some folks use the foam brushes from the paint department at the hardware store (ironmonger's for you folks who speak English).

I develop by putting a small amount of developer in the tray (depends on size of the tray) and add one negative - emulsion side up. I rock the tray for about 10-15 seconds to be sure the negative is well covered. Then begin brushing lightly over the surface of the negative. I make strokes horizontally and vertically completely covering the negative. Times seem to run about 20% less than for the shuffle method, or about the same as with a Jobo on a slow speed. I have not scratched a negative since adopting this method.
juan
 

Curt

Member
Joined
Sep 22, 2005
Messages
4,618
Location
Pacific Nort
Format
Multi Format
I you don't want to handle them much and would like to do stand developing try tanks, hard rubber, and hangers, stainless steel.

Curt
 

MurrayMinchin

Membership Council
Subscriber
Joined
Jan 9, 2005
Messages
5,481
Location
North Coast BC Canada
Format
Hybrid
And to further complicate things...

When developing 4x5's in an 8x10 tray with lots of developer (you said a litre?), I've found it helpful to have the trays all at an angle (with a corner pointing towards me) and I put something like a bottle cap under the the corner that's the furthest away. This way, all the trays are slightly tilted and the negatives always drift down towards the bottom corner that's the closest to me.

When agitating, I don't have to over handle them to make sure they stay in order, and when I lift the bottom negative and place it on top of the pile, I 'nudge' it into the corner of the tray before dropping it.

As you can tell, everybody discovers what works themselves...you'll get it :smile:

Murray
 

Scott Peters

Member
Joined
Aug 20, 2005
Messages
359
Location
Scottsdale,
Format
ULarge Format
Try tray development again, but with Emulsion side up, constant shuffling and gently rock the tray every so often. Also, you can rotate the neg to see if this helps. Use plenty of developer in the tray as well. Also, when you shuffle, make sure all images are in a aligned on top of each other. It's the corners that will scratch.
 

BradS

Member
Joined
Sep 28, 2004
Messages
8,124
Location
Soulsbyville, California
Format
35mm
If you can suffer doing one sheet at a time and already have a tank for processing smaller sized roll films, try using the tank without the reels as a developing tube. I do 4x5 in the Paterson System 4 Universal tank designed to hold two plastic reels for 35mm or one plastic reel for 120. Just remember to use the center column inside the plastic tank. It forms part of the light trap.
 

sanking

Member
Joined
Mar 26, 2003
Messages
5,437
Location
Greenville,
Format
Large Format
BradS said:
If you can suffer doing one sheet at a time and already have a tank for processing smaller sized roll films, try using the tank without the reels as a developing tube. I do 4x5 in the Paterson System 4 Universal tank designed to hold two plastic reels for 35mm or one plastic reel for 120. Just remember to use the center column inside the plastic tank. It forms part of the light trap.

The slosher is a good idea. Another solution is to cut some pieces of PVC tubing to the lengh of your film and put the film in the tubes for developing, them put the tubes in a tray filled with developer to the height of the tubes. You don't use end caps for this type of developing as it is done in the dark. You can develop this way with any type of agitation you like, from stand to continuous.

Another solution if you like rotary agitaiton is to build some BTZS types tubes from ABS plastic. They would have end caps of course, and you develop with the light on by rolling the tubes in tray of water.

Sandy
 
OP
OP
gbenaim

gbenaim

Member
Joined
Nov 3, 2004
Messages
441
Format
8x10 Format
Thanks all for all the helpful advice. I'll keep trying and get back to you.
Brad , I did try using the paterson tank, but started getting undeved corners which seemed to happen because the tacos curl up and one corner can be left outside the soup (even w 750ml).
Murray, I'll try the tilted tray idea, sounds like it can help. Have you found when scanning your negs that you get micro scratches from tray development, even when not visible in wet enlarging? Just something Sandy mention at LFphoto, thought I'd ask for people's experience.
I'll keep trying and will update you, thanks again.
 

leeturner

Subscriber
Joined
Mar 12, 2004
Messages
489
Location
North of Eng
Format
Multi Format
John, looking at your tubes is there a particular reason why you build them from two 5" lengths of pipe? I've seen some that have a cap that screws on to the male coupler. I'm going to attempt to make some this weekend and there are a few designs but yours look very straightforward to build. How much chemical do you recommend and, finally :smile: , do you perform the fix stage under safelight as quite a few seem to do? I've tried tray developing but am not brave anough yet to tackle more than one sheet at a time and have lost my bearings more than once after 12 minutes in the dark. :rolleyes:
 

Alan9940

Member
Joined
Jun 17, 2006
Messages
2,434
Location
Arizona
Format
Multi Format
Tray processing, IMO, is difficult to master--uneven development, scratched negs, etc, are the norm. However, I do believe tray development can be mastered and is certainly the least expensive way to go. Use lots of developer is using trays.

That said, for the most consistent development of sheet film, especially, I'd recommend some sort of rotary development. BTZS tubes or similar homemade tubes will work fine. If you use a developer like Mr. King's excellent Pyrocat-HD, which works best with slower rotation of the tubes, you'd be able to handle more tubes at one time than you might think. Of course, the Lexus solution is a Jobo CPA- or CPP-2 with Expert Drums. I've used this combo for both 4x5 and 8x10 film for about 10 years and cannot imagine ever going back to any other method of development.

Just my 2 cents...good luck!
 

BradS

Member
Joined
Sep 28, 2004
Messages
8,124
Location
Soulsbyville, California
Format
35mm
gbenaim said:
Thanks all for all the helpful advice. I'll keep trying and get back to you.
Brad , I did try using the paterson tank, but started getting undeved corners which seemed to happen because the tacos curl up and one corner can be left outside the soup (even w 750ml).
Murray, I'll try the tilted tray idea, sounds like it can help. Have you found when scanning your negs that you get micro scratches from tray development, even when not visible in wet enlarging? Just something Sandy mention at LFphoto, thought I'd ask for people's experience.
I'll keep trying and will update you, thanks again.


Tacos? Are you using rubber bands?

I usually just put one sheet in, emulsion side toward the center - no rubber bands. Fill the tank 'till the solution fills about half of the filling funnel. Yes, out the top. Maybe, it's closer to 800ml. I've not had any problems with this technique.

The nice thing is, there's no tubes to build or other stuff to buy. I guess you could also use the Paterson tank like a tube if you have the lid. Load film as before, cover the tank with the plastic lid and float it on it's side in a tub of water. Rotate continuously. The benefit is that you don't need as much solution and you are virtually guaranteed to get even development. Never tried this though.
 

raucousimages

Member
Joined
May 12, 2003
Messages
824
Location
Salt Lake
Format
Large Format
Open tanks with hangers is the best method I have found. But what is taco method?
 

MurrayMinchin

Membership Council
Subscriber
Joined
Jan 9, 2005
Messages
5,481
Location
North Coast BC Canada
Format
Hybrid
gbenaim said:
Murray, I'll try the tilted tray idea, sounds like it can help. Have you found when scanning your negs that you get micro scratches from tray development, even when not visible in wet enlarging?

Sorry, but I've never scanned my negatives and I use a diffusion light source, so I've never had to look close enough to find "micro scratches".

Murray
 

BradS

Member
Joined
Sep 28, 2004
Messages
8,124
Location
Soulsbyville, California
Format
35mm
raucousimages said:
Open tanks with hangers is the best method I have found. But what is taco method?

I don't but some "fold" or "bend" the neg into a taco shape (emulsion side in) before putting it into a tank. A rubber band is used to hold the folded neg in that shape. I guess the idea is that more than one sheet can fit into the tank in this manner?
 

David A. Goldfarb

Moderator
Moderator
Joined
Sep 7, 2002
Messages
19,974
Location
Honolulu, HI
Format
Large Format
I've seen "micro scratches" or very fine surface abrasion with some of the East European films. They won't show up in a contact print or modest enlargement, but you can see them on a high resolution scan or with a 10x loupe, and possibly on a big enlargement, but I don't enlarge that big.
 

John Bartley

Member
Joined
Sep 12, 2004
Messages
1,386
Location
13 Critchley
Format
8x10 Format
leeturner said:
John, looking at your tubes is there a particular reason why you build them from two 5" lengths of pipe? I've seen some that have a cap that screws on to the male coupler. I'm going to attempt to make some this weekend and there are a few designs but yours look very straightforward to build. How much chemical do you recommend and, finally :smile: , do you perform the fix stage under safelight as quite a few seem to do? I've tried tray developing but am not brave anough yet to tackle more than one sheet at a time and have lost my bearings more than once after 12 minutes in the dark. :rolleyes:

Hi Lee,

The reason I built pipes with two sections was so that the film could be put in one end and stay there during the entire process while the other end could hold the various chemicals. Here's my basic process (I use D-D23) ::

1) fill one half of the tube with developer (D23) and stand it up in a holder ( a 2x4 with a hole in it works nicely)
2) in the dark, put the negative in the other half, screw the negative end onto the chemical end and leave it standing up so that the negative stays dry. (see note #1)
3) turn on the lights
4) set your timer, put the tube assembly into a tempering bath (sink full of water at 20'C) let it float and gently roll it slowly in alternating directions for the required time
5)with the lights still on .... yes, you're reading correctly, unscrew the top (film half) half of the tubes assembly and set the film tube down so that the open end is downward on a towel or in the 2x4 stand (blocks the light)(see note #2)
6) dump and refill the chemical end with whatever (in my case, a Borax solution)
7) screw the two parts together and agitate in a water bath again
8) unscrew, set film end down on towel/in block (whatever) to block light
9) dump and refill chemical (stop bath or whatever ...)

I think you've got the idea now, so you just dump and refill until you're done. Once you're at the wash stage, fill the film tube with water and then pull the film out, throw it into the sink and let the tap run ever so slowly to give it a good wash - the sink shouldn't overflow as it likely has a drain hole at the top front to prevent accidents.

If you wanted to make the procedure even more easy, you could have a separate chemical tube end for each stage and then all you have to do is swap the film end from one tube to another without dumping.

I don;t worry about "how much" chemical to fill with as I re-use my D23 for months anyway ....

Note 1) : I do a water soak before any developing takes place - it makes for better development

Note 2) : once the film has been through the first stage (developer), it is desensitised enough that you don;t really have to worry about stray light - this information came direct from Ilford in case anyone wants to dispute it. The Ilford tech guy doesn't even try to block light during the stop/fixer stage, but I do, just in case.

cheers
 

Jeanne

Subscriber
Joined
Nov 8, 2003
Messages
69
I like stand developing in hard rubber tanks and metal hangers, too -- I've tried just about everything else, but always come back to this. It's easy, it's very hard to scratch the negatives, and inspecting for doneness is simple.
 

Wade D

Member
Joined
Feb 15, 2006
Messages
897
Location
Jamul, CA
Format
Multi Format
I also use hard rubber tanks and metal holders for my 4x5 work.
When agitation is due I lift the hangers out of the developer and turn them 90 degrees then put them back in. For me this eliminated development streaks from the holes on the hanger edge. My photography professor suggested this many years ago after seeing my first batch of negatives.
 
Photrio.com contains affiliate links to products. We may receive a commission for purchases made through these links.
To read our full affiliate disclosure statement please click Here.

PHOTRIO PARTNERS EQUALLY FUNDING OUR COMMUNITY:


Ilford ADOX Freestyle Photographic Stearman Press Weldon Color Lab Blue Moon Camera & Machine
Top Bottom