FP4+ in 510-Pyro

Sombra

A
Sombra

  • 3
  • 0
  • 52
The Gap

H
The Gap

  • 5
  • 2
  • 78
Ithaki Steps

H
Ithaki Steps

  • 2
  • 0
  • 92

Forum statistics

Threads
199,008
Messages
2,784,549
Members
99,767
Latest member
wwestergard
Recent bookmarks
0

jstraw

Member
Joined
Aug 27, 2006
Messages
2,699
Location
Topeka, Kans
Format
Multi Format
Much praise to the massive development chart.

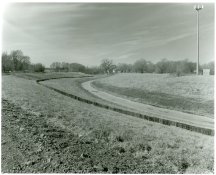
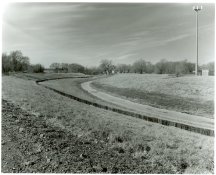
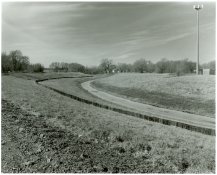
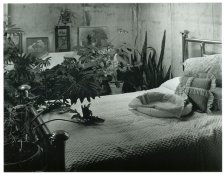
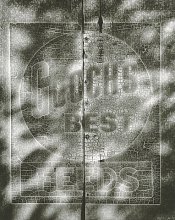
I shot some film on Saturday, doubling up on several images, processing one set in 510-Pyro at 1:100 dilution for 7 minutes and the other set at 1:500 for 50 minutes...both, as per the massive dev chart.

I can't imagine that the negative denisities would match any closer if I did one scheme, twice. To the naked eye, they're amazingly matched.

The naked eye also doesn't see the benefit of the semi-stand development. Fortunately, the naked eye, looking at the negative is not the last word. Prints will tell.

Several observations...

I'm not seeing the apparent thinness of a stained negatives. They seem as dense as any negative in a non-staining developer. Maybe my metering practices are suspect.

The color of the two sets of negatives are the one noticible difference. The 7 minute batch appear olive in color and the 50 minute set appear more mocha colored. What this difference in staining means for the light spectrum that's in use during printing may prove interesting.

I will make the best straight print I can from one of the "7" set, then print it's sibling from the "50" batch exactly the same way, to compare printing behavior headt-to-head. Then I'll try and make the best straight print I can from the "50" negative so I have that comparison as well. I'll post scans of the three resulting prints.
 

Alex Hawley

Member
Joined
Jul 17, 2003
Messages
2,892
Location
Kansas, USA
Format
Large Format
Michael, don't make any judgments on anything until after you have printed. There is not a direct correlation to a stained negative's appearance to the eye and how it prints.

I'm not seeing the apparent thinness of a stained negatives. They seem as dense as any negative in a non-staining developer. Maybe my metering practices are suspect.

I'm not sure where that idea came from. Its possible with pyro developers and over-exposure to get very dense negatives. I've done it. They are difficult to print because of long exposure times, but can print quite beautifully.

Again, don't change anything until after you have printed. Metering for a pyro developer is nearly the same as for a non-pyro one. Half-rated speed or full rated speed (dependent upon film and developer) usually works.
 

PhotoJim

Member
Joined
Oct 9, 2005
Messages
2,314
Location
Regina, SK, CA
Format
35mm
I"ve not used this developer, but FP-4 Plus is a great film in the pyrogallol-based developers I've tried.

As for negative density, most of my pyro negatives look just fine, but I have run into situations (with Delta 100 and Pan-F Plus) where developed density looked very thin. However, the negatives still printed quite well. I've learned to not use the visual density as a benchmark as to printability. Some films don't look great in pyro, but print well anyway.
 
OP
OP
jstraw

jstraw

Member
Joined
Aug 27, 2006
Messages
2,699
Location
Topeka, Kans
Format
Multi Format
"Fortunately, the naked eye, looking at the negative is not the last word. Prints will tell."

I said that! Honestly! It's right up there.
 

fhovie

Member
Joined
Mar 20, 2003
Messages
1,250
Location
Powell Wyoming
Format
Large Format
At the risk of sounding argumentative: I know what my papers do with calibrated step wedges. - I can get white to black with a density range of .3 to 1.5 for a DR of 1.2 on grade 2 paper. Working backward to what my negatives give me and measuring with a densitometer, a thin negative will not have both true whites and true blacks - something will be missing. I have some pyro negs that look thin yet have incredible detail in the shadows. (FP4 in PMK) There are areas on the same negative that are dense enough to give me the contrast (1.5) so my photo has the drama it needs to be interesting. Lucky accidents are wonderful when they happen but when you pay a bundle to be somewhere and get a shot, it is comforting to know that your repeatable and calibrated processes will give you guarenteed predictable results. That is why I got a densitometer (they are giving them away on ebay) and spent the time to learn my materials so that I would not have to wonder if "thin" is OK. If I make a thin neg, it is either operator error (yeh - it still happens) or the scene has mostly shadows in it - but somewhere on the negative there will be a point of interest with a density at or above 1.3 or so.
 

Robert Hall

Member
Joined
Aug 18, 2004
Messages
2,033
Location
Lehi, Utah
Format
8x10 Format
The off color of the stand set of negatives is probably due to oxidation of the developer. (just a guess)
 
OP
OP
jstraw

jstraw

Member
Joined
Aug 27, 2006
Messages
2,699
Location
Topeka, Kans
Format
Multi Format
The first images is the 7 minute neg, the second image is the 50 minute neg, printed identically and the third image is the 50 minute neg printed its own way. The next post will show the same print with some additional burning. What I learned is that the benefits of the semi-stand are less evident with this sort of low-contrast scene.

Some of the washed out corners are due to holder light leaks. I'm really glad I've implemented a numbering system.
 

Attachments

  • creek1.jpg
    creek1.jpg
    244.8 KB · Views: 369
  • creek2.jpg
    creek2.jpg
    239.7 KB · Views: 336
  • creek3.jpg
    creek3.jpg
    251.5 KB · Views: 310
OP
OP
jstraw

jstraw

Member
Joined
Aug 27, 2006
Messages
2,699
Location
Topeka, Kans
Format
Multi Format
Here's the version of the 50 minute with some burning:
 

Attachments

  • creek4.jpg
    creek4.jpg
    251.1 KB · Views: 274
OP
OP
jstraw

jstraw

Member
Joined
Aug 27, 2006
Messages
2,699
Location
Topeka, Kans
Format
Multi Format
Now, I'm seeing that the semi-stand dev really comes into it's own with a negative with a broader contrast range. I'm very impressed with the shadow detail it's given here:
 

Attachments

  • bodhibed4.jpg
    bodhibed4.jpg
    255.2 KB · Views: 467

Steve Sherman

Subscriber
Joined
Sep 14, 2003
Messages
548
Location
Connecticut
Format
ULarge Format
Now, I'm seeing that the semi-stand dev really comes into it's own with a negative with a broader contrast range. I'm very impressed with the shadow detail it's given here:

Hi Michael,

You are beginning to see the difference that SS development makes. It does not always show up such as the smooth tone sky scene. However, you do see a difference in the interior shot especially in the bedspread where texture is accentuated.

The comparison between the two scenes really proves what I've been saying all along, that Semi-Stand development does NOT increase sharpness, it increases micro contrast. It also compresses overall contrast.

This sounds contradictory when talking about the same negative, there in lies the incredible control this method of film development can be.

Very simply, with this method, you can control every aspect of the negative regardless of lighting or contrast at the time the negative is made. Your impressions of a scene certainly will differ from mine, the creative possibilities are endless.

Keep experimenting!
 
OP
OP
jstraw

jstraw

Member
Joined
Aug 27, 2006
Messages
2,699
Location
Topeka, Kans
Format
Multi Format
Thanks Steve,

How would you recommend deriving more overall contrast from a scene like that image of the creek, using semi-stand? I'm about to begin experimenting with development by inspection and I suspect that will tell me a few things.
 

Steve Sherman

Subscriber
Joined
Sep 14, 2003
Messages
548
Location
Connecticut
Format
ULarge Format
Thanks Steve,

How would you recommend deriving more overall contrast from a scene like that image of the creek, using semi-stand? I'm about to begin experimenting with development by inspection and I suspect that will tell me a few things.

Michael,
Overall contrast is a function of exposure, length of development / strength of developer and of course temperature.

If you want more overall contrast, filters not withstanding, you would decrease exposure or if shadow information is important than you would increase development time while mantaining present exposure.

Micro contrast is a result of diluted developer in contact for a length of time necessary for diluted developer to exhaust in more sensitized areas of the negative.

All of the above work in concert with one another and will differ slightly if changes are made to one component of the process. That said, the components will have their greatest impact in the areas I outlined above.

I can not stress enough, if you truly want to be a creative as well as technically accomplished photographer, pick one film, one developer and one positive material, learn them intimately and go and make photographs.

In my work I believe that Semi-Stand / Extreme Minimal Agitation has allowed me to produce photographs in any lighting conditions, any contrast range using film and traditional wet processing methods that anyone can produce with a computer. Bold statement, yes, but I have prints to back it up!

In the end it doesn't matter how you got there, just how it looks.
 

Alex Hawley

Member
Joined
Jul 17, 2003
Messages
2,892
Location
Kansas, USA
Format
Large Format
How would you recommend deriving more overall contrast from a scene like that image of the creek, using semi-stand? I'm about to begin experimenting with development by inspection and I suspect that will tell me a few things.

Michael,

First, I must say that I give Steve Sherman and Sandy King the credit (high credit) for bringing Semi-stand/Extreme minimal agitation techniques back to the forefront. It was because of these two gentlemen that the method enjoys the use and popularity that it does today.

Here's a scan of a subject that I don't think could have done near as well without EMA. The basic subject is a faded and cracked plastic decal sign applied over some very weathered galvanized steel. Flat, flat, and flat for contrast. The black areas are tree leave shadows. Even with the shadows, the SBR was only 5.5. Very flat indeed. Film was Efke PL100. I exposed the film at the nominal 100 speed setting and developed for N+1 in pyrocat using EMA. Time was 80 minutes. Got a nice dense negative for my troubles.

I printed it using grade 3.5 contrast filtration to heighten contrast even more for effect. At less contrast, the galvanized steel detail is still visible in the dark shadow areas. I have also shot the exact same subject using 4x5 FP4 using the same techniques with the same results.

A similar low SBR subject is (there was a url link here which no longer exists). Again, I doubt it would have come off with the same feeling of texture and tonal variations using normal agitation development.

And just so people don't get the idea that EMA is the domain of the La Grande LF types, I also use EMA for my roll film work, which these days is centered around documenting the grand daughter. The negatives I get from 35mm and 120 film look like they were chiseled out of glass.
 
OP
OP
jstraw

jstraw

Member
Joined
Aug 27, 2006
Messages
2,699
Location
Topeka, Kans
Format
Multi Format
Thanks Alex, the first link is missing but I remember seeing the print in person and it was very good!

I'm not sure how to absorb SBR numbers. Is the subject brightness range expressed in stops?

I think the exterior scene I uploaded would have done fine in semi-stand if I'd increased development.
 

sanking

Member
Joined
Mar 26, 2003
Messages
5,437
Location
Greenville,
Format
Large Format
Michael,

First, I must say that I give Steve Sherman and Sandy King the credit (high credit) for bringing Semi-stand/Extreme minimal agitation techniques back to the forefront. It was because of these two gentlemen that the method enjoys the use and popularity that it does today.

Hi Alex,

Thank you for the compliment. And as you now, I give Steve Sherman most of the credit.

BTW, I just posted an image in the Gallery that was made with my Extreme Minimal agitation technique. I think it is a good example of the type of mid-tone glow you can get with this type of agitation.

Technical data, which I believe is in the Gallery, was SBR of 6, 3:00 minutes of exposure at f/32, film TMY, and development with Pyrocat-HD for 40 minutes at 70ºF. There were four agitation periods, at the beginning for 1.5 minutes (and with vigor), and then for 10-15 seconds at the 1/4, 1/2, and 3/4 points of development.

The large carbon transfer print is from an enlarged negative.

Best,

Sandy King
 

Alex Hawley

Member
Joined
Jul 17, 2003
Messages
2,892
Location
Kansas, USA
Format
Large Format
Hi Alex,

Thank you for the compliment. And as you now, I give Steve Sherman most of the credit.

BTW, I just posted an image in the Gallery that was made with my Extreme Minimal agitation technique. I think it is a good example of the type of mid-tone glow you can get with this type of agitation.

You're most welcome Sandy. Steve put the technique with your developer as I recall the sequence of events. Still, if not for the threads both of you posted on the Azo forum and here, I don't think any of us would have the knowledge and technique available. Mucho Gracias for sharing it.

Now, as to that scan you posted. Quite stunning. I can surmise that its even more stunning seeing the 14x20 print!
 

Steve Sherman

Subscriber
Joined
Sep 14, 2003
Messages
548
Location
Connecticut
Format
ULarge Format
You're most welcome Sandy. Steve put the technique with your developer as I recall the sequence of events. Still, if not for the threads both of you posted on the Azo forum and here, I don't think any of us would have the knowledge and technique available. Mucho Gracias for sharing it.

Now, as to that scan you posted. Quite stunning. I can surmise that its even more stunning seeing the 14x20 print!

Thanks for the kind words my fellow photographers.

Alex, The photograph of the stone column is terrific, a wonderful example of Reduced Agitation Development.

Sandy, Would love to see your cliff erosion in person, it must be exquisite.

Let’s not forget without Sandy’s writings on Pyrocat HD and wealth of knowledge of chemistry and sensitometry I would never have experimented with Semi-Stand and Stand development techniques.

A discovery we can all benefit from.
 

haryanto

Member
Joined
May 2, 2005
Messages
167
Format
4x5 Format
I use ilford FP4, and souped it in pyrocat MC, and semistand in pvc tube, the tonality, and sharpenest is great, I really love it, thanks for Sandy, Gainer, and steve sherman for bringing Pyrocat and stand dev. and for their generous to share their knowledge

pardon me, for my bad English
 

gainer

Subscriber
Joined
Sep 20, 2002
Messages
3,699
I use ilford FP4, and souped it in pyrocat MC, and semistand in pvc tube, the tonality, and sharpenest is great, I really love it, thanks for Sandy, Gainer, and steve sherman for bringing Pyrocat and stand dev. and for their generous to share their knowledge

pardon me, for my bad English

I have seen writings by native born Americans with college education that are worse than yours. Don't be ashamed of trying what others fear to do.
 
Photrio.com contains affiliate links to products. We may receive a commission for purchases made through these links.
To read our full affiliate disclosure statement please click Here.

PHOTRIO PARTNERS EQUALLY FUNDING OUR COMMUNITY:


Ilford ADOX Freestyle Photographic Stearman Press Weldon Color Lab Blue Moon Camera & Machine
Top Bottom