Focomat 1C Color - changing filters mid print

What is this?

D
What is this?

  • 3
  • 9
  • 92
On the edge of town.

A
On the edge of town.

  • 7
  • 6
  • 184
Peaceful

D
Peaceful

  • 2
  • 12
  • 342
Cycling with wife #2

D
Cycling with wife #2

  • 1
  • 3
  • 126

Forum statistics

Threads
198,289
Messages
2,772,388
Members
99,592
Latest member
gregmulvey
Recent bookmarks
0

peter16

Member
Joined
Jun 24, 2011
Messages
106
Format
4x5 Format
I'm about to get set up and start printing with a new to me Focomat. Mine has the filter drawer. I don't do split filter printing exactly but frequently I like to burn using the 00 filter.

I'm nervous about the pulling out the side filter drawer and changing filters in the middle of a print, In theory everything should settle back down to the exact same place focus wise but it's a lot of banging/grinding around to yank out that filter drawer and re-insert.

Curious to hear how others dealt with this. Rig up a a below the lens filter holder? buy an expensive dial in filter? not worry about it?
 

Hilo

Subscriber
Joined
Apr 19, 2011
Messages
917
Format
35mm
Unless the filter holder is bent or damaged, the only thing holding it in place when pushed in is a small mechanism on the back inside the holder. This mechanism secures the filter holder in place. When you pull the filter holder out, you have to "help" it by pushing the rod on the back in substantially.

Like you, I don't like that. I removed the small mechanism (simply unscrew it) and this makes pulling out the filter holder effortless.

In case the above doesn't do the trick, your holder is bent. Or the opening in the enlarger's head is bent. It should not be difficult to understand what causes the problem and bend it back.
 

Hilo

Subscriber
Joined
Apr 19, 2011
Messages
917
Format
35mm
In case the above doesn't work out, yes you'd be helped fine with an under the lens filter holder. The original one Leitz made is almost impossible to find. There's an Omega filter holder that I have gotten several times for the Ic. I can send you pictures of the modification . . .
 

Saganich

Subscriber
Joined
Nov 21, 2004
Messages
1,257
Location
Brooklyn
Format
35mm RF
Yea, shouldn't be so much banging and grinding to open the draw. Helps to have a very stable surface for the enlarger also.
 
OP
OP

peter16

Member
Joined
Jun 24, 2011
Messages
106
Format
4x5 Format
Thanks Hilo. I see that wire on the back of the holder and will try removing it. I may message you about the omega filter holder mod if that doesn't make it smooth enough for me.
Saganich – yes I'm printing in a bathroom so enlarger is on an ikea bror utility cart - lockable wheels but not as stable as I'd like.
 

Hilo

Subscriber
Joined
Apr 19, 2011
Messages
917
Format
35mm
Let's say, the holder normally meets this resistence at the beginning of pulling it out. However, between the Ic enlargers that I have dealt with, it was not always the same resistance. So, you may already have a problem right there.

But once you're past that initial point, the holder should just slide to the left without any trouble.

Using an under the lens holder is a good alternative.
 

ic-racer

Member
Joined
Feb 25, 2007
Messages
16,522
Location
USA
Format
Multi Format
When burning high lights, blue light does not do much, so burning with white light is essentially the same as burning with 00 or max yellow or green.
 

Don_ih

Member
Joined
Jan 24, 2021
Messages
7,544
Location
Ontario
Format
35mm RF
I have a filter holder under the lens - attached below the red filter (which I kept there but for no reason whatsoever - I never use it). When I want to burn using a filter, though, I normally hold it in my hand. I don't like disturbing the enlarger at all.
 
OP
OP

peter16

Member
Joined
Jun 24, 2011
Messages
106
Format
4x5 Format
Thanks everyone. I haven't started printing yet. But I removed the spring Hilo suggested and it slides much much smoother now, Will have to see how it works once I start printing.

Totally separate question that maybe someone here could help with: My enlarger was shipped from Germany with a bulb made by Phillips that says "Photocresenta 220V 150W *18

I had an electrician re-wire the enlarger and the bulb turned on - though seemed very dim. Another photographer friend pointed out that this was because it was 220. I searched through the forums and thought most people said to buy the PH211 115-125V 75W. I ordered 3 but none of them work. My old phillips 220 does work. What bulb do I need to buy that will work? Hoping to order one from Film Tools in Burbank CA. Not planning on printing huge (8x10, 11x14) though most of my negatives are Ilford xp2 rated at 200 so slightly more dense than average.

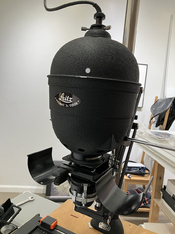
Here is a picture of my enlarger head.
 

Attachments

  • IMG_9748.jpg
    IMG_9748.jpg
    485.2 KB · Views: 90

Don_ih

Member
Joined
Jan 24, 2021
Messages
7,544
Location
Ontario
Format
35mm RF
PH211 115-125V 75W. I ordered 3 but none of them work.

Is there a difference between the socket in Europe and North America? Is it possible the three bulbs you bought are faulty? Check an ordinary light bulb in the enlarger - it should light up. Check the new bulbs in a regular lamp. Incandescent light bulbs are extremely simple, so if the bulb isn't blown but doesn't light up, it's just not getting electricity.

.... I just looked it up. North American E26 bulbs are a bit shorter than European E27 bulbs. The bulb will screw into the socket, but the difference is possibly enough to make it not work. So, change the socket in the enlarger.

1702548815867.png

from here.
 

guangong

Member
Joined
Sep 10, 2009
Messages
3,589
Format
Medium Format
I have a filter holder under the lens - attached below the red filter (which I kept there but for no reason whatsoever - I never use it). When I want to burn using a filter, though, I normally hold it in my hand. I don't like disturbing the enlarger at all.

You took the words right out of my mouth! As I read many of the suggestions to various threads I find a very strong tendency towards complicated Rub Goldberg solutions. Just holding filter with fingers below lens is just too simple.
 

Hilo

Subscriber
Joined
Apr 19, 2011
Messages
917
Format
35mm
You cannot use a 220 v bulb in the US. The PH211 115-125V 75W should be the correct bulb. You better check these 3 bulbs you got in another fitting, perhaps you have a desktop lamp or something like that. I bet they do work, and if so then their shape may prevent them to make contact in the enlarger's fitting.
It is possible the problem is inside the enlarger's fitting. You can use a small and sharp screwdriver to scratch the surface of the contact in the fitting. And bend that slightly upwards. Be very careful with this bending, you do not want to break off the contact.

Sorry, I had written this earlier today, now I sent too early without reading the comments that address your problem.
What I find strange is it never came up before, this difference between European and US bulbs. I will ask a friend in the US who prints with all the Leitz enlargers . . .
 
Last edited:
OP
OP

peter16

Member
Joined
Jun 24, 2011
Messages
106
Format
4x5 Format
What I find strange is it never came up before, this difference between European and US bulbs. I will ask a friend in the US who prints with all the Leitz enlargers . . .

Yes I was also surprised to not see this not mentioned on the www...am taking it to a lamp repair place to get the socket changed today, hopefully that does the trick.
 

Hilo

Subscriber
Joined
Apr 19, 2011
Messages
917
Format
35mm
Yes I was also surprised to not see this not mentioned on the www...am taking it to a lamp repair place to get the socket changed today, hopefully that does the trick.

I think you better wait a moment, it can be something else
 

Don_ih

Member
Joined
Jan 24, 2021
Messages
7,544
Location
Ontario
Format
35mm RF
What I find strange is it never came up before, this difference between European and US bulbs. I will ask a friend in the US who prints with all the Leitz enlargers . . .

My Leitz enlargers were almost certainly manufactured for the North American market, so have the proper sockets (just like they were originally wired with plugs for North American outlets).
 

Joe Edwards

Member
Joined
Sep 10, 2019
Messages
19
Location
Virginia USA
Format
35mm
Hi guys. I'm Hilo' friend in the US. Yes, I would check those bulbs in a lamp and see if they work. I have a Valoy from Europe and the PH211 115-125V 75W bulb. It fits and works fine.
 

Don_ih

Member
Joined
Jan 24, 2021
Messages
7,544
Location
Ontario
Format
35mm RF
The fact is, the difference in depth of the sockets from A26 to A27 can cause arcing, which can be a fire hazard. If you have a fixture from Europe in North America, you should change the socket. It's actually very simple to do, anyway.
 
OP
OP

peter16

Member
Joined
Jun 24, 2011
Messages
106
Format
4x5 Format
You can use a small and sharp screwdriver to scratch the surface of the contact in the fitting. And bend that slightly upwards. Be very careful with this bending, you do not want to break off the contact.
The guys at the lamp store were cool - I believe they just bent the fitting up as you said.
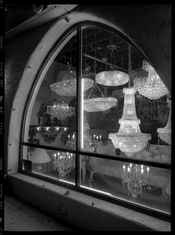
I had taken a picture of the front of their store years earlier, brought them a print and they refused to charge me.
So it works now.
 

Attachments

  • Screen Shot 2023-12-15 at 6.18.14 AM.jpg
    Screen Shot 2023-12-15 at 6.18.14 AM.jpg
    946.8 KB · Views: 56

Saganich

Subscriber
Joined
Nov 21, 2004
Messages
1,257
Location
Brooklyn
Format
35mm RF
Yea! I was going to offer a socket from a spare IC head I bought to retro fit an aristo cold light head. Never did the retrofit.
 

Hilo

Subscriber
Joined
Apr 19, 2011
Messages
917
Format
35mm
The guys at the lamp store were cool - I believe they just bent the fitting up as you said.
I had taken a picture of the front of their store years earlier, brought them a print and they refused to charge me.
So it works now.

Perfect !
 

Hilo

Subscriber
Joined
Apr 19, 2011
Messages
917
Format
35mm
Something else,

You have an early version of the Ic. Indicated by the oval name plate and by the presence of two locks on either side of the negative stage. I had the same version at one point and the locks did not work for me. What they do is tightly locking the head to the negative stage. This would happen spontaneously while adjusting the negative strip into place, but often too early. Then you need to unlock on both sides and start all over.
Leitz soon changed it to only one lock on the left side. Which is a more gentle lock so you can gradually push the head upwards when you want to move the negative strip around.

You may not be bothered by this, I'm sure some folks aren't. But if you struggle when placing the negative, you can just remove both locks and simply let the condenser land on the negative. The presure is enough to keep it flat, as all subsequent versions of the 1c will testify to.

Did your Ic come with the Anti Newton glass on the condenser?
 
OP
OP

peter16

Member
Joined
Jun 24, 2011
Messages
106
Format
4x5 Format
Something else,

You have an early version of the Ic. Indicated by the oval name plate and by the presence of two locks on either side of the negative stage. I had the same version at one point and the locks did not work for me. What they do is tightly locking the head to the negative stage. This would happen spontaneously while adjusting the negative strip into place, but often too early. Then you need to unlock on both sides and start all over.
Leitz soon changed it to only one lock on the left side. Which is a more gentle lock so you can gradually push the head upwards when you want to move the negative strip around.

You may not be bothered by this, I'm sure some folks aren't. But if you struggle when placing the negative, you can just remove both locks and simply let the condenser land on the negative. The presure is enough to keep it flat, as all subsequent versions of the 1c will testify to.

Did your Ic come with the Anti Newton glass on the condenser?

Just seeing this now, Thanks for the tip. Yes it did come with the Anti newton glass. I can see already those locks are a headache but still have not had an actual print session yet, only dry runs. My neg carrier is not filed out - I can just barely get the crack of light all the way around the outside but it has to be positioned just so. perhaps I'll try taping the neg in place at my lightable..
 

Don_ih

Member
Joined
Jan 24, 2021
Messages
7,544
Location
Ontario
Format
35mm RF
I had an electrician re-wire the enlarger

I'm just wondering if your electrician rewired the entire enlarger? I recently wanted to deal with the fact that mine was flickering periodically, so I started looking at the connections and noticed the insulation of the wires was cracked. I examined only the cord when I first got it and thought it looked ok. But when I started taking it apart to find the loose connection, all the insulation on all the wires started to crumble away. I replaced all the wiring (to the base, to the switch, up the post to the outlet) except the cable to the lamp (which is still in good condition).

1705658470163.png
All the plastic crumbled off that when I moved it.
 

Hilo

Subscriber
Joined
Apr 19, 2011
Messages
917
Format
35mm
Just seeing this now, Thanks for the tip. Yes it did come with the Anti newton glass. I can see already those locks are a headache but still have not had an actual print session yet, only dry runs. My neg carrier is not filed out - I can just barely get the crack of light all the way around the outside but it has to be positioned just so. perhaps I'll try taping the neg in place at my lightable..

I would not tape the negative strip in place. Just do some prints to understand what kind of border you will get. Some of these tight borders the Leitz holders give are actually very beautiful. And should you want no black border, just use an easel and mask the border away.
 

Hilo

Subscriber
Joined
Apr 19, 2011
Messages
917
Format
35mm
. . . still about the Ic negative carier: so, if I were you I would get another one and check both by printing with the border. Which will be slightly fuzzy on the outside. There will very likely be a difference between the borders of both masks. Keep the one you like most.

File out the other one in order to use it with an easel. Masking to sharp black borders on the outside.

Obviously you can use both masks to print without borders.

I have used the Ic and the Valoy II (same negatieve masks) for ages and I have all kinds of negative masks. Also some with glass. In the end I have a use for all of them.

Finally, be aware that each camera gives a specific border! Because there are often small differences in their sizes. Even with different camera bodies of the same brand this can be so.
 
Photrio.com contains affiliate links to products. We may receive a commission for purchases made through these links.
To read our full affiliate disclosure statement please click Here.

PHOTRIO PARTNERS EQUALLY FUNDING OUR COMMUNITY:


Ilford ADOX Freestyle Photographic Stearman Press Weldon Color Lab Blue Moon Camera & Machine
Top Bottom