-
Welcome to Photrio!Registration is fast and free. Join today to unlock search, see fewer ads, and access all forum features.Click here to sign up
You are using an out of date browser. It may not display this or other websites correctly.
You should upgrade or use an alternative browser.
You should upgrade or use an alternative browser.
First go and hand-colouring...
-
A
- Thread starter tomalophicon
- Start date


Recent Classifieds
-
For Sale Arca Swiss Z1+ fliplock ball head
- Started by Guivd
-
Want to Buy Intellifaucet D250 K250 etc
- Started by Rafal Lukawiecki
-
For Sale RB67 and Graflex odds & ends
- Started by OrientPoint
Forum statistics
- Joined
- Feb 22, 2010
- Messages
- 240
- Format
- 35mm
looks good to me. something I wish to try. what kind of paper did you use? I look at thrift stores for old photographs but mostly find glossy prints which wouldn't work too well.
Try sepia toning a print first, then use water based dyes,the colours often blend in better with a toned image.
Ian
Ian
I haven't hand colored a print in many years but when I was doing some I used a matte surfaced warm tone paper (Agfa Portriga Rapid Warm Tone) with Marshall oils. As I recall you needed to let them dry for a pretty long time.
http://www.jeffreyglasser.com/
http://www.jeffreyglasser.com/
There's two approaches to hand colouring, the main US way is with Marshall's oils, because this sits on top of the image this always looks hand coloured. The European way is/was mainly to use colour retouching dyes which sink into the emulsion leaving no trace on the suface, the finest exponent of this technique was the late Bob Carlos Clarke, many of his hand coloured images could easily be mistaken for full colour originals.
Two teqniques the results are like chalk and cheese.
Ian
Two teqniques the results are like chalk and cheese.
Ian
Very nice!!
OP
OP
Thanks for the hints all.
Have you seen prices for those oils?? No thanks, not yet anyway.
I'm going to try to find something that will make the pencils run a bit to cause them to blend. But colouring out of focus areas is kinda hard. I'll have to try a more suitable print.
The paper is Ilford FB MG.
Have you seen prices for those oils?? No thanks, not yet anyway.
I'm going to try to find something that will make the pencils run a bit to cause them to blend. But colouring out of focus areas is kinda hard. I'll have to try a more suitable print.
The paper is Ilford FB MG.
Get an old colour ink cartridge and mix your own dyes, it does work  I've used them for wood stains as well
Ian
I've used them for wood stains as well Ian
OP
OP
Thanks Ian, I'll have a look at what I have.
Thanks for the hints all.
Have you seen prices for those oils?? No thanks, not yet anyway.
I'm going to try to find something that will make the pencils run a bit to cause them to blend. But colouring out of focus areas is kinda hard. I'll have to try a more suitable print.
The paper is Ilford FB MG.
Any oils will work. It doesn't have to be Marshall's. Try a cheap tube, or two, from your local art supply store.
You don't need to make the pencils "run" either. You can buff them with an eraser. I use Eraserstiks. They're pencil shaped erasers (getting hard to find) which will help blend the pencils, and soften the texture of the lead. Try it with any eraser, though. Just make sure it's clean, and stays clean. With the Eraserstiks, I rub it on fine grade sandpaper, both to keep it clean, and shape it for the space I'm blending.
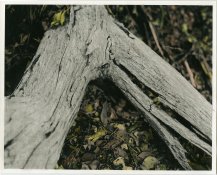
Well, I took a print that I hated, and made it more bearable.
The pencil marks at the top right actually don't show on the print, the scanner seems to pick everything up.
Anyway, there'll be a lot more where this one comes from, I think.
That's beautiful! I like the grain, too.
OP
OP
eddie, thanks. I have been using oils but failed at colouring anything where a steady hand was needed.
The erasers are a good idea. I'll give that a go.
Thanks!
The erasers are a good idea. I'll give that a go.
Thanks!
OP
OP
That's beautiful! I like the grain, too.
Thanks. I think the grain is caused by the scanner. I could never figure out how to work those things.
What kind of color pencils did you use? I've been wanting to try this myself.
Any colored pencil will work. I have Prismacolor, Crayola, Marshall's, and Walnut Hollow . If you want subtle colors, avoid a sharp point. I use fine grained sand paper to grind down the point. It makes the application more even, and easier to "buff".
For paper choices, matte fiber, with a smooth finish. MGIV is a good choice among available papers. If you use paint, it has enough tooth to hold the oils but not too much, where the paint will bunch up.
The best thing to do is save your reject prints to play with. Don't get discouraged. It takes a while to figure it out, but it is a lot of fun.
Here's an example I did which is half painted (not how I normally do it, but for the demonstration...)
Attachments
OP
OP
eddie, looks good.
Are the Marshall's oils just regular oil paints?
I used a Faber-Castell pencil.
Are the Marshall's oils just regular oil paints?
I used a Faber-Castell pencil.
So... you used mixture of materials: pencils and artist paints. I never thought Q tips and cotton swabs as tools for the task, but that makes sense. Thank you for sharing that.
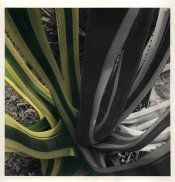
How did you get such a brilliant color on middle of the "leaves" where density is so high? I'm surprised the grey tone of b&w image didn't show through.
How did you get such a brilliant color on middle of the "leaves" where density is so high? I'm surprised the grey tone of b&w image didn't show through.
Any good quality oils will work. Marshall's makes "Extra Strong" versions of many of their colors. I use these when I want more intensity. They also make "Extender", which I use when I want to thin the paint, and get a more pastel look. You can also use linseed oil to thin the paints.
The thing to remember is that you're applying the paint so thinly that it is transparent. Any texture in the original Black and White will show through.
The reason to use Q-Tips, cotton balls, medical applicators, and toothpicks wound with cotton is because brushes will add texture. While you may want a more painterly effect (and adding dimension and brush marks), I prefer a smoother finish.
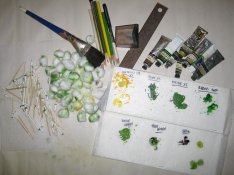
This photo shows all you need to try hand-painting. It's inexpensive, a lot of fun, and can really alter the look of your work. I'm sure other hand-colorists have their own techniques (and I hope they add to this thread) but I'll go through my workflow.
I generally use Ilford MGIV matte fiber. After the prints have dried, I start to apply the oils using either cotton balls, Q-Tips, etc. depending on the size of the area to be covered- large balls for larger areas, small applicators for smaller spaces. Once I apply them, I carefully remove the excess, being careful not to spread into adjacent areas where I want a different color. When first starting out, I recommend that you don't apply different colors to adjacent areas. It's easy to get some bleed. Instead, paint alternating areas allowing them to dry before returning to paint other areas. Eventually, you'll develop the ability to work with different colors in adjacent areas, but first you need to get control of your removal technique. (As an aside, I find cool colors take longer to dry. Warm colors are quicker. When it's humid, blues can take weeks to dry. Yellows may only take a day. A chemist once told me it was because of the cobalt in the paint, though I have no idea...). When it comes to the border of the print, some people use painters tape to mask it. I don't, as I find the paint builds up at the tape. Instead, I go into the border and deal with it later.
Once the painting is finished, and completely dry, I go back to deal with the borders. I use a straightedge and harder erasers to erase the paint. The reason I have different erasers is because each type works better at different tasks. Hard ones (usually gray or white) are better at removing paint. Soft ones (usually pink) are better at smoothing pencil marks. Since the paint gets on the eraser, I rub the erasers on fine grit sandpaper to remove the paint as I work.
This "tutorial" is just my way of doing things. I hope others will chime in with their techniques.
Attachments
Dan Dozer
Subscriber
- Joined
- Dec 10, 2004
- Messages
- 414
- Format
- Large Format
I tried Marshal oils and really didn't like the look of them at all. What I really like is using colored pencils - mainly prisma colors, and use them with the two solutions that Marshal makes (P.M. Solution and Marlene). The solutions allow you to blend the colors easily because it tends to disolve the colors and lets you work with them better. Most of my hand coloring is only spot areas in a print, not the full print.
Prints should be on matt or semi matt surface (I use Ilford MGFB warmtone). Use a fine brush to apply the P.M. Solution onto the area to be worked on and let it soak in a little - maybe a minute at the most. Then just draw on the image with your pencils and work them in together allowing the solution to do it's thing. You can use many different colors at a time. You have to work quickly and only coat a small part with the solution at a time because it starts to soak into the print after a few minutes. When your coloring is complete, let the image "cure" for a little while. Then use the Marlene solution to remove any of the P. M. Solution that has spread outside the area you have worked on.
Note that the P. M. solution is an oil based product and the Marlene solution is a solvent. What you are doing is applying the oil based product to the print to allow it to take the colored pencil better then using the solvent to clean up the edges. This is needed because the oil based product spreads out a little after it starts soaking into the paper. All you really need are some Q-tips and a tooth pick with a little cotton from a cotton ball rolled/spun onto it's tip. The Q-tips will do most of your clean up and the tooth pick is for really tiny areas.
Here is one of my hand colored images. Print was sepia toned a little first.
Attachments
Hand coloring is very difficult. It takes lots of practice. Don't get frustrated in your attempts. Just keep plugging!
- Joined
- Feb 22, 2010
- Messages
- 240
- Format
- 35mm
It's nice to know there are other colorist out there. One of my H.S. graduation pics was subtly handcolored by the photographer; a standard practice in the last century. My real interest in the technique was piqued when I purchased a slightly damaged but affordable Thomas Nutting print. As I understand the history, Mr. Nutting made a living in the Great Depression of the 20th century in photography and handcoloring the prints for sale. I dunno, but I enjoy looking at it hanging on my wall.
I never tried hand colouring, but it looks fine on my monitor.Well, I took a print that I hated, and made it more bearable.
The pencil marks at the top right actually don't show on the print, the scanner seems to pick everything up.
Anyway, there'll be a lot more where this one comes from, I think.
I have seen hand coloured prints by Kathy Harcom that looked good and I also have a book called Painted Ladies by a photographer called James Wedge who hand coloured his prints.
Any oil paint will work although I generally use Marshall's. The Marshall oils are nice because they are transparent. However, that has more to do with the pigment than the brand. As you get closer to titanium white, the colors generally become more opaque. Darker colors like violet are going to be the most transparent.
The PM solution is essentially linseed oil and turpentine (or a similar solvent). I spend most of my time removing the color and use the extender on a toothpick wrapped lightly in cotton. For absolutely blank white areas I might use Marlene similarly to remove all the color. Smear the color on and take it off carefully, then add details with the oil pencils is basically my technique. Pencils other than Marshall's (e.g., Prismacolor, etc.,) will also work. Don't be afraid to apply a lot of color or have it bleed a bit. I think the key to hand-coloring is the skill in removing the oils. It's a nice way to spend a rainy afternoon. And good therapy...
Others have mentioned the toothpicks, cotton balls, blue tape, etc., and I use those too. I generally print a little flat and then boost the contrast when tinting. The Navy Blue and Cobalt Violet pencils are great for that. Just a little outline along a contour with those colors can make an image pop. It's also important to remove all color from specular highlight areas in the print. Otherwise it takes on a weird, unnatural pastel tone. There are also lots of different colors in what might at first seem to be a single hue. For example, when painting grass I use reds, violets, blues and yellow pencils as well as the green variety to make the area look more realistic.
My favorite paper was Ektalure G-surface, now long discontinued. A very close second was the original Foma 532 Chamois but that paper has changed. I think the newer version (532-II IIRC) would still probably be my favorite of the remaining suitably textured papers for hand-coloring.
If you ever get a chance to do a hand-coloring workshop with Elizabeth Opalenik, take it. You'll learn a lot by just watching her. I've taken two workshops from her as well as other popular photographers who hand-color and I must say I learned everything from Elizabeth combined with a lot of practice and patience. I was also fortunate to live in the same town as Rita Dibert long ago and saw her work all the time in local exhibits. I'm sure that also impacted my hand-coloring technique.
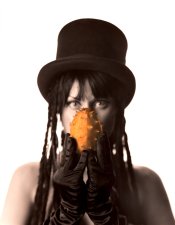
A couple examples are below. Both are around 11" in one dimension. There are several other examples in my APUG gallery.

"Polyphemus"

"Noam Stompsky" (of the Killamazoo Derby Darlins)
The PM solution is essentially linseed oil and turpentine (or a similar solvent). I spend most of my time removing the color and use the extender on a toothpick wrapped lightly in cotton. For absolutely blank white areas I might use Marlene similarly to remove all the color. Smear the color on and take it off carefully, then add details with the oil pencils is basically my technique. Pencils other than Marshall's (e.g., Prismacolor, etc.,) will also work. Don't be afraid to apply a lot of color or have it bleed a bit. I think the key to hand-coloring is the skill in removing the oils. It's a nice way to spend a rainy afternoon. And good therapy...
Others have mentioned the toothpicks, cotton balls, blue tape, etc., and I use those too. I generally print a little flat and then boost the contrast when tinting. The Navy Blue and Cobalt Violet pencils are great for that. Just a little outline along a contour with those colors can make an image pop. It's also important to remove all color from specular highlight areas in the print. Otherwise it takes on a weird, unnatural pastel tone. There are also lots of different colors in what might at first seem to be a single hue. For example, when painting grass I use reds, violets, blues and yellow pencils as well as the green variety to make the area look more realistic.
My favorite paper was Ektalure G-surface, now long discontinued. A very close second was the original Foma 532 Chamois but that paper has changed. I think the newer version (532-II IIRC) would still probably be my favorite of the remaining suitably textured papers for hand-coloring.
If you ever get a chance to do a hand-coloring workshop with Elizabeth Opalenik, take it. You'll learn a lot by just watching her. I've taken two workshops from her as well as other popular photographers who hand-color and I must say I learned everything from Elizabeth combined with a lot of practice and patience. I was also fortunate to live in the same town as Rita Dibert long ago and saw her work all the time in local exhibits. I'm sure that also impacted my hand-coloring technique.
A couple examples are below. Both are around 11" in one dimension. There are several other examples in my APUG gallery.
"Polyphemus"
"Noam Stompsky" (of the Killamazoo Derby Darlins)
| Photrio.com contains affiliate links to products. We may receive a commission for purchases made through these links. To read our full affiliate disclosure statement please click Here. |
PHOTRIO PARTNERS EQUALLY FUNDING OUR COMMUNITY:  |