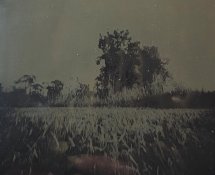
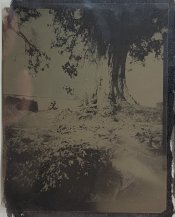
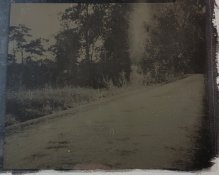
First experiment in displaying ortho lith film over black

Watering time

A
Watering time

  • 1
  • 0
  • 23
Cyan

D
Cyan

  • 1
  • 0
  • 18
Sunset & Wine

D
Sunset & Wine

  • 4
  • 0
  • 23
Adam Smith

A
Adam Smith

  • 1
  • 0
  • 75

Recent Classifieds

Forum statistics

Threads
199,101
Messages
2,786,141
Members
99,809
Latest member
OttoMaass
Recent bookmarks
0

Candlejack

Member
Joined
Sep 2, 2021
Messages
228
Location
Louisiana
Format
Med. Format Pan
So Im experimenting with just shooting photos with ortho lith film, but i wanted to show how they looked displayed over black ink, black water color and painted with black watercolor. I think id like to display them with a mat, glass and frame. It seems very seldom discussed on the internet and Id love to hear your opinions and experiences.
 

Attachments

  • 20211010_183911.jpg
    20211010_183911.jpg
    215.8 KB · Views: 244
  • 20211010_173209.jpg
    20211010_173209.jpg
    397.3 KB · Views: 240
  • 20211010_173351.jpg
    20211010_173351.jpg
    611.9 KB · Views: 241

@DrHSTGonzo

Member
Joined
Jul 25, 2018
Messages
51
Location
AR, USA
Format
Multi Format
Very interesting, what type of film and developer combination are you using? I've read and seen that Litho film is a very high contrast type film, but these look to have a better tonal range then expected. It seems like more folks go with X-Ray film in lieu of Litho film.
Unfortunately I don't have much experience with this process but would love to hear what others think, your progress and set-up working with Litho film.
Edit:
The look of how you're doing this is pretty cool. The ability to display in front of paper that has been painted looks like it can really expand the possibilities with this film.
~ Ryan
 

koraks

Moderator
Moderator
Joined
Nov 29, 2018
Messages
23,258
Location
Europe
Format
Multi Format
When I still used xray film, I ran into the possibilities for doing this often. It helps if a film has little to no top coat so that the silver layer is effectively right on top of the film. This creates the strongest effect. Xray film meets this criterion.

To get good results, in my experience you want to expose sufficiently, but develop only briefly. Downrate the film by one or two stops (so overexpose +1 or +2) and reduce development drastically compared to what you'd need for normal printing. You want a very thin negative, but with good shadow detail. If you develop too much, highlights will block up as shown in the example you posted.
 
Joined
Jul 6, 2008
Messages
181
Location
Europe
Format
Multi Format
So Im experimenting with just shooting photos with ortho lith film, but i wanted to show how they looked displayed over black ink, black water color and painted with black watercolor. I think id like to display them with a mat, glass and frame. It seems very seldom discussed on the internet and Id love to hear your opinions and experiences.

I played around with the idea, which I called faux-ambrotype. Litho or reproduction films work well, I used primarily (very) expired and somewhat fogged ORWO films (FU/FP/FN types). I found that phenidone or phenidone-rich developers work well, think POTA or XR-1, which also give you a higher EI. I developed the sheets in a tray at 30C for what I recall were extensive periods of time, which yielded positives that could be viewed without a black backing due to the high buildup of density. In fact, I could only scan the images in reflective mode on a flatbed and I never attempted optical printing. I did find it works better for low-key photos due to the loss of separation in the highlights.
I'll look around for examples.
 
OP
OP

Candlejack

Member
Joined
Sep 2, 2021
Messages
228
Location
Louisiana
Format
Med. Format Pan
Very interesting, what type of film and developer combination are you using? I've read and seen that Litho film is a very high contrast type film, but these look to have a better tonal range then expected. It seems like more folks go with X-Ray film in lieu of Litho film.
Unfortunately I don't have much experience with this process but would love to hear what others think, your progress and set-up working with Litho film.
Edit:
The look of how you're doing this is pretty cool. The ability to display in front of paper that has been painted looks like it can really expand the possibilities with this film.
~ Ryan

So this was my first ever ortho lith developed. The arista 3.0. I shot it in pinhole cameras but didnt account for reciprocity.. it was mainly just fooling around and seeing what could occur.

Development wise I did taco method, 1 +200 L110 for 18 minutes, with very slight tilting of the paterson every third minute. (Based on what I read online)

I would love to try x ray film, but after reading its double sided, I dont know how to adequately protect the back side from scratches.
 
OP
OP

Candlejack

Member
Joined
Sep 2, 2021
Messages
228
Location
Louisiana
Format
Med. Format Pan
When I still used xray film, I ran into the possibilities for doing this often. It helps if a film has little to no top coat so that the silver layer is effectively right on top of the film. This creates the strongest effect. Xray film meets this criterion.

To get good results, in my experience you want to expose sufficiently, but develop only briefly. Downrate the film by one or two stops (so overexpose +1 or +2) and reduce development drastically compared to what you'd need for normal printing. You want a very thin negative, but with good shadow detail. If you develop too much, highlights will block up as shown in the example you posted.

I think I need to expose the film more right? I have a crown graphic coming in so that should help.

I used the development formula above. Maybe I can decrease the development time as well?
 
OP
OP

Candlejack

Member
Joined
Sep 2, 2021
Messages
228
Location
Louisiana
Format
Med. Format Pan
I played around with the idea, which I called faux-ambrotype. Litho or reproduction films work well, I used primarily (very) expired and somewhat fogged ORWO films (FU/FP/FN types). I found that phenidone or phenidone-rich developers work well, think POTA or XR-1, which also give you a higher EI. I developed the sheets in a tray at 30C for what I recall were extensive periods of time, which yielded positives that could be viewed without a black backing due to the high buildup of density. In fact, I could only scan the images in reflective mode on a flatbed and I never attempted optical printing. I did find it works better for low-key photos due to the loss of separation in the highlights.
I'll look around for examples.

Id love to see your examples. Did you wind up displaying them as if they were ambrotype? Thats the end goal of this experiment.
 

koraks

Moderator
Moderator
Joined
Nov 29, 2018
Messages
23,258
Location
Europe
Format
Multi Format
I think I need to expose the film more right?
Yeah, I would increase exposure significantly and reduce development as well.

The nice thing with Ortho film is that you can develop by inspection; I would recommend doing so. Stop developing as soon as the important shadows are just visible. If the highlights don't show sufficient differentiation anymore by then (i.e. they're blocked up), you know you need to further increase exposure on the next shot.

It's essentially the same approach as making ambrotypes (you know, with collodion). The main difference is that your material is much faster to expose and much slower to develop. And the film approach is a lot less messy of course.
 
OP
OP

Candlejack

Member
Joined
Sep 2, 2021
Messages
228
Location
Louisiana
Format
Med. Format Pan
Yeah, I would increase exposure significantly and reduce development as well.

The nice thing with Ortho film is that you can develop by inspection; I would recommend doing so. Stop developing as soon as the important shadows are just visible. If the highlights don't show sufficient differentiation anymore by then (i.e. they're blocked up), you know you need to further increase exposure on the next shot.

It's essentially the same approach as making ambrotypes (you know, with collodion). The main difference is that your material is much faster to expose and much slower to develop. And the film approach is a lot less messy of course.

So far ive just developed traditional film and then sheet film using the taco method. Eventually when i build a darkroom ill be able to tray process it and watch the development take place :smile:.
So far ive done cyanotype and van dyke. Id like to try the other alt methods as well eventually. :smile:!
 

MattKing

Moderator
Moderator
Joined
Apr 24, 2005
Messages
53,174
Location
Delta, BC Canada
Format
Medium Format
I would love to try x ray film, but after reading its double sided, I dont know how to adequately protect the back side from scratches.
Some x-ray films are single sided - primarily ones for mammography I believe.
 

Donald Qualls

Subscriber
Joined
Jan 19, 2005
Messages
12,313
Location
North Carolina
Format
Multi Format
A couple potential options for processing sheet film in daylight (after loading the tank, of course) other than taco: Yankee Agitank works well in my experience (I have one), accommodates most sheet film sizes, and holds a lot of film (up to 12 sheets), though it also needs a lot of solution to cover the film, which stands on its long edge inside the tank (mine needs 1.6+ liters to cover 4x5, whether it's one sheet or twelve) and is easy to misload (leading to sheets contacting each other, causing undeveloped areas). There are a number of inserts for Paterson System 4 and Super System 4 that accept one size of sheet film each -- Mod 54 is one brand. They hold, IIRC, 4 sheets in a Paterson that will take 2x120. Jobo made a tank and reel system specifically for sheet film, but it's expensive and unless used with a rotary agitation system of some kind, also needs a lot of liquid. You can also process film in "print drums" -- daylight processing drums originally made/sold for daylight processing color prints after initial handling (under the enlarger) in total darkness. These haven't been made in decades, though, and are likely to leak due to old compressed gaskets; if you have (access to) a 3D printer it may be possible to print replacement seals in Thermoplastic Polyurethane (TPU) filament, and they can be had at pretty reasonable prices (though shipping cuts into the savings).

Trays are a good option once you have a darkroom, especially for ortho films, since you can develop under red safelight and see what you're doing at every stage, but the others above make a bathroom with a decent counter a good alternative, as long as you have a large changing bag.
 

BrianShaw

Member
Joined
Nov 30, 2005
Messages
16,547
Location
La-la-land
Format
Multi Format
For 4x5 the best daylight processing option I’ve used is the Stearman 445. Only 4 sheets but so what?
 
OP
OP

Candlejack

Member
Joined
Sep 2, 2021
Messages
228
Location
Louisiana
Format
Med. Format Pan
Some x-ray films are single sided - primarily ones for mammography I believe.

Id love to be able to find mammogram film in 4x5. Not sure if they need to be ordered in a larger size and cut down to fit film holders.
 

Donald Qualls

Subscriber
Joined
Jan 19, 2005
Messages
12,313
Location
North Carolina
Format
Multi Format
I don't think I've seen any X-ray stock in sizes smaller than about 6x9 inches (or metric equivalent) other than dental (which is closer to 3x4 cm) -- but I haven't looked that hard. The main reason folks use X-ray is that it comes precut to 8x10 film holder size, but costs about what economy 4x5 camera film costs. You'd need a darkroom to recut it, though.

Does Ilford sell their Ortho 80 in 4x5?
 
OP
OP

Candlejack

Member
Joined
Sep 2, 2021
Messages
228
Location
Louisiana
Format
Med. Format Pan
I don't think I've seen any X-ray stock in sizes smaller than about 6x9 inches (or metric equivalent) other than dental (which is closer to 3x4 cm) -- but I haven't looked that hard. The main reason folks use X-ray is that it comes precut to 8x10 film holder size, but costs about what economy 4x5 camera film costs. You'd need a darkroom to recut it, though.

Does Ilford sell their Ortho 80 in 4x5?

That would be a pretty lucrative side gig, cutting down x ray film to 4x5 and reselling it.

If i had a 8x10.. that would be the way to go.
 

MattKing

Moderator
Moderator
Joined
Apr 24, 2005
Messages
53,174
Location
Delta, BC Canada
Format
Medium Format
It is relatively easy to cut, because you can work under safelight.
 

koraks

Moderator
Moderator
Joined
Nov 29, 2018
Messages
23,258
Location
Europe
Format
Multi Format
That would be a pretty lucrative side gig, cutting down x ray film to 4x5 and reselling it.
I don't know. You'd be catering to a crowd that is very cost-conscious (not to say they're cheapskates for a large part), many of them will buy once and never return (concluding xray or even sheet film altogether is not for them). It's not difficult, but I doubt it's fun. There is a market for it, however.
 
OP
OP

Candlejack

Member
Joined
Sep 2, 2021
Messages
228
Location
Louisiana
Format
Med. Format Pan
I don't know. You'd be catering to a crowd that is very cost-conscious (not to say they're cheapskates for a large part), many of them will buy once and never return (concluding xray or even sheet film altogether is not for them). It's not difficult, but I doubt it's fun. There is a market for it, however.

Yea, I guess that does make sense. Plus reboxing, mailing, shipping, it wouldnt be cost effective. Thats probably what the 4x5 xray film thats already on the market is honestly...
 

Donald Qualls

Subscriber
Joined
Jan 19, 2005
Messages
12,313
Location
North Carolina
Format
Multi Format
And let's not forget that these "cost conscious" users are also going to be the first ones to complain about scratches, fingerprints, incorrectly positioned orientation notches, etc. Plus, to make this cost-effective and minimize safelight fogging (because the end user will also handle the film under safelight, adding to the total exposure before development) you'd want a machine that does the actual cutting -- pull a sheet from the box, drop it on the machine stage, pull the handle, collect the four sheets, notch them while maintaining orientation (mainly important for single-sided films, of course), then into the black bag for the new size.

I doubt you could sell the end product much below Arista .EDU Ultra 100 and still make anything close to wages, which would make it a labor of love -- which is a bad idea in this market.
 
OP
OP

Candlejack

Member
Joined
Sep 2, 2021
Messages
228
Location
Louisiana
Format
Med. Format Pan
And let's not forget that these "cost conscious" users are also going to be the first ones to complain about scratches, fingerprints, incorrectly positioned orientation notches, etc. Plus, to make this cost-effective and minimize safelight fogging (because the end user will also handle the film under safelight, adding to the total exposure before development) you'd want a machine that does the actual cutting -- pull a sheet from the box, drop it on the machine stage, pull the handle, collect the four sheets, notch them while maintaining orientation (mainly important for single-sided films, of course), then into the black bag for the new size.

I doubt you could sell the end product much below Arista .EDU Ultra 100 and still make anything close to wages, which would make it a labor of love -- which is a bad idea in this market.

Yup, its a shame. Im using the cheap ortho lith as well as the artisa 400. I did get scratches with ortho lith so far.. but I read that going into it. Honestly i cant wait to use more ortho lith and if it works somewhat decently ill order a bunch.

I really do like the potential of displaying the ortho lith negs as faux ambrotypes
 

Donald Qualls

Subscriber
Joined
Jan 19, 2005
Messages
12,313
Location
North Carolina
Format
Multi Format
You could also try developing the Ortho Lith in a print developer like Dektol 1+3 (or even higher dilutions, like the 1+9 usually used for film in Dektol) -- you'll get lower contrast, which you want/need, without having to shorten development so far you have trouble with consistency and evenness. Some say it won't work well, but we processed Kodalith in Dektol when I was in high school (though we did it at print strength, in print trays, under safelight, so we could snatch it at the right stage -- which is a recipe for inconsistent development).
 
OP
OP

Candlejack

Member
Joined
Sep 2, 2021
Messages
228
Location
Louisiana
Format
Med. Format Pan
You could also try developing the Ortho Lith in a print developer like Dektol 1+3 (or even higher dilutions, like the 1+9 usually used for film in Dektol) -- you'll get lower contrast, which you want/need, without having to shorten development so far you have trouble with consistency and evenness. Some say it won't work well, but we processed Kodalith in Dektol when I was in high school (though we did it at print strength, in print trays, under safelight, so we could snatch it at the right stage -- which is a recipe for inconsistent development).

When i eventually make a darkroom, I can definately get a print developer and try that with the lith. Right now im restricted to cyanotype and van dyke contact prints.

I miss black and white prints. :sad:
 

Donald Qualls

Subscriber
Joined
Jan 19, 2005
Messages
12,313
Location
North Carolina
Format
Multi Format
Cyanotype can be toned to a near-black -- either directly (soak in strong tea) or by bleaching and then toning (also in strong tea). Either method converts some (the latter most) of the Prussian blue that forms the image into iron tannate, the primary ingredient of registrar's ink (and in permanent enough to last centuries under poor conditions). The tea toning will also stain the paper, of course, so you'll wind up with a blue-black or black on brown image, but it's a nice variation on the traditional cyanotype and won't fade if kept in the dark for many years as cyanotype can.
 
OP
OP

Candlejack

Member
Joined
Sep 2, 2021
Messages
228
Location
Louisiana
Format
Med. Format Pan
Cyanotype can be toned to a near-black -- either directly (soak in strong tea) or by bleaching and then toning (also in strong tea). Either method converts some (the latter most) of the Prussian blue that forms the image into iron tannate, the primary ingredient of registrar's ink (and in permanent enough to last centuries under poor conditions). The tea toning will also stain the paper, of course, so you'll wind up with a blue-black or black on brown image, but it's a nice variation on the traditional cyanotype and won't fade if kept in the dark for many years as cyanotype can.

The cyanotype toning ive seen and tried is so pleasing. Ive seen some people do amazing work with tumeric.. but I have no idea as to the longevity of tumeric toning. Any ideas?

Ive also experimented with brushing acrylic gel medium on the dried cyanotype. It gives it a wet look.
 
Photrio.com contains affiliate links to products. We may receive a commission for purchases made through these links.
To read our full affiliate disclosure statement please click Here.

PHOTRIO PARTNERS EQUALLY FUNDING OUR COMMUNITY:


Ilford ADOX Freestyle Photographic Stearman Press Weldon Color Lab Blue Moon Camera & Machine
Top Bottom