


Jessestr
Member
- Joined
- Mar 31, 2014
- Messages
- 399
- Format
- 35mm
So... I did my first enlargements tonight. Forgot about some pretty obvious things due to the excitement. Such as filter grades and aperture (  ). After finally digging out what was wrong got some successful prints.
I only saw one vid about enlarging so mostly trial and error. Took only 7 tries to get a good exposure on the paper. But I have some questions.
What I was using
I was using Adox MCP 312 10x15 matte paper (variable contrast), love the blacks!
Durst M305 Cls with a Schneider Componon-S 50/f2.8
Ilford Multigrade kit (grade 3 for a particular photo, which I knew needed a little bit more contrast)
Adox Adotol NE
Adostop
Adofix
What I did
Put a piece of paper, and exposed 5,10,15,20,25 seconds and such. I found a sweet spot on about 7 seconds (aperture: f11) for my picture and some other pictures I did. (which had correct exposure)
Now how can I find this time without trial & error. How do I add some extra stops, (logaritmic ?). Is there any logic in the "base" time?
My actual questions
- (answered) What is the best way to find the correct exposure for a shot?
- (answered) So Adox says, Adotol NE needs 60 seconds of development for PE paper in 20°C... Does it vary on what paper is used (like developer times changes on film type)? As I used 60 seconds and it worked fine
- (answered) The vid I saw of the darkroom, the guy had exposure times of about 20-30 seconds, also on f/11.. How is that achieved? I'm not sure but I think he used Ilford paper with ISO 6 (possible?)
- (answered) What is the ISO of the Adox MCP 312 paper? And how does the grade filters affect the ISO speed?
- (answered) The developer acts different is I thought it would do. The first 10 seconds basically almost nothing, then from 10 tot 20 seconds I can see the picture appearing, and from 20-60 I can't see any other differences in the development process. Pretty weird actually. Thought it was going to fade in smoothly from 1 to 60.
- I used the Ilford filters from a friend. But I'm using a color head and I want to be able to use the color head instead of the filters. I was checking the datasheet and found out about the settings. But when I compare the actual grade filter vs. the color head settings (that corresponds to the grade filter for a durst color head). It looks like a different kind of color. Is this normal?
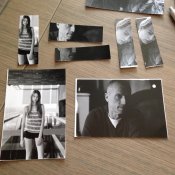
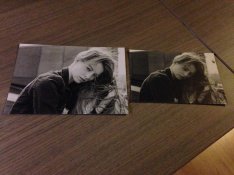
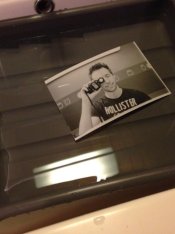
Here are some prints I made, sorry for the crappy iPhone shots (weird color balance & noise), I dumped all my digital gear for analog
). After finally digging out what was wrong got some successful prints.I only saw one vid about enlarging so mostly trial and error. Took only 7 tries to get a good exposure on the paper. But I have some questions.
What I was using
I was using Adox MCP 312 10x15 matte paper (variable contrast), love the blacks!
Durst M305 Cls with a Schneider Componon-S 50/f2.8
Ilford Multigrade kit (grade 3 for a particular photo, which I knew needed a little bit more contrast)
Adox Adotol NE
Adostop
Adofix
What I did
Put a piece of paper, and exposed 5,10,15,20,25 seconds and such. I found a sweet spot on about 7 seconds (aperture: f11) for my picture and some other pictures I did. (which had correct exposure)
Now how can I find this time without trial & error. How do I add some extra stops, (logaritmic ?). Is there any logic in the "base" time?
My actual questions
- (answered) What is the best way to find the correct exposure for a shot?
- (answered) So Adox says, Adotol NE needs 60 seconds of development for PE paper in 20°C... Does it vary on what paper is used (like developer times changes on film type)? As I used 60 seconds and it worked fine
- (answered) The vid I saw of the darkroom, the guy had exposure times of about 20-30 seconds, also on f/11.. How is that achieved? I'm not sure but I think he used Ilford paper with ISO 6 (possible?)
- (answered) What is the ISO of the Adox MCP 312 paper? And how does the grade filters affect the ISO speed?
- (answered) The developer acts different is I thought it would do. The first 10 seconds basically almost nothing, then from 10 tot 20 seconds I can see the picture appearing, and from 20-60 I can't see any other differences in the development process. Pretty weird actually. Thought it was going to fade in smoothly from 1 to 60.
- I used the Ilford filters from a friend. But I'm using a color head and I want to be able to use the color head instead of the filters. I was checking the datasheet and found out about the settings. But when I compare the actual grade filter vs. the color head settings (that corresponds to the grade filter for a durst color head). It looks like a different kind of color. Is this normal?
Here are some prints I made, sorry for the crappy iPhone shots (weird color balance & noise), I dumped all my digital gear for analog
Attachments
Last edited by a moderator:


 but can anyone else here help? Given that the OP doesn't have an RH Designs Analyser and intends to try using a dichroic head for contrast can anyone else help with links?