Ferrotyping fiber paper - problem

Rouse st

A
Rouse st

  • 1
  • 1
  • 12
Do-Over Decor

A
Do-Over Decor

  • 1
  • 1
  • 78
Oak

A
Oak

  • 1
  • 0
  • 65
High st

A
High st

  • 10
  • 0
  • 94

Forum statistics

Threads
199,228
Messages
2,788,205
Members
99,836
Latest member
Candler_Park
Recent bookmarks
0

-chrille-

Member
Joined
Jan 7, 2023
Messages
121
Location
Sweden
Format
Large Format
Hi,

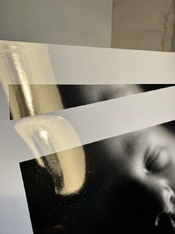
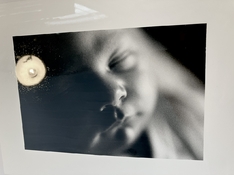
I made my first print with ferrotyping/glazing process and got a problem. There is some kind of pitting all over the print emulsion. Does anyone here know what the problem is?

I use Ilford MG FB glossy paper.

Here is my process:

Developing and washing print according to Ilford archival method. (Ilford Rapid fixer used.)

Rinsed the print in destilled water with Adox Adoflo dilution 1:200.

Cleaned the chrome plate(brand new, never used in perfect condition) with soap and a tap water rinse. Finally rinsed the plate in destilled water with Adox Adoflo dilution 1:200 as I did with the print. Both print and chromed plate are wet when combined, emulsion side on the plate, and I used a roller to press out the water between the print and chrome plate.

Placed the print and plate in the dryer(double canvas-type dryer) and let it dry for approx 1 hour with heat on, then I let the print stay in the dryer for another 12h with heater off.

The print was easily separated from the chrome plate, pops off by itself, when dry and I can not see any pieces of gelatin sticking on the chrome plate. Plate clean as new.

You can see example of the pitting (in the glare ande reflection of the lamp) in the attached photo.

Best regards

/Christian
C9E17267-869E-46A5-B90D-9A1D00D0C07C.jpeg
 

Rick A

Subscriber
Joined
Mar 31, 2009
Messages
9,956
Location
Laurel Highlands
Format
8x10 Format
No one makes ferrotype polish any more. You can try polishing the plates with a micro crystalline wax(such as Renaissance Wax) and hope for a good outcome. The Kodak stuff reeked to high heaven but long gone. Dry your prints with the emulsion facing away from the plates so you don't get the blotches.
 

lantau

Member
Joined
Jan 15, 2016
Messages
826
Location
Germany
Format
Multi Format
For ferrotyping you should probably harden the print. Since being archival is important for you, probably best to do it after washing and then wash again.
 

Philippe-Georges

Subscriber
Joined
Apr 11, 2005
Messages
2,680
Location
Flanders Fields
Format
Medium Format
As I can recall from more than 40 years ago, when I learned to glaze (AGFA-) FB prints, my master told me not to use a wetting agent, which at the time was AGEPON, and is still made by ADOX under the name Adoflo.
But don't ask me why not to use a wetting agent, after 40 years...

What I do recall is that at the time, we used a special glazing product, also made by AGFA, and an 'anti curl' product too.
When I have the time I will 'dive' in the cupboard of my darkroom where I keep the leftovers of the 'no more used' products (if I kept it)...

We had the famous and very professional KODAK drum glazing machine, a heavy beast considered ast the best money could buy.
Keeping the glazing plate (drum) clean, and free of scratches was a time consuming and painful forced labor, and that's why we stopped glazing!

I think, by the touch if it, that the actual FB papers aren't made to for ferrotyping any more, but that's a personal feeling (based on recollection)...
 
OP
OP

-chrille-

Member
Joined
Jan 7, 2023
Messages
121
Location
Sweden
Format
Large Format
Thank you all for the replies and input👍

I did another copy the same way but without heat in the dryer. The print came out really good with only a couple of pits. Not perfect thought and the print dont show the glossiness of the heat dried copy.

I really like the high gloss of the heat dryed ferrotyped print and I will do some more tests soon.

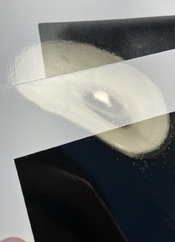
Attached is a comparison of my two ferrotyped prints. The print in front is the heat dryed with all the pitting/cavities and the other is just ”air” dryed in the print dryer.

BD2E0E2C-55F0-4257-B169-44F21CA5D7E1.jpeg
 
OP
OP

-chrille-

Member
Joined
Jan 7, 2023
Messages
121
Location
Sweden
Format
Large Format
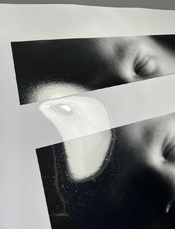
A bit of topic but if anyone is interested in the surface texture of prints, I did some comparison between the heat dried ferrotyped print and Ilford Multigrade RC and non ferrotyped(just air dried on mesh) Ilford Multigrade fiber glossy

RC print behind the ferrotyped print:


F5D5FEB1-F1DF-4AEB-A681-A75919742571.jpeg

Air dried Fiber print behind ferrotyped print:


489F4C93-6140-4143-8D16-C7ABBA15F0E1.jpeg
 

Don_ih

Member
Joined
Jan 24, 2021
Messages
7,861
Location
Ontario
Format
35mm RF
The best results I ever had were from when I used furniture wax on the plate. You rub it on and buff it off until you don't see a trace of it, anymore. Every time without that wax had pits such as yours. But even the best ones still had some defects.
 

VinceInMT

Subscriber
Joined
Nov 14, 2017
Messages
1,889
Location
Montana, USA
Format
Multi Format
As I remember it, seeing some speckling in my ferrotyped prints, it was setting the heat too high on the dryer. The spots were caused by the water steaming up with no place for it to go and causing a separation from the plate. I do remember that some people would use a ferrotype plate without any heat at all.
 

koraks

Moderator
Moderator
Joined
Nov 29, 2018
Messages
23,472
Location
Europe
Format
Multi Format
The spots were caused by the water steaming up with no place for it to go and causing a separation from the plate.

Indeed. The problem will be worse if there's poor contact between the plate and the print surface while squeegeeing the pair together.

The best ferrotyping results I've had were with plexiglass and no heat. YMMV.
 

Philippe-Georges

Subscriber
Joined
Apr 11, 2005
Messages
2,680
Location
Flanders Fields
Format
Medium Format
Thanks! Are there any table of contents printed on the bottles? I tried to google the old products but with no success.

All I could find about Novogloss is a concise description in an AGFA-Gevaert Technical leaflet from 1974 in Flemish/Dutch...
But no formula.
 
OP
OP

-chrille-

Member
Joined
Jan 7, 2023
Messages
121
Location
Sweden
Format
Large Format
As I remember it, seeing some speckling in my ferrotyped prints, it was setting the heat too high on the dryer. The spots were caused by the water steaming up with no place for it to go and causing a separation from the plate. I do remember that some people would use a ferrotype plate without any heat at all.

I spend some more quality time in the darkroom and ferrotyped a couple of prints in the dryer with and without heat. With heat on there are cavities all over the print. Without heat the print gets a perfect finish but the gloss is no way near the heat dryed print. Probably to hot in the dryer. Unfortunately there is no way controlling the temperature on my dryer.

Photo of ferrotyped print, no heat in dryer.
196E3C2C-76CC-4DED-9828-5AE870EEC5D7.jpeg
 

VinceInMT

Subscriber
Joined
Nov 14, 2017
Messages
1,889
Location
Montana, USA
Format
Multi Format
I’m not sure why the degree of gloss would be different with or without heat but at least you are onto a solution.
 

mshchem

Subscriber
Joined
Nov 26, 2007
Messages
14,781
Location
Iowa City, Iowa USA
Format
Medium Format
Heat needs to be controlled, maybe a lightning variable dimmer switch? The ferrotype polish of the old days was a wax dissolved in benzene (not gasoline 😊). In the US there was Pakosol and Kodak Print Flattening solution used for glazing.
Keep trying 😊
 

Don_ih

Member
Joined
Jan 24, 2021
Messages
7,861
Location
Ontario
Format
35mm RF
I’m not sure why the degree of gloss would be different with or without heat but at least you are onto a solution.

Emulsion melting?

I had better luck ferrotyping 50 year old Kodabromide than any contemporary paper.
 

Paul Howell

Subscriber
Joined
Dec 23, 2004
Messages
9,750
Location
Scottsdale Az
Format
Multi Format
I've stopped ferrotyping and use RC glossy, I only dry FB semi gloss. In the past I cleaned the plate with a chrome cleaning and polishing compound, from the auto parts store, soaked the prints in distilled water, (not sure why but seemed to work better than tap water) used Kodak print flatting solution when I had some, squeegeed the prints on the plate and let them air dry and pop off. My ferrotype dryer is electric but found the slower drying cycle of air drying leaves a print with less curl. You can make your own print flatting solutions, there are a number of formulas on line. All in all just determined it was worth the trouble. As a historical note when I was freelancing for the newspapers in the 60s and 70s when RC was not as developed as today's versions all my prints had to be glossy for the old half tone printing method.
 

mshchem

Subscriber
Joined
Nov 26, 2007
Messages
14,781
Location
Iowa City, Iowa USA
Format
Medium Format
This isn't rocket science. There's probably imperfections either on the plate, or possibly the paper/chemistry.

It could be that it's improving because the paper is removing crud from the ferrotype tin???

This is making me want to try this even though I haven't done this in decades 😳

If you want really high gloss from RC/PE paper find an Ilford print dryer, slightly melts the gelatin to let if level to an amazing gloss.

I use a Pako drum dryer for fiber base prints. If I don't use hardener the prints stick (face out to the canvas belt) to the belt.

When I try this I'm going to go back in time Polish, hardener, Pakosol.
 
Joined
Jul 31, 2012
Messages
3,362
Format
35mm RF
I pretty much invented the plexiglas method. But the old way works fine too. If you are having issues with areas that aren't glazing then your heat is probably too high, like others have mentioned. If you like the gloss with heat better, try putting the print in hot water before you ferrotype it on a cold plate. I had very sporadic luck with ferrotype plates. Mostly failures. Modern papers just aren't the same as the old ones. If you can get your hands on some plexiglas it is pretty cheap and works great. Just make sure you wax it just a touch. You have to do that with your metal plate too. Just a tiny bit of wax. I use Butcher's wax here in the US but it is just a combination of carnauba and beeswax. You can find beeswax pretty much everywhere. Dilute it in a solvent if you have one. You really only need the tiniest amount to spread it over the plate/plexi. Then buff it a bit. Make sure the plate is clean too before you wax it.

The advantage of the plexi, if you get clear plexi, is that you can see through it. Any dust that is trapped can be eliminated. You can also see if you have full contact with the plexi.

Another tip is to put a towel over the print so it dries more slowly/evenly. You'll have less of a chance of oystering that way. I don't recall plexi ever oystering on me but I always cover it with a towel. The static of the plexi I think is what makes it work so well.

I use a hard plastic brayer to press the paper into the plexi. I apply quite a bit of pressure.

I've done the glycerine thing before which is what is in the print flattening solution IIRC. I don't recall much about it except the print still felt a bit wet afterwards which is actually the case. Glycerine is hydroscopic.
 

mshchem

Subscriber
Joined
Nov 26, 2007
Messages
14,781
Location
Iowa City, Iowa USA
Format
Medium Format
I pretty much invented the plexiglas method. But the old way works fine too. If you are having issues with areas that aren't glazing then your heat is probably too high, like others have mentioned. If you like the gloss with heat better, try putting the print in hot water before you ferrotype it on a cold plate. I had very sporadic luck with ferrotype plates. Mostly failures. Modern papers just aren't the same as the old ones. If you can get your hands on some plexiglas it is pretty cheap and works great. Just make sure you wax it just a touch. You have to do that with your metal plate too. Just a tiny bit of wax. I use Butcher's wax here in the US but it is just a combination of carnauba and beeswax. You can find beeswax pretty much everywhere. Dilute it in a solvent if you have one. You really only need the tiniest amount to spread it over the plate/plexi. Then buff it a bit. Make sure the plate is clean too before you wax it.

The advantage of the plexi, if you get clear plexi, is that you can see through it. Any dust that is trapped can be eliminated. You can also see if you have full contact with the plexi.

Another tip is to put a towel over the print so it dries more slowly/evenly. You'll have less of a chance of oystering that way. I don't recall plexi ever oystering on me but I always cover it with a towel. The static of the plexi I think is what makes it work so well.

I use a hard plastic brayer to press the paper into the plexi. I apply quite a bit of pressure.

I've done the glycerine thing before which is what is in the print flattening solution IIRC. I don't recall much about it except the print still felt a bit wet afterwards which is actually the case. Glycerine is hydroscopic.

All good information. I have washer dividers I could try. I think surface preparation of the glazing surface is super important, waxing was used back in the day. The print flattering solutions are absolutely hygroscopic, the Kodak version used a glycol ether IIRC.
One other thing back in the day most "glossies" were single weight paper. I have a bottle of ancient ferrotype polish, I'm going to try.
 

koraks

Moderator
Moderator
Joined
Nov 29, 2018
Messages
23,472
Location
Europe
Format
Multi Format
To explain "why the degree of gloss would be different with or without heat"?

Yes. Water expands and turns into steam as it boils. Water trapped in small pockets dus to the slightly uneven surface texture of the paper results in localized pitting. Without heat, it doesn't happen as the water has time to diffuse away gradually.
 
OP
OP

-chrille-

Member
Joined
Jan 7, 2023
Messages
121
Location
Sweden
Format
Large Format
Yes. Water expands and turns into steam as it boils. Water trapped in small pockets dus to the slightly uneven surface texture of the paper results in localized pitting. Without heat, it doesn't happen as the water has time to diffuse away gradually.

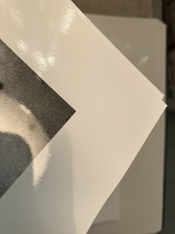
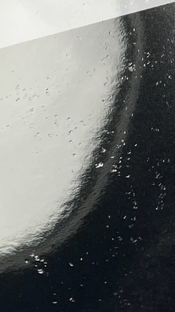
I think thats why I get all those cavities in the print. The cavities goes deep into the paper base through the emulsion layer.

Here is a photo. Not the best macro capability with my iPhone but I hope it will add something to this discussion.

EDFD6681-8917-448C-865C-8BF743FF9D8D.jpeg
 
Photrio.com contains affiliate links to products. We may receive a commission for purchases made through these links.
To read our full affiliate disclosure statement please click Here.

PHOTRIO PARTNERS EQUALLY FUNDING OUR COMMUNITY:


Ilford ADOX Freestyle Photographic Stearman Press Weldon Color Lab Blue Moon Camera & Machine
Top Bottom