Fancy leatherette - multiple leathers?

Brentwood Kebab!

A
Brentwood Kebab!

  • 0
  • 0
  • 9
Summer Lady

A
Summer Lady

  • 0
  • 0
  • 9
DINO Acting Up !

A
DINO Acting Up !

  • 0
  • 0
  • 8
What Have They Seen?

A
What Have They Seen?

  • 0
  • 0
  • 13
Lady With Attitude !

A
Lady With Attitude !

  • 0
  • 0
  • 13

Recent Classifieds

Forum statistics

Threads
198,755
Messages
2,780,468
Members
99,698
Latest member
Fedia
Recent bookmarks
0

hospadar

Member
Joined
Jun 24, 2024
Messages
51
Location
Michigan, USA
Format
35mm
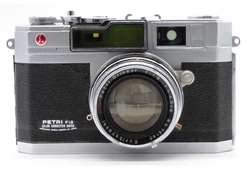
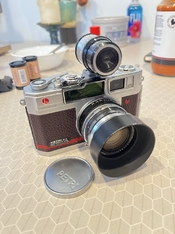
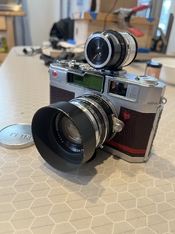
Currently in the process of rebuilding a Petri Color Corrected Super 1.9. It's in pretty good shape but all the lube is extremely gunky so I've totally pulled apart the helical for a full cleaning. The rangefinder and film winder mechs are similarly gunked up with ancient grease so they'll all be getting a good working-over. Got it (and a parts donor) for pretty cheep so am having a fun time with it. Normally I wouldn't be messing around with disassembling the lens, but the focus was SO stiff and grungy to the point of almost grinding (which must just be from sitting because the glass actually looks great). Will probably open up the shutter and clean things up in there too - it seems mostly functional and the blades are clean, but it occasionally hangs a bit on the slow speeds (great guide to opening up the shutter on this over here: https://www.photo.net/forums/topic/470076-petri-cc-19-shutter-repair/).

ANYWAYS - you have to peel up the leatherette to get the lens out, and when you do peel up the leatherette on these guys, it shatters into a million tiny plastic pieces, so I'm also going to be recovering it. Since it's such a stylish cam to start with, and since I'm kinda going overboard and it's going to be SO nice and clean and smooth by the time i'm done with it I want to give it a really fancy custom covering job.

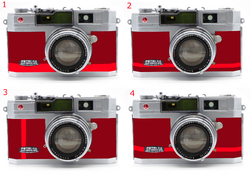
The original leatherette has some stylish racing stripes embossed into it, and I was thinking about mimicking that with a racing strip of a different leather color (like maybe a dark burgundy with a bright red stripe. The stripe would be glued directly to the body, not on top of the main covering (i'd excise a strip from the main covering and install it all mosaic-style). Seems like I should just go ahead and try it, but wondering if anyone has ever done something like that? If so do you pick a particular glue for a particular reason? I imagine it'll work just fine but maybe I need to be thoughtful about the leather shrinkng and pulling away from where the two strips butt up against each other?

TBH mostly I'm just excited to get this lil guy looking gorgeous and wondering if anyone has pictures of a similar stylish covering job
 

Tel

Subscriber
Joined
May 9, 2011
Messages
965
Location
New Jersey
Format
Multi Format
I’ve re-covered a number of cameras and found Pliobond to be a good adhesive. It’s a contact cement, I suppose, but it gives you a fairly generous amount of fitting time. And it seems to remain flexible after it’s cured, so maybe shrinkage or swelling of the leather would be less of an issue. It’s not a specialist product—I get mine at Ace Hardware. I haven’t tried doing a racing stripe but it seems like a good idea. Good luck with it.
 
OP
OP
hospadar

hospadar

Member
Joined
Jun 24, 2024
Messages
51
Location
Michigan, USA
Format
35mm
For reference, something like this:

I realize I could also stitch the stripe color on top of base color and then just glue the base down. I would have no doubts about the durability of that approach but it'd be a different look
 

Attachments

  • 61y93KtEfSL.jpg
    61y93KtEfSL.jpg
    71.6 KB · Views: 42
  • g20.png
    g20.png
    1.6 MB · Views: 73
OP
OP
hospadar

hospadar

Member
Joined
Jun 24, 2024
Messages
51
Location
Michigan, USA
Format
35mm
I’ve re-covered a number of cameras and found Pliobond to be a good adhesive. It’s a contact cement, I suppose, but it gives you a fairly generous amount of fitting time. And it seems to remain flexible after it’s cured, so maybe shrinkage or swelling of the leather would be less of an issue. It’s not a specialist product—I get mine at Ace Hardware. I haven’t tried doing a racing stripe but it seems like a good idea. Good luck with it.

Do you apply it to the camera (that's how I've always used contact cement for countertops and whatnot) and the leather or just the leather?
 

Dan Daniel

Subscriber
Joined
Jul 4, 2009
Messages
2,883
Location
upstate New York
Format
Medium Format
Do you have access to a laser cutter? It could make the inlays easy to do. I think that Hugo Studios uses lasers for their skin cutting. Maybe ask them if you could send them a file for cutting?
 

Tel

Subscriber
Joined
May 9, 2011
Messages
965
Location
New Jersey
Format
Multi Format
Do you have access to a laser cutter? It could make the inlays easy to do. I think that Hugo Studios uses lasers for their skin cutting. Maybe ask them if you could send them a file for cutting?
Good idea--Hugo’s stuff is very cleanly cut and precise, and the adhesive he uses is excellent.
 
OP
OP
hospadar

hospadar

Member
Joined
Jun 24, 2024
Messages
51
Location
Michigan, USA
Format
35mm
Update:

Just lasere'd and applied my covering yesterday and very happy with the results. All in all looks great, we'll see how the inlaid strips and little corners hold up over time (I cut another set of leather with none of the inlays to save in case stuff goes south later).

Some notes:
  • Leather: I used genuine veg tanned leather ordered from Rocky Mountain Leather Supply - the leather is "Dollaro" made by Conceria Walpier. RML will split it for free, I had it split to .6mm which is what I measured the original leatherette to be and seems to be a perfect match thickness-wise. It's super luxurious looking and feeling and should age really nicely.
  • Pattern: I used masking tape to measure around the body curves and came up pretty accurately. I ended up with an extra .5-1mm up against the hinges that I just trimmed off with an exacto which still looks pretty decent. I drafted a pattern with cad software. I did a test cut with some slightly thicker scrap leather that got me pretty close. I think I would probably have needed to do 2 or 3 cuts with the laser to dial the pattern in perfectly, but I only had 2 or 3 cuts worth of leather total so I just hedged on the "maybe slightly too long" side of things and trimmed down. I designed the pattern to fit my measurements then outset the entire pattern .1mm to accomodate the kerf of the laser (which I guessed)
  • Glue: I used dap weldwood contact cement because that's what I had. I masked off areas on the camera to be glued and applied glue to both the camera and the leather. As normal with contact cement, let it dry to the touch then applied the leather. In a couple places where the leather needs to be manouvered before it's stuck down (around the lens the leather needs to be slid under the rearmost ring), I used a piece of plain paper between the leather and camera to prevent the two contact-cemented surfaces from sticking. The paper won't stick to the dried contact cement so can simply be pulled out once the leather is in position. A dental pick and small screwdriver where helpful for tucking little leather corners in where they're supposed to go.
 

Attachments

  • signal-2025-02-10-142457_002.jpeg
    signal-2025-02-10-142457_002.jpeg
    400.2 KB · Views: 56
  • signal-2025-02-10-142457.jpeg
    signal-2025-02-10-142457.jpeg
    399 KB · Views: 52

monopix

Member
Joined
Dec 10, 2009
Messages
156
Location
Lincolnshire, UK.
Format
Hybrid
Update:

Just lasere'd and applied my covering yesterday and very happy with the results. All in all looks great, we'll see how the inlaid strips and little corners hold up over time (I cut another set of leather with none of the inlays to save in case stuff goes south later).
What laser cutter did you use? I experimented with cutting my own covers until my laser (CO2 type) failed. I was looking at one of the LED laser cutters but not sure what power is required. Any info would be useful.
 
OP
OP
hospadar

hospadar

Member
Joined
Jun 24, 2024
Messages
51
Location
Michigan, USA
Format
35mm
What laser cutter did you use? I experimented with cutting my own covers until my laser (CO2 type) failed. I was looking at one of the LED laser cutters but not sure what power is required. Any info would be useful.
I used a C02 laser at my local makerspace - that being said I was cutting at a pretty high speed and very low power so probably you could cut with a powerful enough diode laser. Seems to me you could almost certainly get away with using a blade cutter too - I think cricut machines can cut over 2mm and leatherette is only ~.6mm usually.
 

Dan Daniel

Subscriber
Joined
Jul 4, 2009
Messages
2,883
Location
upstate New York
Format
Medium Format
Do you put a protective tape or film on the leather surface for cutting? Looks like a little smoke bleeding onto the front at the edges, but typical tape coverings might not prevent this with pebble leather.

Search Ebay for '3M double sided adhesive transfer' and you'll get some sheets of very thin tape material. this can be applied to the leather before cutting and will hold very well.

Low power and high speed is good for leather. Burning flesh is not a good smell! :smile:
 
OP
OP
hospadar

hospadar

Member
Joined
Jun 24, 2024
Messages
51
Location
Michigan, USA
Format
35mm
Didn't use any tape - probably would have helped but the final product looks pretty good in person - any charring on the dark burgundy is basically invisible and even on the red it's pretty slight. I think some of the char impression just comes from the dark cut edge made by the laser being visible - there's a fraction of a mm between the inlaid panels so the edge is somewhat exposed. I think I underestimated the laser kerf in my cad drawings so the panels are just a tad too narrow. I guessed .2mm but I think it probably came out .3-.5ish. Didn't have enough time on the cutter to adjust my pattern so just rolled with it.
 
Photrio.com contains affiliate links to products. We may receive a commission for purchases made through these links.
To read our full affiliate disclosure statement please click Here.

PHOTRIO PARTNERS EQUALLY FUNDING OUR COMMUNITY:


Ilford ADOX Freestyle Photographic Stearman Press Weldon Color Lab Blue Moon Camera & Machine
Top Bottom