Expose for the shadows, develop for the ... scanner?

Hensol woods

Hensol woods

  • 1
  • 0
  • 25
Harbour at dusk

A
Harbour at dusk

  • 1
  • 0
  • 27
blossum in the night

D
blossum in the night

  • 1
  • 0
  • 36
Brown crested nuthatch

A
Brown crested nuthatch

  • 2
  • 1
  • 58

Recent Classifieds

Forum statistics

Threads
198,715
Messages
2,779,743
Members
99,685
Latest member
alanbarker
Recent bookmarks
1
Joined
Jul 2, 2020
Messages
16
Location
Hamme, Belgium
Format
Multi Format
As I scan all my negatives and have no intention (now and in the foreseeable future) of doing any dark room printing I would like to optimize my negative development to obtain the best possible results from scanning (I'm using a Nikon Coolscan 4000).

At this time I'm focusing on Kodak T-Max 400 film developed in D-76 1:1.
I've made some test shots to plot my characteristic curve, it's fairly close to the middle curve on Kodak's chart below:
upload_2020-8-27_11-15-23.png


Using the standard development time Dmax is about 2, so the total density range is about 1.8 for 10 stops of exposure.
The scanner has a Dmax of 4.2 (marketing claim) and an ADC bit depth of 14 bits.
Is my reasoning correct that this means that an image with a density range of 1.8 only has about 6 bits of tonality range for mapping these 10 stops of exposure?

Would it make sense to develop my negatives longer, increasing the contrast and expanding the range up to a Dmax of about 3.2 to make better use of the scanner's dynamic range? Would this give me more tonality levels to play with in post as the used bit depth increases to about 10 bits? Incidentally this would also correspond well (again, if my reasoning is correct) with the 10 stops exposure range.

I intend to scan a Stouffer step wedge soon to determine the real optical range of my scanner.
 

George Collier

Subscriber
Joined
Feb 23, 2005
Messages
1,363
Location
Richmond, VA
Format
Multi Format
I've never heard of bit depth as referring to or indicating dynamic range, only in indicating level of tonal discretion over a range. But I have seen statements like that on Photrio.
To answer your question, though, my approach would be to achieve as much "information" as possible in the negative, which would imply the highest dynamic range you can get for the film and the scanner, just to optimize local tonal separation in the subject, between tones of similar values. I once did a test of varying development times from lesser to greater, mostly to see the affect on grain. After printing with different grades to compensate for the development variation, I was surprised to see some detail (stripes in a shirt, different colors but similar values in B&W). Once the development time dropped below a certain amount (maybe 70%), the stripes disappeared, and obviously could not be restored with contrast adjustments in printing. If it's not in the negative, you can't make it appear later.
I've always attempted to "fill" the negative range for this reason. Most of my printing has been done with an Aristo cold light and multiple filter grade exposure to optimize range and detail. I've shot 35mm, 6x6cm, and 4x5 over the decades, and as I scan these negs with an Epson V850, no neg has more range than the scanner can accommodate.
I would take this approach until proven that it won't work.
 

beemermark

Subscriber
Joined
Sep 21, 2008
Messages
867
Format
4x5 Format
Forget the curves and the mumbo-jumbo. If the high lights are the most important part of the scene then meter to just get detail in the highlights (usually 2 stops more than the "average"). Ditto, if you want details in the shadows, then meter for the shadows. Basis for the Zone system. As an example if you want detail in snow then you need to me meter the snow to have just enough detail to show up in the print. If your photographing a black cat you want enough shadow detail to see the cat's black hairs. Doesn't matter if your making a paper print or scanning. If the detail isn't in the final negative no amount of post processing manipulation will bring out that detail.
 

Alan9940

Member
Joined
Jun 17, 2006
Messages
2,421
Location
Arizona
Format
Multi Format
If you have a full-scale negative that prints well in the darkroom, it will scan well, too. Qualification...that's been my experience with B&W film.
 

DonW

Member
Joined
Jun 7, 2020
Messages
502
Location
God's Country
Format
Medium Format
That's what Sandy King has been doing for quite some time now. He develops his negatives so they give him the optimal scans for making digital negs. I'm looking at doing that myself.
 
Joined
Aug 29, 2017
Messages
9,443
Location
New Jersey formerly NYC
Format
Multi Format
The trick is to capture the whole range of light from black to white. Since post processing programs provide curves and other adjustments to any part of the exposure range, you have complete control of the final results. So whatever process gives you that full range when shooting and developing, go with it. I use Tmax 100 because it has a nice tonal palette that extends from white to black, as well as fine resolution. I suppose in post processing, I can make it look like Tri-X. But I don't think I could make Tri-X look like Tmax. Just to clarify, I develope all my film in a lab without pushing or pulling. Good luck.
 
Joined
Aug 29, 2017
Messages
9,443
Location
New Jersey formerly NYC
Format
Multi Format
Forget the curves and the mumbo-jumbo. If the high lights are the most important part of the scene then meter to just get detail in the highlights (usually 2 stops more than the "average"). Ditto, if you want details in the shadows, then meter for the shadows. Basis for the Zone system. As an example if you want detail in snow then you need to me meter the snow to have just enough detail to show up in the print. If your photographing a black cat you want enough shadow detail to see the cat's black hairs. Doesn't matter if your making a paper print or scanning. If the detail isn't in the final negative no amount of post processing manipulation will bring out that detail.
The OP stated he has no intention of printing chemically. He's going to make all adjustments digitally in post processing. What recommendations would you give under that scenario?
 

shutterfinger

Member
Joined
Feb 25, 2013
Messages
5,020
Location
San Jose, Ca.
Format
4x5 Format
The OP stated he has no intention of printing chemically. He's going to make all adjustments digitally in post processing. What recommendations would you give under that scenario?
A properly exposed and developed B&W negative prints or scans well. Scanning or printing a negative that is 2 stops over exposed or under exposed and normally developed in difficult as is a correctly exposed but under developed or over developed negative. Fine tuning for scanning or printing is the same as each film/developer respond differently. Exposure changes in 1/3 stop and or development changes in 5% increments are the standard fine tune increments.
 
OP
OP
Joined
Jul 2, 2020
Messages
16
Location
Hamme, Belgium
Format
Multi Format
I've never heard of bit depth as referring to or indicating dynamic range, only in indicating level of tonal discretion over a range..
If you look at the specifications of the Nikon Coolscan scanners you'll realise that their Dmax values are based on the bit depth. The Cooscan IV/40/2000 are listed as 12bit with 3.6Dmax, Coolscan 4000/8000 as 14bit with 4.2Dmax and Coolscan 5000/9000 as 16bit with 4.8Dmax, clearly this is just stops converted to Dlog (x0.3).

I did a quick test to measure the actual density range that can by scanned by the Coolscan 4000 by scanning a Stouffer 21 step wedge (density 0-3.0). I scanned to a 16-bit raw Tiff file an measured the values with an averaging color picker in PS and obtained the following chart:
upload_2020-8-31_10-12-20.png


As you can see the values are fairly linear up to about 8 stops.
I would say the result are usable up to about 9.5 stops or a density of about 2.85.

Now this is the density range it can handle, not the absolute maximum density as the CCD exposure time will be set by the software for the highest density areas.
For most BW negatives and C41 color negatives this range is sufficient. For color slides this might be an issue as Fuji Velvia 50 for instance can reach a density range of over 3.5. Wide range slide film will definitely gain some shadow detail by doing a multi-exposure scan.

Applying the "expose to the right" principle of digital photography, which I assume applies equally here, I would say that (for this scanner) BW negatives should be developed to a density range of about 2.4 (8 stops), to make optimal use of the scanner range.
I am not (yet :wink:) familiar with darkroom printing but I believe this is also a good range for printing?
A properly exposed and developed B&W negative prints or scans well..
This would make sense as the scanner should be optimized for scanning negatives that also print well, and this seems to be supported by my findings.

Thanks all for your input. So the verdict seems to be that negatives can be optimized for both printing and scanning using the same process.
It might be interesting to develop to a smaller density range if you're using a scanner with a smaller dynamic range such as a cheaper flatbed scanner, this might result in some additional highlight detail.

PS. I also tested scanning with my Canon 6D DSLR as DSLR scanning is quickly gaining in popularity and I found about the same limit in density range, maybe slighly more, but linearity was quite a bit worse.
 
OP
OP
Joined
Jul 2, 2020
Messages
16
Location
Hamme, Belgium
Format
Multi Format
The scanner has a Dmax of 4.2 (marketing claim) and an ADC bit depth of 14 bits.
Is my reasoning correct that this means that an image with a density range of 1.8 only has about 6 bits of tonality range for mapping these 10 stops of exposure?
My reasoning was not correct, there are about 30000 levels in the top 8 stop range of my scanner.
 

shutterfinger

Member
Joined
Feb 25, 2013
Messages
5,020
Location
San Jose, Ca.
Format
4x5 Format
I am not (yet :wink:) familiar with darkroom printing but I believe this is also a good range for printing?
All B&W photo papers unexposed and developed is paper white. As you expose the paper to light then develop it the paper becomes darker. The amount of light at a given aperture where the paper gets no darker is paper black. Wen you print at paper black the enlarger is set to the selected aperture and exposure time to give paper black with the negative either in the carrier or in contact with the paper. Once developed and dry the print is examined for tonality and areas either burned in by giving them more exposure or dodged (blocked from receiving light) to get the desired tone.
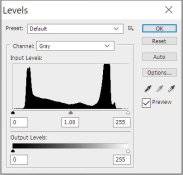
A negative that has deep shadows with no detail and bright whites in sun light should give a raw scan with the deep shadows between 0 and 10 with the whites between 225 and 255 on a histogram.
Over exposed have blacks that are above the base line of a histogram at 0, over developed have highlights above the base line at 255 on a histogram baring direct sun or bright reflections off chrome.
 
Joined
Aug 29, 2017
Messages
9,443
Location
New Jersey formerly NYC
Format
Multi Format
All B&W photo papers unexposed and developed is paper white. As you expose the paper to light then develop it the paper becomes darker. The amount of light at a given aperture where the paper gets no darker is paper black. Wen you print at paper black the enlarger is set to the selected aperture and exposure time to give paper black with the negative either in the carrier or in contact with the paper. Once developed and dry the print is examined for tonality and areas either burned in by giving them more exposure or dodged (blocked from receiving light) to get the desired tone.
A negative that has deep shadows with no detail and bright whites in sun light should give a raw scan with the deep shadows between 0 and 10 with the whites between 225 and 255 on a histogram.
Over exposed have blacks that are above the base line of a histogram at 0, over developed have highlights above the base line at 255 on a histogram baring direct sun or bright reflections off chrome.
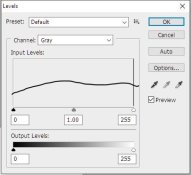
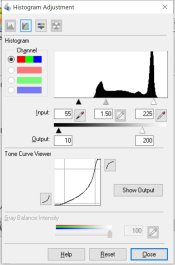
If scanning flat with my Epson, I'll get a range much less than 0-255 unless I set my black and white points just at the ends of the histogram before the scan. Some people have claimed that setting the points before the scan gives you more data than scanning 0-255 flat and doing the levels (black and white points) in post processing. Somehow the way the histogram and data gather, there's more data if you set the points before the scan.

I haven't notice any practical difference having tried both methods. Can you add any ideas on this matter?
 

shutterfinger

Member
Joined
Feb 25, 2013
Messages
5,020
Location
San Jose, Ca.
Format
4x5 Format
No, I was just describing where the end points should lie. If you set the B&W points on the histogram input in EpsonScan be sure to set the output B&W points to 0 and 255 to see the difference. If the input is narrower than the output then it will be expanded on output which may allow additional adjustment range in given tones. If the detail is not in the negative it will not be in the scan or print.
 
Joined
Aug 29, 2017
Messages
9,443
Location
New Jersey formerly NYC
Format
Multi Format
No, I was just describing where the end points should lie. If you set the B&W points on the histogram input in EpsonScan be sure to set the output B&W points to 0 and 255 to see the difference. If the input is narrower than the output then it will be expanded on output which may allow additional adjustment range in given tones. If the detail is not in the negative it will not be in the scan or print.
Can you clarify if it matters to set the points before the scan? Or just set Epsonscan with no adjustments? It scans flat giving the full range, but then you get a very low contrast darker picture that you expand with levels afterwards.
 
OP
OP
Joined
Jul 2, 2020
Messages
16
Location
Hamme, Belgium
Format
Multi Format
If scanning flat with my Epson, I'll get a range much less than 0-255 unless I set my black and white points just at the ends of the histogram before the scan. Some people have claimed that setting the points before the scan gives you more data than scanning 0-255 flat and doing the levels (black and white points) in post processing. Somehow the way the histogram and data gather, there's more data if you set the points before the scan.

I haven't notice any practical difference having tried both methods. Can you add any ideas on this matter?

No, I was just describing where the end points should lie. If you set the B&W points on the histogram input in EpsonScan be sure to set the output B&W points to 0 and 255 to see the difference. If the input is narrower than the output then it will be expanded on output which may allow additional adjustment range in given tones. If the detail is not in the negative it will not be in the scan or print.

I don't have any experience with EpsonScan, only with Nikon Scan, but as far as I know you can only change the exposure time of the sensor, not the scaling.
So for instance if I preview a negative using automatic exposure the software will find the lightest points (least density) and set its exposure so this becomes the maximum level. But the lowest level will depend on the maximum density of your film.
You can also set a black point (or perform auto contrast in Nikon Scan) but this is only applied after the scanning. So the scanned tonal range will be expanded to cover the whole histogram (which is sometimes plain wrong if there is no black in your scene).
If the density range of the film only covers half of the range of the sensor's dynamic range you will only get half of the tonal levels the scanner is capable to produce so you can run into banding problems when making large adjustments in post processing, even more so if your density range is too large and you run into the limits of the sensor.
 

shutterfinger

Member
Joined
Feb 25, 2013
Messages
5,020
Location
San Jose, Ca.
Format
4x5 Format
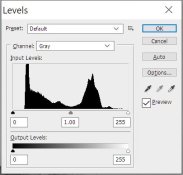
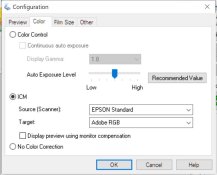
This is the histogram of a 4x5 negative with Epsonscan with the configuration set as shown.

Epsonscan histogram 1.jpeg Config.jpeg
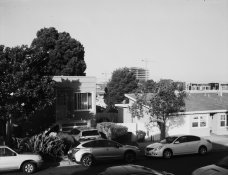
The image as scanned with Epsonscan
img004.jpg and the Photoshop levels histogram Photoshop histogram.jpeg
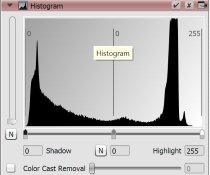
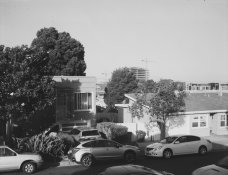
Same image in Silverfast SE 8 histogram
Silverfast SE 8 histogram.jpeg and scan Untitled.jpg
Silverfast histogram changes slightly with different film types selected with Negafix.
Silverfast SE 8 16 Bit HDR raw converted to jpeg without any adjustments and reduced to 150dpi
silverfast raw.jpg and its Photoshop histogram HDR raw photoshop histogram.jpeg
Software auto exposure can and will clip information from the scanned material to give the programmed "good image".
 

PhilBurton

Subscriber
Joined
Oct 20, 2018
Messages
467
Location
Western USA
Format
35mm
If you look at the specifications of the Nikon Coolscan scanners you'll realise that their Dmax values are based on the bit depth. The Cooscan IV/40/2000 are listed as 12bit with 3.6Dmax, Coolscan 4000/8000 as 14bit with 4.2Dmax and Coolscan 5000/9000 as 16bit with 4.8Dmax, clearly this is just stops converted to Dlog (x0.3).

I did a quick test to measure the actual density range that can by scanned by the Coolscan 4000 by scanning a Stouffer 21 step wedge (density 0-3.0). I scanned to a 16-bit raw Tiff file an measured the values with an averaging color picker in PS and obtained the following chart:
View attachment 253537

As you can see the values are fairly linear up to about 8 stops.
I would say the result are usable up to about 9.5 stops or a density of about 2.85.

Now this is the density range it can handle, not the absolute maximum density as the CCD exposure time will be set by the software for the highest density areas.
For most BW negatives and C41 color negatives this range is sufficient. For color slides this might be an issue as Fuji Velvia 50 for instance can reach a density range of over 3.5. Wide range slide film will definitely gain some shadow detail by doing a multi-exposure scan.

Applying the "expose to the right" principle of digital photography, which I assume applies equally here, I would say that (for this scanner) BW negatives should be developed to a density range of about 2.4 (8 stops), to make optimal use of the scanner range.
I

/QUOTE]
@Koen Van Crombrugghe Wow, :D just the other day I was thinking that I should do some sort of calibration on my Coolscan 5000. So I have some questions about how you accomplished your scan.
  1. Which model (or size) Stouffer wedge did you use?
  2. If you could do this scan all over would you get a different size wedge?
  3. How did you feed the wedge into the scanner so that all the 21 steps got scanned?
  4. Which scanning software did you use?
Phil Burton
 

Bormental

Member
Joined
Mar 1, 2020
Messages
622
Location
USA
Format
Multi Format
Would it make sense to develop my negatives longer, increasing the contrast and expanding the range up to a Dmax of about 3.2 to make better use of the scanner's dynamic range?

Yes. The advice "if it prints well, it scans well" is common on photrio but it's absurd. The paper offers abysmal dynamic range and skillful printing means skillful compression of film DR into paper's limits. Scanning is the complete opposite: you're going from the limited DR of film to a "wider" medium with assumed post-processing, so the skill of scanning is a skill of expanding, so you want as much density as possible without contrast getting out of hand.
 

MattKing

Moderator
Moderator
Joined
Apr 24, 2005
Messages
52,844
Location
Delta, BC Canada
Format
Medium Format
Yes. The advice "if it prints well, it scans well" is common on photrio but it's absurd. The paper offers abysmal dynamic range and skillful printing means skillful compression of film DR into paper's limits. Scanning is the complete opposite: you're going from the limited DR of film to a "wider" medium with assumed post-processing, so the skill of scanning is a skill of expanding, so you want as much density as possible without contrast getting out of hand.
I beg to differ.
If the negative prints well optically, it means that the dynamic range of the scene is accurately recorded on the negative, with a full range of tones and excellent micro and macro contrast. There is no loss of detail or contrast in the parts of the shadows that matter, nor is there any compression or blocking up in the parts of the highlights that matter. The translation of that information into the more limited dynamic range of a print is handled (relatively) automatically by the photographic paper - the two sets of characteristic curves match up nicely.
The film is designed to faithfully capture the wide dynamic range in most scenes. It may not be a linear capture, but the paper takes care of that for you.
Once the information is in the negative, if the exposure and development are such that it will print well optically, than that information is easily extracted with a scan too.
 

shutterfinger

Member
Joined
Feb 25, 2013
Messages
5,020
Location
San Jose, Ca.
Format
4x5 Format
Yes. The advice "if it prints well, it scans well" is common on photrio but it's absurd.
Film, like paper, has its limits. A scene can have far more dynamic range than a film can handle but careful manipulation can bring compress that range to fit that of the film. (ever heard or pushing or pulling?)
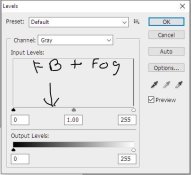
All film base has optical density. The chemistry used to process the film increases this density with no exposure to the film. This is called Film Base + fog.
Any scanner regardless of software used and any editing software has a histogram. The base line of the histogram is film base plus fog labeled fb+f. A histogram is a graphical representation of the information contained in the scanned material.
Blank histogram.jpeg
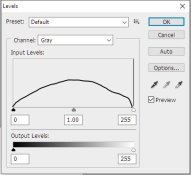
0 on the histogram is pure black and at base line is no detail or in wet printing is paper black; 255 is pure white and at base line is no detail or in wet printing paper white. The dynamic range of the film or paper in use is irrelevant to these two points. Information contained on the scanned medium is registered above the base line. A perfectly exposed and developed negative with scene detail that fills the range of the film will have the blacks starting at 0 with the whites ending at 255.
Blank histogram 2.jpg
A over exposed but correctly developed negative will have information above the base line at 0 which cannot be retrieved in either scanning or wet printing.
Blank histogram 3.jpg
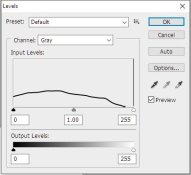
A over exposed over developed negative will have information above the base line at both 0 and 255 which is detail lost and not retrievable by any means.
Blank histogram 4.jpg

Another way to state this is the exposure is set so that the deepest blacks are just above the start of the toe of the film and the development is such that the highlights end just before the shoulder of the film. Exposure that extends the scene dynamic range into the toe of the film is lost detail from the scene and development that puts the highlights into the shoulder of the film is also lost information. I have yet to see a negative whose detail put the peak of the information between the toe, histogram 0, and the shoulder, histogram 255, beyond the height of the histogram but one may exist and that peak of information will likely not be loss of detail.

Repeating, any negative whose deepest blacks are just above the toe of the film and whose highlights are just before the shoulder of the film will wet print well (not perfect) at paper black and will scan well on any scanner or scanning software.
 
OP
OP
Joined
Jul 2, 2020
Messages
16
Location
Hamme, Belgium
Format
Multi Format
Yes. The advice "if it prints well, it scans well" is common on photrio but it's absurd. The paper offers abysmal dynamic range and skillful printing means skillful compression of film DR into paper's limits. Scanning is the complete opposite: you're going from the limited DR of film to a "wider" medium with assumed post-processing, so the skill of scanning is a skill of expanding, so you want as much density as possible without contrast getting out of hand.
I tend to agree but you need to have a good knowledge of your scanner's capabilities , as testing shows that the official specifications are not a good reference.
Furthermore you'll need very tight process control to match the dynamic ranges.
 

Bormental

Member
Joined
Mar 1, 2020
Messages
622
Location
USA
Format
Multi Format
I beg to differ.
Let's see how you'll do :smile:

MattKing said:
If the negative prints well optically, it means that the dynamic range of the scene is accurately recorded on the negative, with a full range of tones and excellent micro and macro contrast. There is no loss of detail or contrast in the parts of the shadows that matter, nor is there any compression or blocking up in the parts of the highlights that matter. The translation of that information into the more limited dynamic range of a print is handled (relatively) automatically by the photographic paper - the two sets of characteristic curves match up nicely.

Ok. Should I copy-paste a random banal truism from a photography book in response? Of course it's true and nobody was arguing. But what is also true, is that a scanner is capable of pulling even more information out of the negative. Paper doesn't translate anything, it simply "throws away" data it can't capture. Scanning is a higher bar.

MattKing said:
The film is designed to faithfully capture the wide dynamic range in most scenes. It may not be a linear capture, but the paper takes care of that for you.

Why are you saying it? It sounds like a copy-paste from a random photography book.

MattKing said:
Once the information is in the negative, if the exposure and development are such that it will print well optically, than that information is easily extracted with a scan too.

No. Not the same. Much more. You didn't really talked about this very point I was making, instead just repeating random truisms.
 
Last edited:

Bormental

Member
Joined
Mar 1, 2020
Messages
622
Location
USA
Format
Multi Format
I tend to agree but you need to have a good knowledge of your scanner's capabilities , as testing shows that the official specifications are not a good reference.
Furthermore you'll need very tight process control to match the dynamic ranges.

Agreed! Instead of wasting time on misplaced ramblings on photography 101 here, a fun project is to take your favorite film and break it into, say, 3 short rolls and shoot the same controlled, hopefully tone-rich and high-dynamic range scene on each roll with under/over exposure. -2, -1, 0, +1, +2. Then you develop each roll gradually increasing development time. Then you scan them all and it becomes very clear what the limits of your film and scanner are. No need to trust the specs. You'll see that density is generally your friend, both from the dynamic range perspective, but you get nicer grain too.
 

Bormental

Member
Joined
Mar 1, 2020
Messages
622
Location
USA
Format
Multi Format
Film, like paper, has its limits. A scene can have far more dynamic range than a film can handle but careful manipulation can bring compress that range to fit that of the film. (ever heard or pushing or pulling?)
All film base has optical density. The chemistry used to process the film increases this density with no exposure to the film. This is called Film Base + fog.
Any scanner regardless of software used and any editing software has a histogram. The base line of the histogram is film base plus fog labeled fb+f. A histogram is a graphical representation of the information contained in the scanned material.
View attachment 253613
0 on the histogram is pure black and at base line is no detail or in wet printing is paper black; 255 is pure white and at base line is no detail or in wet printing paper white. The dynamic range of the film or paper in use is irrelevant to these two points. Information contained on the scanned medium is registered above the base line. A perfectly exposed and developed negative with scene detail that fills the range of the film will have the blacks starting at 0 with the whites ending at 255.
View attachment 253614
A over exposed but correctly developed negative will have information above the base line at 0 which cannot be retrieved in either scanning or wet printing.
View attachment 253615
A over exposed over developed negative will have information above the base line at both 0 and 255 which is detail lost and not retrievable by any means.
View attachment 253616

Another way to state this is the exposure is set so that the deepest blacks are just above the start of the toe of the film and the development is such that the highlights end just before the shoulder of the film. Exposure that extends the scene dynamic range into the toe of the film is lost detail from the scene and development that puts the highlights into the shoulder of the film is also lost information. I have yet to see a negative whose detail put the peak of the information between the toe, histogram 0, and the shoulder, histogram 255, beyond the height of the histogram but one may exist and that peak of information will likely not be loss of detail.

Repeating, any negative whose deepest blacks are just above the toe of the film and whose highlights are just before the shoulder of the film will wet print well (not perfect) at paper black and will scan well on any scanner or scanning software.

@shutterfinger, saying "if it prints well it scans well" is absurd. You have not communicated anything that everybody here doesn't already know. I can contribute! One must make sure there's enough available flat surface under the enlarger or the paper may not fit, so if there's a bowl of fish eyes in the way, care must be taken. Also, your house must have electricity to engage in wet printing. Should I continue "arguing"?
 
Last edited:
Photrio.com contains affiliate links to products. We may receive a commission for purchases made through these links.
To read our full affiliate disclosure statement please click Here.

PHOTRIO PARTNERS EQUALLY FUNDING OUR COMMUNITY:


Ilford ADOX Freestyle Photographic Stearman Press Weldon Color Lab Blue Moon Camera & Machine
Top Bottom