Epson 3880 - front loading paper

Recent Classifieds

Forum statistics

Threads
198,721
Messages
2,779,914
Members
99,691
Latest member
Vlad @ausgeknipst
Recent bookmarks
0

calico

Member
Joined
Oct 20, 2020
Messages
313
Location
USA
Format
Medium Format
I'm trying to load paper from the front of my Epson 3880 because I read that can solve problem of roller marks on prints (print doesn't pass through the rollers causing the problem). I am getting faint roller marks, visible in dark areas of image.

Have cleaned heads multiple times, including power clean. In software, have increased platen gap, increased paper thickness setting. Have also unchecked high speed printing (read that ink going down more slowly might help). None of these things helped when paper loaded from the back.

I have the 3880 manual and followed the instructions for loading the paper from front. But when I hit "print" in Photoshop print window, I get message on printer's LCD:

"Paper setting error. Check paper source in the driver settings and load paper correctly."

I've gone through all the menus on the LCD and don't see a paper source setting there. I do see the "Paper size check" setting which is set to "on" per the manual in instructions for front loading.

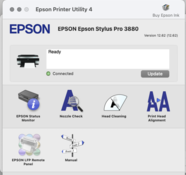
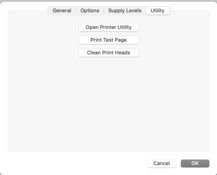
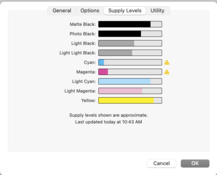
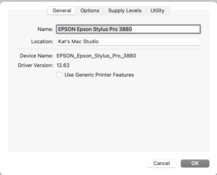
When I look in the "Epson Stylus Pro 3880" software, I don't see any paper source settings there either -- just driver number (12.62), notifications options, supply levels, utility.

Anyone know where I would find the paper source setting mentioned in the error message? I guess they are referring to the software, not the LCD menus, as they mention "driver settings." But I don't see anything.

Thanks.
 
Last edited:
OP
OP

calico

Member
Joined
Oct 20, 2020
Messages
313
Location
USA
Format
Medium Format
P.S.

Poking around Epson site more, I see text instructions for accessing "Paper Source" setting -- which do not work on my 3880. My LCD menu different.

I also see pages where they have images of their driver software where "Paper Source" is a choice. But it is not available in my 12.62 version of Epson 3880 driver software (which is appropriate version for my Mac OS 13.1).

Yet the printer is telling me I must select paper source before it will print from front loader. Paper loaded fine, but printer won't print until I set paper source.
 

koraks

Moderator
Moderator
Joined
Nov 29, 2018
Messages
22,656
Location
Europe
Format
Multi Format
I've never tried the front loading option on my 3880. I do see the option is there in the printer drivers (on Windows obviously):
1691047786526.png


I don't know if it can be set on the LCD at all since paper settings are job-specific, not device-specific. In my mind it doesn't make much sense to set this on the LCD, since the printer should basically execute whatever settings are handed to it in each individual print job.

I'll give it a go with a test print, see what happens.

Edit: just checked with a one-page print job, setting the Source in the printer driver to Manual-Front (see screenshot above). The printer then asks (on the LCD) to extend the front manual feed tray and insert media. I don't have suitably thick media handy so can't verify that it'll actually print, but it seems to be prepared to do so.
1691048219186.png

1691048244731.png
 
Last edited:
OP
OP

calico

Member
Joined
Oct 20, 2020
Messages
313
Location
USA
Format
Medium Format
Hi Koraks,

Thanks for taking the time to try these things on your printer.

Just fyi, to use the front loading option, you can use normal thickness paper (like 310 gsm), even though the front loader is designed for thicker paper or other materials. When I put in normal paper in the front loader, the printer pulled it in just fine.

But you don't have to go to the trouble to try it. The problem here is that I don't seem to have the software setting I need to set printer for front loading. (You made good points about why it wouldn't be in LCD settings.)

I took screen grabs of my Epson 3880 driver software which I'll put below. I don't have everything you have in your software.

I went to Epson site yesterday and made sure I had the correct software for my operating system, and I do. I'm on a Mac in OS 13.1. Epson software is 12.62.

I guess I should call Epson. I always dread calling companies, can be such a frustrating experience.

Thank you again for looking into the issue on your printer. Really appreciate.

If you or anyone see that I'm doing something wrong, please point it out!

Kat
 

Attachments

  • Epson 5.png
    Epson 5.png
    101 KB · Views: 108
  • Epson 4.png
    Epson 4.png
    25.8 KB · Views: 105
  • Epson 3.png
    Epson 3.png
    36 KB · Views: 96
  • Epson 2.png
    Epson 2.png
    33.9 KB · Views: 94
  • Epson 1.png
    Epson 1.png
    31.4 KB · Views: 95
OP
OP

calico

Member
Joined
Oct 20, 2020
Messages
313
Location
USA
Format
Medium Format
Where is the paper size menu? There has to be one of those. It seems the paper source selection can be made from the paper size menu, per Epson manual (see page 50):


:Niranjan

Bingo!

I choose paper size in my Photoshop Print Settings window.

Printer setup > Print Settings > Paper size > then there are pull-down menus for each paper size

I just went there and see that the pull-down menu for US Letter (which is what I always use) has seven choices.

I have always just selected the top one, "US Letter," and ignored the six others, four of which are for borderless. I never print borderless.

But looking at them now, I see the seventh choice is "US Letter (Manual - front)."

So THAT'S where I set for front loading!

Thank you for prompting me to look in this area! I will try printing with front loader later today. I imagine it will work now. Hurray.
 
OP
OP

calico

Member
Joined
Oct 20, 2020
Messages
313
Location
USA
Format
Medium Format
To Koraks: I should've said I think normal weight paper can be printed with front loader, based on what someone on another forum said. He started to use it, with normal paper, to avoid the roller marks he got printing from the back. I haven't tried it yet myself. Hoping it will work and the roller marks will be gone.
 

nmp

Member
Joined
Jan 20, 2005
Messages
2,014
Location
Maryland USA
Format
35mm
Bingo!

I choose paper size in my Photoshop Print Settings window.

Printer setup > Print Settings > Paper size > then there are pull-down menus for each paper size

I just went there and see that the pull-down menu for US Letter (which is what I always use) has seven choices.

I have always just selected the top one, "US Letter," and ignored the six others, four of which are for borderless. I never print borderless.

But looking at them now, I see the seventh choice is "US Letter (Manual - front)."

So THAT'S where I set for front loading!

Thank you for prompting me to look in this area! I will try printing with front loader later today. I imagine it will work now. Hurray.

Excellent!

My experience with putting thinner paper in the front (with my P400) is that although there were no pizza wheels (I am assuming that's what you mean by "roller marks") there was a lot of over-spray in the print - I guess the platen gap, which can not be changed in P400, was too big. That was on a poster-board, which is approximately the same thickness as a 300 gsm paper as a carrier for printing on transparencies. Then I changed over to a 4 ply mat board and the over-spray went away. Of course, the situation on a 3880 might be different.

:Niranjan.
 

koraks

Moderator
Moderator
Joined
Nov 29, 2018
Messages
22,656
Location
Europe
Format
Multi Format
Just fyi, to use the front loading option, you can use normal thickness paper (like 310 gsm), even though the front loader is designed for thicker paper or other materials. When I put in normal paper in the front loader, the printer pulled it in just fine.

I only tried flimsy 80gsm; I may try something heavier if I think about it. Frankly, the pizza wheel marks don't bother me too much on normal paper media. They're a b*** on transparencies though, but I try to steer clear of digital inkjet negatives as much as I can anyway.
 
OP
OP

calico

Member
Joined
Oct 20, 2020
Messages
313
Location
USA
Format
Medium Format
Excellent!

My experience with putting thinner paper in the front (with my P400) is that although there were no pizza wheels (I am assuming that's what you mean by "roller marks") there was a lot of over-spray in the print - I guess the platen gap, which can not be changed in P400, was too big. That was on a poster-board, which is approximately the same thickness as a 300 gsm paper as a carrier for printing on transparencies. Then I changed over to a 4 ply mat board and the over-spray went away. Of course, the situation on a 3880 might be different.

:Niranjan.
Hmm. Maybe I will run into the over-spray problem, too. I guess you mean the ink is laid on too thick.....and image loses detail and/or gets dark?

I guess what I'm seeing in prints loaded from top would be the "pizza wheels." What I see are very fine, evenly-spaced lines in dark areas of print. This is on Canson Arches 88. I don't think I have the same problem on all papers (or it will go away when heads cleaned). But for this particular image, my color was turning out the best on the Arches 88 (better ICC profile?), so I was persisting with that paper.

I'd actually like to print this image on Canson Platine, but I can only print on matte paper now because the Photo Black head blew on my printer.

Considering getting a new printer, but would I be just asking for more problems?
 
OP
OP

calico

Member
Joined
Oct 20, 2020
Messages
313
Location
USA
Format
Medium Format
I only tried flimsy 80gsm; I may try something heavier if I think about it. Frankly, the pizza wheel marks don't bother me too much on normal paper media. They're a b*** on transparencies though, but I try to steer clear of digital inkjet negatives as much as I can anyway.

They do seem worse on some papers than others, from what I can tell. Interesting that they are really bad when you make inkjet negatives. I think I read they are more likely to appear if surface is slicker. I'm only using matte papers now, but even in that realm, there would be different degrees of softness/hardness of surface.
 

koraks

Moderator
Moderator
Joined
Nov 29, 2018
Messages
22,656
Location
Europe
Format
Multi Format
The problem with transparencies is that they generally are coated in a gelatin-like layer (it's not actually gelatin) that is damaged easily, especially when wet. That's exactly what happens with the pizza wheels.
And yes, indeed, with actual papers, the severity of the problem can vary greatly depending on the paper used.
 

nmp

Member
Joined
Jan 20, 2005
Messages
2,014
Location
Maryland USA
Format
35mm
It's glossy vs matte - former more prone to be display pizza wheels than the latter. Transparencies being glossy as well as see through, they tend to show them more prominently, which then can get translated on the contact print, particularly on smoother papers.

Pizza wheels or "star wheels" as officially called are a necessary evil, at least in designs that do not have other means of holding the paper flat on the leading edge, like a vacuum platen. Those marks are formed because of a still wet ink at the time when it comes in contact with the wheels. (No relation to head cleaning.) That's why a slower speed is recommended if they are a problem, giving more time for the ink to dry before going under the wheels. Now that is not to say, if the star wheels also do not gouge the substrate coating underneath even if the ink is dry but the general perception is it is because of the wet ink.

Front feed mechanism retracts the wheels up so they do not come in contact with the paper at all. But then the paper can flop around while it is being printed - particularly in the last couple of inches (give or take, depending on the printer) when the trailing edge is off the back rollers and the paper is basically on its own under the printing heads, potentially creating havoc if there are head strikes. That's why a rigid media is recommended for front feeding.

Over-spray - as I call it, not sure what the official word is - forms a kind of haze on the print. It is particularly apparent on the edges of the print where it looks like a faint shadow of ink.

How do you like Canson Arches 88, by the way. My go to matte paper so far has been the Canson Rag Photographique, but thinking of getting a pack of 88 and try it out. If you are having pizza wheels problem on 88, then Platine will be even worse.

Good luck!

:Niranjan.
 
Last edited:
OP
OP

calico

Member
Joined
Oct 20, 2020
Messages
313
Location
USA
Format
Medium Format
The problem with transparencies is that they generally are coated in a gelatin-like layer (it's not actually gelatin) that is damaged easily, especially when wet. That's exactly what happens with the pizza wheels.
And yes, indeed, with actual papers, the severity of the problem can vary greatly depending on the paper used.

Oh, I see. I've never printed on transparency material.
 
OP
OP

calico

Member
Joined
Oct 20, 2020
Messages
313
Location
USA
Format
Medium Format
It's glossy vs matte - former more prone to be display pizza wheels than the latter. Transparencies being glossy as well as see through, they tend to show them more prominently, which then can get translated on the contact print, particularly on smoother papers.

Pizza wheels or "star wheels" as officially called are a necessary evil, at least in designs that do not have other means of holding the paper flat on the leading edge, like a vacuum platen. Those marks are formed because of a still wet ink at the time when it comes in contact with the wheels. (No relation to head cleaning.) That's why a slower speed is recommended if they are a problem, giving more time for the ink to dry before going under the wheels. Now that is not to say, if the star wheels also do not gouge the substrate coating underneath even if the ink is dry but the general perception is it is because of the wet ink.

Front feed mechanism retracts the wheels up so they do not come in contact with the paper at all. But then the paper can flop around while it is being printed - particularly in the last couple of inches (give or take, depending on the printer) when the trailing edge is off the back rollers and the paper is basically on its own under the printing heads, potentially creating havoc if there are head strikes. That's why a rigid media is recommended for front feeding.

Over-spray - as I call it, not sure what the official word is - forms a kind of haze on the print. It is particularly apparent on the edges of the print where it looks like a faint shadow of ink.

Thank you for these detailed explanations. Helps to know what is actually going on inside the printer.
How do you like Canson Arches 88, by the way. My go to matte paper so far has been the Canson Rag Photographique, but thinking of getting a pack of 88 and try it out. If you are having pizza wheels problem on 88, then Platine will be even worse.

I like the Arches 88. Compared to the Rag Photographique, it is just slightly more textured. Also, if you put the two together, the Arches 88 looks pinkish, whereas the Photographique looks more yellowish/creamy.

I was trying to print this particular image on the Arches 88 for a long time. Besides the problem with the lines in the dark area, I was wishing for more contrast. As I can only print on matte paper now (because Photo Black head broken), I thought I'd try the Photographique which I read was smoother.

But on the Photographique, the image printed darker, too saturated -- with all the same settings in Photoshop print window as for the Arches 88, except with the Photographique ICC profile in appropriate place. And I still saw the lines in the almost-black area. So I decided to stick with the Arches 88 and just focus on getting rid of the lines.

When I was able to use glossy paper, I used the Platine which I loved. Switched to that when Ilford Gold Fibre Silk was discontinued. I was able to get prints without the lines on the Platine. As I remember, I was able to get rid of the lines by cleaning heads.

Which makes me wonder if my current problem really is the "pizza wheel" problem, as you say that has nothing to do with cleaning heads.

What I see are very faint straight lines, pretty close together, in an area of image that is almost solid black. I guess if they go away when I load paper from front, they are indeed pizza wheels/roller problem. Hope to do some printing tomorrow.

Probably no one else would see them in the print, but I'm framing this photo, and I can't stand framing a print which has a flaw.
Good luck!

:Niranjan.

Thank so much for your help!

Kat
 

nmp

Member
Joined
Jan 20, 2005
Messages
2,014
Location
Maryland USA
Format
35mm
As I remember, I was able to get rid of the lines by cleaning heads.
Which makes me wonder if my current problem really is the "pizza wheel" problem, as you say that has nothing to do with cleaning heads.

What I see are very faint straight lines, pretty close together, in an area of image that is almost solid black. I guess if they go away when I load paper from front, they are indeed pizza wheels/roller problem. Hope to do some printing tomorrow.

This makes me also doubt if it's the pizza wheels problem. Are these contimuous lines? Pizza wheels should be like pin pricks equidistant from each other in the direction of the paper path. A picture would help.

:Niranjan
 
OP
OP

calico

Member
Joined
Oct 20, 2020
Messages
313
Location
USA
Format
Medium Format
This makes me also doubt if it's the pizza wheels problem. Are these contimuous lines? Pizza wheels should be like pin pricks equidistant from each other in the direction of the paper path. A picture would help.

:Niranjan
They look like continuous lines. But they are very faint, in the black and dark blue area, so hard to say for sure. They are about 1 mm apart from each other. Run in direction the paper goes into the printer.

They are only visible in the very dark areas.

I see in my pile of prints, the one printed on Hahnemuhle Photo Rag Bright White does not have the lines. I just had one or two pieces of that paper from a sample pack.

I will scan a print tomorrow and increase contrast of scan to make the lines more visible, so you can see what they are like.

If you just glanced at the print, you wouldn't notice them, but I see them if I look closely with good light.

I wonder why not there on the Hahnemuhle. And I also see one of the Arches 88 prints does not have the lines. Very confusing. I did clean heads about three times and did a power clean once. Maybe the one Arches 88 without lines was right after cleaning? I don't remember.

Thanks. Will be in touch tomorrow.
 

koraks

Moderator
Moderator
Joined
Nov 29, 2018
Messages
22,656
Location
Europe
Format
Multi Format
Sounds like you have a problem with clogged nozzles or alignment. Does your nozzle check print out perfectly? And have you tried the alignment procedure (accessible from the driver dialog)?

Pizza wheel marks are fitted lines in the direction of paper travel and on a Letter sized sheet you'd typically have two of them at most, spaced some inches apart. With a loupe you can see the individual dots/holes in the surface. Your problem doesn't sound like this at all.
 
OP
OP

calico

Member
Joined
Oct 20, 2020
Messages
313
Location
USA
Format
Medium Format
Sounds like you have a problem with clogged nozzles or alignment. Does your nozzle check print out perfectly? And have you tried the alignment procedure (accessible from the driver dialog)?

Pizza wheel marks are fitted lines in the direction of paper travel and on a Letter sized sheet you'd typically have two of them at most, spaced some inches apart. With a loupe you can see the individual dots/holes in the surface. Your problem doesn't sound like this at all.
Hi Koraks,

I think you are right, it must be clogged nozzles or alignment.

Below is photo of a print which I overexposed dramatically, so the lines could be seen. Will also attach a digital version (not print) of the image, so you can see the image and the dark areas where the lines are visible on the print.

When I was doing my printing, I did the nozzle check and didn't see a problem in the nozzle check print. I also did a nozzle check just now, to double check, and don't see any problems in that print.

I don't remember if I did a head alignment when I was printing the image. I don't think I did, as the symptom didn't seem to go with head alignment problem. But I can do that.

When printing the image, I did head cleaning three times and power clean once. I was able to get a print without lines a few times, once or twice on Canson, once on Hahnemuhle.

Should I just keep doing head cleanings? I know that uses ink which is a drag. When I was looking into this online, I saw some posts from people who went into the printer and cleaned something by hand, using some kind of head cleaner they bought? It wasn't clear to me what they did exactly.

The printer was just sitting unused for many months before I started the current project, so I guess clogged heads would make sense.

Question is, is it fixable.

Thanks to you and Niranjan who have taken the time to help.

Kat
 

Attachments

  • Megan grass 600w.jpg
    Megan grass 600w.jpg
    272.5 KB · Views: 95
  • lines in megan print for photrio.jpg
    lines in megan print for photrio.jpg
    1.8 MB · Views: 96

nmp

Member
Joined
Jan 20, 2005
Messages
2,014
Location
Maryland USA
Format
35mm
If there is nothing in nozzle check, don't do any head cleanings. It's not clogged heads.

Are the artifacts those horizontal lines like here?

1691167770168.png


If so, they are definitely not pizza wheels and won't be helped by front loading. Quite likely alignment related. But you say you have done alignment - so no idea. Also, I would expect misaligned heads would have these line all over, not just in the shadows. May be they are there but not easily discernible.


:Niranjan.
 
OP
OP

calico

Member
Joined
Oct 20, 2020
Messages
313
Location
USA
Format
Medium Format
Or maybe it is some other issue, not clogged heads.

I was looking at the manual again. For horizontal or vertical banding, says to:

-- Check if low on ink (I am low on a few)

-- Do nozzle check and cleaning cycle (DONE)

-- Align print heads (need to do)

-- Turn off high speed printing (DONE)
I see I can also set drying time in the Photoshop print settings window. Default is 0 (0.1 sec) but can go to 50.

-- Make sure media type selected is correct (DONE)

-- Use printable side of paper (DONE)

-- Choose higher resolution (need to try 2880, used 1440 previously)

-- Adjust paper thickness (had it on 4)
Have tried going from "auto" to "wide" for platen gap.
As I remember, in my old version of Photoshop, I would set the platen gap to 4 for paper of this weight which always worked fine, and there was no paper thickness setting.

-- Use "paper feed adjustment" in menu in LCD to eliminate banding; reduce the value for white lines, increase for overlapping dark lines.
I see that setting also available in the Photoshop print settings window. Default is 0, but you can go to minus or plus 70.

So I will align print heads first.

If anyone has opinion about whether the lines in the print are from clogged heads which are not getting unclogged or something I have to deal with by adjusting paper thickness, platen gap, drying time, paper feed -- please let me know.

Doesn't seem printing this photo should require so many settings adjustments.

I wish having a lab make prints would work. But no way it would be perfect first time, I'd want to adjust something and have to have it printed again and again.

Thanks,
Kat
 
OP
OP

calico

Member
Joined
Oct 20, 2020
Messages
313
Location
USA
Format
Medium Format
If there is nothing in nozzle check, don't do any head cleanings. It's not clogged heads.

Are the artifacts those horizontal lines like here?

View attachment 345720

If so, they are definitely not pizza wheels and won't be helped by front loading. Quite likely alignment related. But you say you have done alignment - so no idea. Also, I would expect misaligned heads would have these line all over, not just in the shadows. May be they are there but not easily discernible.


:Niranjan.

Hi Niranjan,

I'm not sure if I did alignment when I was printing the photos. So I have to do this. I'm glad you think that's what it is. Before I saw your post, I typed the one with all the possible settings adjustments suggested in manual. Could be nightmare to try all variations of settings.

Yes, it is the horizontal lines which are close together. I think they go through the whole print, but they are not discernable in busy and lighter areas. I can see in the black of creek water and the dark blue of girl's clothes. Then the image becomes busier, without flat areas of dark color, and that's reason don't see the lines.

I will do head alignment and report results. (Might have to be done tomorrow.)

Thanks.
 

koraks

Moderator
Moderator
Joined
Nov 29, 2018
Messages
22,656
Location
Europe
Format
Multi Format
-- Do nozzle check and cleaning cycle (DONE)

Ok, keep doing the nozzle check from time to time. Every other print or so until you get the problem fixed.
The reason why clogged nozzles should be high up the list of priorities is because you mentioned the problem went away for a few prints after doing power clean cycles, but then came back. That doesn't sound like an alignment issue.

-- Choose higher resolution (need to try 2880, used 1440 previously)

That won't do much, however, there's something in the resolution dialog that can make a difference, which is the 'high speed' setting. Disable it. This can result in the kind of banding you're seeing. By default the printer prints bidirectionally (it deposits ink as the head travels in either direction), which is obviously faster, but alignment is worse this way. The slow mode is unidirectional and alignment will be better. See how that works.

I've never found it necessary to mess with paper feed or thickness parameters.

When it comes to cleaning, the main issue with this printer is the cleaning pad/station that's in the bottom right of the printer, all the way underneath the display, near the bottom of the machine. There's a landing pad for the head which consists of two sponge sections (with a metal mesh) that the head parks on when the printer is not in use. Underneath the sponge assembly, which fits to the head hermetically sealed, there's a pump. This is used for the power cleaning cycle. Power cleaning works by applying pressure to the ink (i.e. ink is pressed into the head), opening the nozzles in the head (allowing ink to drop out of the head) and applying strong suction via the sponge/foam pads of the cleaning station. This basically pulls ink through the head and ink lines, and it's very effective in cleaning nearly all clogs.

However, after some time, the pump assembly itself can get clogged due to buildup of ink residue. I took mine apart about a month ago to clean this part. It requires disassembling the printer to a large extent. For me, this fixed persistent clogging problems, which could no longer be fixed by the printer itself because the power cleaning routine was ineffective (due to the clogged pump). If your power cleaning cycles still work OK and you don't get clogged nozzles all the time, don't worry about this (yet).

Sorry about the TL;DR.

Anyway, if you're having issues with this printer, feel free to post back. Over the years I've come to know it reasonably intimately.

Oh, one more thing - I use refillable cartridges, 3rd party inks and a resettable maintenance cartridge these days. This really helps managing the worries of flushing lots of ink by doing cleaning cycles. I used to worry about the cost of ink, but since I've switched to 3rd party inks, I don't care anymore and just do a power cleaning cycle whenever I use the printer again after not using it for one or two weeks (or more). These inks may very well fade faster than Epson's, which may be a concern if you sell your prints. I don't recommend 3rd party inks in that case. However, for amateur/home use, I don't worry about it.
 
OP
OP

calico

Member
Joined
Oct 20, 2020
Messages
313
Location
USA
Format
Medium Format
Ok, keep doing the nozzle check from time to time. Every other print or so until you get the problem fixed.
The reason why clogged nozzles should be high up the list of priorities is because you mentioned the problem went away for a few prints after doing power clean cycles, but then came back. That doesn't sound like an alignment issue.


That won't do much, however, there's something in the resolution dialog that can make a difference, which is the 'high speed' setting. Disable it. This can result in the kind of banding you're seeing. By default the printer prints bidirectionally (it deposits ink as the head travels in either direction), which is obviously faster, but alignment is worse this way. The slow mode is unidirectional and alignment will be better. See how that works.

I've never found it necessary to mess with paper feed or thickness parameters.

When it comes to cleaning, the main issue with this printer is the cleaning pad/station that's in the bottom right of the printer, all the way underneath the display, near the bottom of the machine. There's a landing pad for the head which consists of two sponge sections (with a metal mesh) that the head parks on when the printer is not in use. Underneath the sponge assembly, which fits to the head hermetically sealed, there's a pump. This is used for the power cleaning cycle. Power cleaning works by applying pressure to the ink (i.e. ink is pressed into the head), opening the nozzles in the head (allowing ink to drop out of the head) and applying strong suction via the sponge/foam pads of the cleaning station. This basically pulls ink through the head and ink lines, and it's very effective in cleaning nearly all clogs.

However, after some time, the pump assembly itself can get clogged due to buildup of ink residue. I took mine apart about a month ago to clean this part. It requires disassembling the printer to a large extent. For me, this fixed persistent clogging problems, which could no longer be fixed by the printer itself because the power cleaning routine was ineffective (due to the clogged pump). If your power cleaning cycles still work OK and you don't get clogged nozzles all the time, don't worry about this (yet).

Sorry about the TL;DR.

Anyway, if you're having issues with this printer, feel free to post back. Over the years I've come to know it reasonably intimately.

Oh, one more thing - I use refillable cartridges, 3rd party inks and a resettable maintenance cartridge these days. This really helps managing the worries of flushing lots of ink by doing cleaning cycles. I used to worry about the cost of ink, but since I've switched to 3rd party inks, I don't care anymore and just do a power cleaning cycle whenever I use the printer again after not using it for one or two weeks (or more). These inks may very well fade faster than Epson's, which may be a concern if you sell your prints. I don't recommend 3rd party inks in that case. However, for amateur/home use, I don't worry about it.

Hi Koraks,

Glad you think it's a clogged head issue which may be fixable at this point. I wouldn't have the confidence to take the machine apart to fix the pump assembly. I did replace the maintenance cartridge before all this printing, but that's probably irrelevant, that's just where the ink lands.

I have tried printing with the "high speed" unchecked -- the lines still appeared in the print. I guess I could fool around with the drying time setting in Photoshop print settings window, make drying times longer.

But the first thing is to try unclogging heads again.

Interesting you found 3rd party inks for this printer. I never looked. That would help with the $$ stress. Yet.....if I"m going to so much trouble, and spending so much on paper, I would worry about using 3rd party inks (as you say, possible longevity issue).

I do use 3rd party inks for the printer I use for office-type things and save a ton of money there.

I hope to attack this again tomorrow when I'm fresh.

Thank you so much for sharing your expertise. Really appreciate. You certainly do know this printer intimately!

Kat
 
OP
OP

calico

Member
Joined
Oct 20, 2020
Messages
313
Location
USA
Format
Medium Format
UPDATE 8/5/23:

Tried printing the same image today.

Cleaned the printer's heads three times and did alignment. No power clean, because manual said ink cartridges have to be half full for that, and I had a couple that weren't, and I didn't want to replace, so I skipped it.

On the Canson Arches 88, the faint lines still appeared in flat, dark areas of image. They were a bit fainter than before, but still there if I looked under strong light. Not so noticeable when looking at print when held vertically instead of horizontally under light.

All prints made with "high speed" unchecked, at 2880 dpi, with appropriate Canson ICC profile.

I did some with paper thickness at 5 instead of 4. I saw at Canson site that the paper is 0.485 mm thick, so 5 actually closer than 4 for that setting (it's 0.1 mm per unit in the settings). That didn't help.

I also did some where I changed platen gap to "wide" instead of "auto." Also tried "wider."

No matter what I did, I could still see the faint lines.

I remembered that previously, I was able to get print without lines on the Canson Rag Photographique. But I didn't like the way the image printed otherwise (too dark, saturated). I also got print w/o lines on Hahnemuhle Photo Rag Bright White, but I only had that one sheet from sample pack.

So I worked with the image in Photoshop so it would look better on the Rag Photographique. Got decent prints. No lines. I used 4 paper thickness (maybe should have used 5; I need to check Canson specs for that paper), "auto" for platen gap, 2880 dpi, high speed unchecked. Appropriate ICC from Canson.

So I don't know what's going on. I don't know why those lines persisted on the Canson Arches 88. In my pile of prints, I did find one which was on that paper and without lines. Maybe I did that one after the power clean I did another day? But that paper must be prone to this line problem if I couldn't get one without lines today but did on the Rag Photographique.

Maybe the Arches 88 will be usable for other images, without flat, dark areas. I'll have to see. I have a whole box of it.

This photo wasn't even worth all the time and money (paper/ink) I put into it! I persisted because I wanted to frame for the subject's parents.

Koraks and Niranjan: Thank you for taking the time to help. Really appreciate!
 
Photrio.com contains affiliate links to products. We may receive a commission for purchases made through these links.
To read our full affiliate disclosure statement please click Here.

PHOTRIO PARTNERS EQUALLY FUNDING OUR COMMUNITY:


Ilford ADOX Freestyle Photographic Stearman Press Weldon Color Lab Blue Moon Camera & Machine
Top Bottom