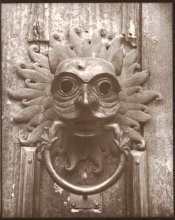
Enlarging a negative for contact printing

Dog Opposites

A
Dog Opposites

  • 2
  • 3
  • 107
Acrobatics in the Vondelpark

A
Acrobatics in the Vondelpark

  • 6
  • 4
  • 186
Finn Slough Fishing Net

A
Finn Slough Fishing Net

  • 1
  • 0
  • 104
Dried roses

A
Dried roses

  • 13
  • 7
  • 193
Hot Rod

A
Hot Rod

  • 5
  • 0
  • 117

Recent Classifieds

Forum statistics

Threads
197,468
Messages
2,759,531
Members
99,512
Latest member
vincent83
Recent bookmarks
0

Fraunhofer

Member
Joined
Jan 1, 2016
Messages
208
Location
East coast
Format
Multi Format
For many of the alternative processes you need a negative the size of the final print. There are many ways to get a large negative, starting with a large camera down to using digital negatives. For various reasons I am trying to do this analogue in the darkroom and since I did not find a good end-to-end description of the process, here is what my experimentation yielded:

I am using Arista Ortho Litho 3.0, since it a) cheap b) can be processed with stuff I have c) can be used with regular safelights. The main drawback is: this film is flimsy and it is very easy to damage the emulsion.

I am enlarging from a 6x6 negative onto 4x5 Ortho, exposure is about 2.5 stops down from a regular silver gelatine print. I develop the inter-positive for about 1 minute in the tray with constant agitation, you do this by inspection, so pull from developer when contrast seems right (here I required a few tries to get that right) in 1:20 Kodak Polymax paper developer. Stop, fix, wash, photoflo, dry, like any other film.

Then contact print the negative on another sheet of 4x5 Ortho. After some experimentation, I settled on the same exposure as for the inter-positive. Same processing sequence as above.

Since the resulting negative was lacking contrast (and density to some extent), I turned the lights on and completely bleached it using ferricyanide + KBr (30g each to the liter) and redeveloped for 15 minutes in Pyrocat HD 2:2:100. Stop, wash, photoflo dry (here I am assuming since it was fully developed no need for fixing, time will tell ...).

Then I made a palladium print (ziatype) like so:
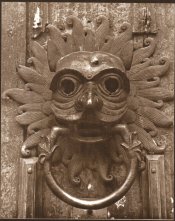
knocker-small.jpg

Overall, I consider this a success, with the following caveats:

I'd probably try this with 1:40 dilution of developer, since this would give more even development.

There are plenty of tiny pinholes in the emulsion, which for above scene is OK, not so if you had a smooth sky or skin in the image. Hardening could help as would more care in handling (I was not too careful).

This whole experiment took about two evenings or so. So this may be a viable method. Next, I'd like to try reversal processing of Ortho film.
 

Jerevan

Member
Joined
Nov 19, 2004
Messages
2,259
Location
Germany/Sweden
Format
Large Format
A too strong acid stop bath can cause pinholes in the emulsion. But as you say, more care in handling and perhaps a hardening fixer might help.
 
Joined
Apr 14, 2016
Messages
814
Location
Bavaria, Germany
Format
Medium Format
As it happens Deutsch ist meine Muttersprache and I know that Moersch is selling "Umkehrbleicher"
But I didn't know about this howto, thanks.

I have not tried it myself, but the trick is to figure out the correct times for first and second exposure. FO5 (or even worse FO6) is a very hard film, and the contrast is brought down through the second exposure - by creating a base fog which is bleached away when reversing the film.

I am planning to use the formula by Tim Rudman (rehal copper sulphate bleach), that should work.
 

jeffreyg

Subscriber
Joined
Jun 12, 2008
Messages
2,583
Location
florida
Format
Medium Format
Fraunhofer,

You are going through a lot of steps. Consider using x-ray duplicating film. Since you want a 4x5 negative an 8x10 sheet will give you two 4x5's. It is a reversal film and yields good contrast for platinum and palladium printing. The dedicated developer and fixer should last about a month in working solution. The film is very slow and you make the negative like making a print with your enlarger. I have been using it for a number of years for enlarged negatives for pt/pd printing with excellent results. Search the net for the best source. i have been using Kodak Dental X-Ray Duplicating Film which may not be around anymore but I still have a box in the fridge. Remember if you go that route you do the opposite since it is a reversal film ie. more exposure to lighten the neg = darken the print. A brief learning curve and you should get very good results.

http://www.jeffreyglasser.com/
 
OP
OP

Fraunhofer

Member
Joined
Jan 1, 2016
Messages
208
Location
East coast
Format
Multi Format
Jeffrey, interesting option. This type film is still made by a number of manufacturers and is fairly cheap $0.8 per 8x10 sheet, alas, I have the chemistry for reversal processing arriving today. So I'll give this a shot first.
 
OP
OP

Fraunhofer

Member
Joined
Jan 1, 2016
Messages
208
Location
East coast
Format
Multi Format
I have not tried it myself, but the trick is to figure out the correct times for first and second exposure. FO5 (or even worse FO6) is a very hard film, and the contrast is brought down through the second exposure - by creating a base fog which is bleached away when reversing the film.

I am planning to use the formula by Tim Rudman (rehal copper sulphate bleach), that should work.

Why rehal? I thought, for reversal you want the metallic silver gone and the undeveloped parts to remain. Or am I missing something?

In any case, my plan is to use either potassium permanganate or potassium dichromate bleach.
 
OP
OP

Fraunhofer

Member
Joined
Jan 1, 2016
Messages
208
Location
East coast
Format
Multi Format
A too strong acid stop bath can cause pinholes in the emulsion. But as you say, more care in handling and perhaps a hardening fixer might help.

Thanks, no acid. For film I always use a water stop bath. But I really was just trying to see whether this can be done at all w/o going crazy, so I was really fairly rough with the emulsion...
 

Vaughn

Subscriber
Joined
Dec 13, 2006
Messages
10,012
Location
Humboldt Co.
Format
Large Format
I went the more expensive route and bought a bigger camera...:cool:
 
OP
OP

Fraunhofer

Member
Joined
Jan 1, 2016
Messages
208
Location
East coast
Format
Multi Format
I went the more expensive route and bought a bigger camera...:cool:

OK, I admit it: I want a bigger camera, and this is just a way to try to delay the day... chemistry is easier to smuggle into the basement and can remain hidden, no so easy with a 8x10 view camera :whistling:

but I also really like to learn whether I enjoy making large Pd print (with Pt also something to be mastered in the future)
 

Vaughn

Subscriber
Joined
Dec 13, 2006
Messages
10,012
Location
Humboldt Co.
Format
Large Format
My wife divorced me years ago...I got an 11x14 (I've been using an 8x10 for 20+ years).

But 8x10 is a nice size for Pt/Pd (I use a combination of the two...2/3 Pd, 1/3 Pt)...and sometimes Pd w/ Na2).
 
Last edited:

cliveh

Subscriber
Joined
Oct 9, 2010
Messages
7,487
Format
35mm RF
It probably makes no difference, but I contact print the negative on ortho to make the pos and then enlarge that onto ortho to make the neg.
 
OP
OP

Fraunhofer

Member
Joined
Jan 1, 2016
Messages
208
Location
East coast
Format
Multi Format
Ok, so here the story of reversal processing. I followed the intstructions by Moersch, specifically

I use the same first exposure as previously.

I use a second exposure with a piece of transparent paper as diffuser under the enlarger lens which is 4 times as long as the first.

I develop for 5 minutes in 1:20 polymax at 22C

Stop 30s in Ilfostop

Turn on lights.

Bleach till completion (very fast, less than 30s) using

10g potassium dichromate
25g sodium bisulfate
Add destilled water to make 1l (should read: add the above to 750ml water and then top off to make 1l)

Wash three minutes in running water
Wash three minutes in HCA

Develop till completion in 1:9 polymax (I am not patient, the 1:20 would surely work too)

Took me 4 attempts and two hours from start to finish. The combined exposure in 1st and 2nd exposure is critical since one needs to get to nearly the film base for the shadows, potentially very fickle.

The result has much better midtones and no emulsion damage (dichromate is said to harden the emulsion).

Final test is of course making a Pd print, but not today.
 

jeffreyg

Subscriber
Joined
Jun 12, 2008
Messages
2,583
Location
florida
Format
Medium Format
As i mentioned above the system is simple and direct. Only three chemicals - developer and fixer plus water for a stop bath and hypoclear as a wash aid. Make a test negative like making a print and then your negative. Burn and dodge (for the opposite reasons*) as you would a print.
*For "darker" areas on the print burning for the negative will give a "lighter" negative. Less exposure to the negative will give a "darker" negative and "lighter" print area.
If duplicating a decent negative to begin with the contrast should be correct, if more contrast is needed it can be done with the print coating mix or longer development time for the negative.

http://www.jeffreyglasser.com/
 
OP
OP

Fraunhofer

Member
Joined
Jan 1, 2016
Messages
208
Location
East coast
Format
Multi Format
Finally, I have time to report back: so I kept playing with reversal processing and after a second session in the darkroom, I came up with this

1.jpg

Sorry, I have a cheap printer/scanner combo and have no idea how to tweak settings so that the image you see here would resemble the original, maybe you can see why I am not interested in the hybrid approach :D

In any case, reversal processing gives lot of control (or in other words: room for error) of contrast. In this particular case the negative needs a grade 3 or 3.5 on silver gelatine to look about right and above print is a pure Pd print. I needed about 5 attempts at the negative to get there. I made one from a different negative and got very close within 1 attempt, so I guess with a bit of practice 2 attempts plus some contrast control in printing would work.

Compared to the process with an inter-negative, reversal processing is about equally time consuming: you replace the drying step of the inter-negative with steeping things into various baths. The quality of negative, even apart from contrast, is much better in reversal processing: no emulsion damage and only one chance for dust to show up.

Given that all my not-LF negatives are developed approximately for grades 1-3 on silver gelatine, the level of contrast control of the reversal process is really useful. Next, I will try this in 8x10...

I guess that the x-ray dupe film would be much easier as pointed out by jeffreyg and is about the same cost, but I don't see how get contrast control over such a wide range...
 
OP
OP

Fraunhofer

Member
Joined
Jan 1, 2016
Messages
208
Location
East coast
Format
Multi Format
After some more tribulations, I had to admit that I had considerable problems in obtaining smooth tones, many attempts had striations and other irregularities. Starting anew with fresh chemistry, larger trays, more careful agitation etc. did not help.

Finally, Wolfgang Moersch pointed me in the right direction: a manufacturing problem with the brand of lith film I was using. After some search I came upon Utrafine ortho lith film and that has solved my issues with non-uniform tones.
 
Photrio.com contains affiliate links to products. We may receive a commission for purchases made through these links.
To read our full affiliate disclosure statement please click Here.

PHOTRIO PARTNERS EQUALLY FUNDING OUR COMMUNITY:


Ilford ADOX Freestyle Photographic Stearman Press Weldon Color Lab Blue Moon Camera & Machine
Top Bottom