Durst Pro 4x5 Enlargers

On the edge of town.

A
On the edge of town.

  • 6
  • 3
  • 94
Peaceful

D
Peaceful

  • 2
  • 11
  • 222
Cycling with wife #2

D
Cycling with wife #2

  • 1
  • 3
  • 94
Time's up!

D
Time's up!

  • 1
  • 1
  • 88

Recent Classifieds

Forum statistics

Threads
198,262
Messages
2,771,910
Members
99,581
Latest member
ibi
Recent bookmarks
1
Joined
Mar 30, 2011
Messages
2,147
Location
NYC
Format
Multi Format
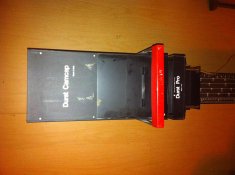
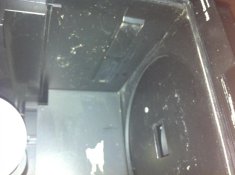
I finally got around to moving some items around in the basement, to setup my Durst Pro 4x5 enlarger. I sandwiched two MDF boards together to make a base and installed some wooden feet with levelers. I have it cleaned up and ready to go, but I need a little help with the setup of the condenser head. On the inside there, are a few guide rail tracks on the sides, but none of my condensers can sit/slide on them. They do fit perfectly if I just lay them on the bottom of the lamp house, which is directly above the negative holder when closed down. Is this the correct way? The whole top of the enlarger head tilts backwards when lifted up to load negatives, is it safe for the condensers to just sit them down there and not have them lock in anywhere?

Does anyone have this enlarger? Or does anyone have a manual for it? Ive searched for awhile online and haven't found anything. Even a simple picture of the open lamp house with different condensers setup would be really helpful.

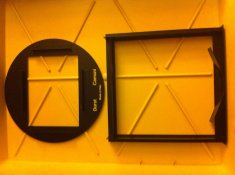
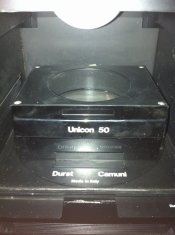
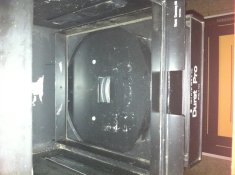
I have condensers labeled for 50, 85, and 150 which I assume is for 35mm, 6x6, and 4x5 negatives. The 50 and 85 condensers fit into the round metal camuni holder. the 150 condensers sit on top of themselves in the head.

I have attached some pictures. I am still not sure what the square metal holder does. Or where gel filters would sit.
 

Attachments

  • IMG_1349.jpg
    IMG_1349.jpg
    545 KB · Views: 222
  • IMG_1354.jpg
    IMG_1354.jpg
    555.3 KB · Views: 218
  • IMG_1353.jpg
    IMG_1353.jpg
    407.9 KB · Views: 194
  • IMG_1350.JPG
    IMG_1350.JPG
    529.7 KB · Views: 268
  • IMG_1352.jpg
    IMG_1352.jpg
    539.2 KB · Views: 217

MattKing

Moderator
Moderator
Joined
Apr 24, 2005
Messages
52,481
Location
Delta, BC Canada
Format
Medium Format
No pictures visible here.
 
OP
OP
Newt_on_Swings
Joined
Mar 30, 2011
Messages
2,147
Location
NYC
Format
Multi Format
Sorry I forgot to press the upload button. Doh, Now they are are flipped to the side =[
 

MattKing

Moderator
Moderator
Joined
Apr 24, 2005
Messages
52,481
Location
Delta, BC Canada
Format
Medium Format
OP
OP
Newt_on_Swings
Joined
Mar 30, 2011
Messages
2,147
Location
NYC
Format
Multi Format

MattKing

Moderator
Moderator
Joined
Apr 24, 2005
Messages
52,481
Location
Delta, BC Canada
Format
Medium Format
Wow thats really helpful. Ok so I was right, the larger 150 condensers just sit right inside. That square metal holder still stumps me, at least I now know it goes all the way up top. Would it possibly be for a piece of heat absorbing glass? I dont think I can put a gel filter that close to the 250watt bulb with out it melting.

I don't know for sure, but that top holder looks like it would be suitable for heat absorbing glass.
 
OP
OP
Newt_on_Swings
Joined
Mar 30, 2011
Messages
2,147
Location
NYC
Format
Multi Format
Yea i think i'll have to get a piece of that heat absorbing glass or use a smaller bulb. I was planning on doing a few test prints with the setup, but after a few times turning it on and off the bulb popped. It had 250watt PH213 bulb in it, I might go down to 150w or lower.

Also does anyone know if this machine needs a voltage stabilizer? The lamphouse came with a standard 2 prong wall plug that I attached to my timer. I didnt see a separate voltage stabilizer brick in the boxes it came with.
 
Photrio.com contains affiliate links to products. We may receive a commission for purchases made through these links.
To read our full affiliate disclosure statement please click Here.

PHOTRIO PARTNERS EQUALLY FUNDING OUR COMMUNITY:


Ilford ADOX Freestyle Photographic Stearman Press Weldon Color Lab Blue Moon Camera & Machine
Top Bottom