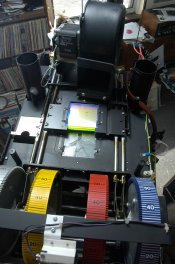
I'm in the process of installing a second cls 1000 5x7 in my darkroom. Upon visual inspection it appears as though the clear filter at the bottom of the filter assembly is partially melted. I've removed the dichroic reflector and when I zero out the three color channels and the neutral density I can see the clear filter in question. I'm guessing it's a UV filter. But why it's plastic and not glass is beyond me. I want to get a closer look but it does not look like one can access the filter assembly through the top of the head. I'm pretty sure the innards of the cls1000 are essentially the same as the cls1840 so a schematic for either head would be a great help. Anyone have any clues or suggestions?...
-
Welcome to Photrio!Registration is fast and free. Join today to unlock search, see fewer ads, and access all forum features.Click here to sign up
You are using an out of date browser. It may not display this or other websites correctly.
You should upgrade or use an alternative browser.
You should upgrade or use an alternative browser.
Durst CLS 1000 / Durst CLS 1840 color head schematic
-
A
- Thread starter frotog
- Start date


Recent Classifieds
-
For Sale Olympus OM-2S Program
- Started by davela
-
For Sale Adjustable Enlarger Easel
- Started by davela
-
For Sale Premier 4-in-1 Enlarger Easel
- Started by davela
-
For Sale Pentax MZ-S + BG10 grip & CS-105 Cable switch
- Started by Disconnekt
Forum statistics
On my CLS1840 head, the top clear filter is a glass IR filter, then the 3 dicro filters, and on the bottom a clear glass UV filter.
I think I was able to access and remove the UV filter by first removing the lamp assembly and IR filter, then zeroing the dicro filters, and finally removing 2 thin spring-steel clips, each clip held by 2 screws. Once you start dis-assembly, it will be easier than you first thought.
Underneath the glass UV filter, my CLS1840 has a glass diffuser. Once you get that far, you might as well clean the diffuser, too.
Like you mentioned, I can't imagine the UV filter being glass, as it gets pretty hot.
What Eric wrote....
Plus, the schematics and shop manual don't cover any of the mechanical elements. It is pretty straight forward as to how things come apart, though.
I spent some time from the bottom fixing my shutter, but don't recall if the piece in question comes out easier from the top or bottom.
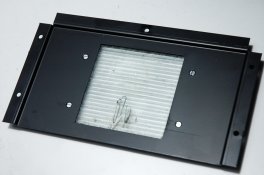
I checked back and I really did not take many pictures as I was working. Just this one which probably does not help much:

Plus, the schematics and shop manual don't cover any of the mechanical elements. It is pretty straight forward as to how things come apart, though.
I spent some time from the bottom fixing my shutter, but don't recall if the piece in question comes out easier from the top or bottom.
I checked back and I really did not take many pictures as I was working. Just this one which probably does not help much:

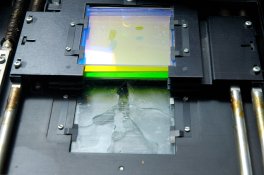
Thanks guys! I was hoping you two would chime in...to be clearer...I was inspecting from the top after having removed the cap and the dichroic reflector. The melted plastic filter in question is under the top clear glass piece and the four adjustable filters. I was peering down inspecting the action of the filters by zeroing them out and it was only after I had retracted all four filters that I noticed something that looks like a melted plastic filter underneath it all. I've yet to power it up and open the shutter so I haven't had a chance to inspect this from below. Am I wrong in thinking that you can approach the filter assembly from the side? It looks as though the cover of the head comes in two after you remove the screws.
When I borrow into this deeper I'll take post some digital shots. Thanks again for the info!
When I borrow into this deeper I'll take post some digital shots. Thanks again for the info!
I'm putting two and two together here; is the piece that is melted the 'diffuser' that Eric mentions?
On that CLS2000 diagram and on my unit I don't have a diffuser in that position, so I'm guessing.
You may be able to carefully lift the actuating lever off the shutter pin and then open the shutter to inspect it from below, rather than doing that with it powered up.
On that CLS2000 diagram and on my unit I don't have a diffuser in that position, so I'm guessing.
You may be able to carefully lift the actuating lever off the shutter pin and then open the shutter to inspect it from below, rather than doing that with it powered up.
Last edited by a moderator:
Now that I'm in there with a flashlight I can see that what I'm looking at is a broken glass UV filter. I still can't figure out how to get past the metal plate that holds the upright posts for the lamp fixture and the seating flange for the dichroic globe in order to get at the broken UV filter underneath the four filter assembly. There are no visible screw heads. I'm going to light it up and take a picture...
Yes, light it up and look carefully. I don't remember exactly how I dis-assembled it, but it was pretty straight forward. Everything unscrews or unbolts. Just take your time and don't force anything (and take careful notes!)......I still can't figure out how to get past the metal plate that holds the upright posts for the lamp fixture and the seating flange for the dichroic globe in order to get at the broken UV filter underneath the four filter assembly. There are no visible screw heads. I'm going to light it up and take a picture...
Good Luck!
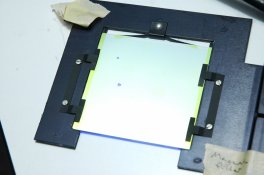
I removed the top half of the case which revealed the four screws holding the lamp assembly in place. After removing the lamp assembly I can now see the four screws that hold the filter assembly in place. It appears as though some sort of grease or flux might have dripped down onto what must be the UV filter. Beneath the UV filter is another piece of glass (diffusion?). It looks corrugated but maybe that's the shutter that I'm seeing (see third picture). I can see how I'm going to get at the broken glass. However, the very bottom piece of glass is being held in place from below. It is intact but covered with this sticky stuff. It looks like I'll have to access it from behind the shutter. I can't figure out how to manually open the shutter. Also, any idea as to where I might find a replacement UV filter?
Attachments
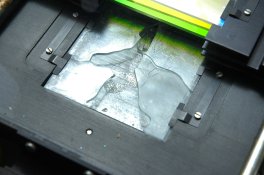
…… Beneath the UV filter is another piece of glass (diffusion?). It looks corrugated but maybe that's the shutter that I'm seeing (see third picture). I can see how I'm going to get at the broken glass. However, the very bottom piece of glass is being held in place from below. It is intact but covered with this sticky stuff. It looks like I'll have to access it from behind the shutter. I can't figure out how to manually open the shutter. Also, any idea as to where I might find a replacement UV filter?
I suspect the broken UV filter is wedged between the diffuser and frame. Try to wiggle the broken piece to remove it.
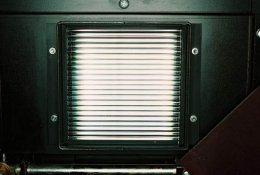
The Diffuser is under the UV filter. This is made up of many (15 or so) thin glass rods about 70mm long, which fit, along with a tensioning spring, in a metal frame. Yes, it does look corrugated, but all the glass rods are separate. First, remove the 4 screws holding the metal frame to the chassis. You may need to access these screws, or the nuts, from below (I've attached a picture, looking up from below the head). Then remove this diffuser assembly intact (without opening the metal frame holding all those rods). Try to clean the diffuser assembly without further disassembly.
But if you must disassemble it, remove 4 very small screws and nuts holding the frame together. Carefully remove the top cover, and then the tensioning spring, and finally the glass rods. When reassembling, place all glass rods in the frame, then the tensioning spring (the point of the spring goes to the outside of the case), and cover all with a thin sheet of paper while carefully holding all in place with the fingers. Then slide the top cover over the paper, being careful not to let the glass rods pop-up out of the frame (remember, they are under tension).
The shutter motor is attached to a circuit board, and that board is attached to the chassis by 2 screws. Once this assembly is removed, the shutter is just slid out of the way. When you re-install the assembly, the shutter blade should pivot freely and not be bent.
For a replacement UV filter, try Jens Jensen in Oregon at 800-675-1493 or Stone Mills in Canada at 613-358-5658.
Attachments
Last edited by a moderator:
I just got off the phone with Christine at StoneMills. After looking through her inventory sheet she came up with three filters, one of which might be the UV filter I'm looking for. The first two are for the cls2000 but I'm thinking they might be the same filters used in the cls1000 and the cls1840 - "base filter...part #AA98340" and "heat protection filter...part #AA98429". They do have a UV filter (part #AD58304) but they're not sure which enlarger it's for. Anyone have a parts manual for either the 1840 or the 2000 so that I can positively ID these numbers? Thanks, frotog.
Ask Christine to measure the filters, and then compare it to your filter size. Any UV filter should work, as long as it physically fits the space. I don't have my heads open to compare, but I think the CLS1840 and CLS2000 share the same filter size.
I removed the diffusion plate. It is covered with the same sticky oily and sour to the taste substance that I suspect caused the uv filter to crack in such a bizarre pattern...in any event I need to clean it. Eric, once I remove the four screws will those little spring-loaded glass rods come flying out? I guess I'll use dilute rubbing alcohol or a windex-soaked paper towel to clean the filter.
When I pulled the magenta filter I noticed an aberration on the dichroic surface. Am I nitpicking in thinking I should try to replace it too?
When I pulled the magenta filter I noticed an aberration on the dichroic surface. Am I nitpicking in thinking I should try to replace it too?
Attachments
. once I remove the four screws will those little spring-loaded glass rods come flying out? I guess I'll use dilute rubbing alcohol or a windex-soaked paper towel to clean the filter.
When I pulled the magenta filter I noticed an aberration on the dichroic surface. Am I nitpicking in thinking I should try to replace it too?
Those 4 screws should release the diffusion filter and frame assembly, and the rods should remain together within the frame. Any cleaner you mentioned should work, or just soap it up good with dishwashing soap and rinse. Then blow it out and let it dry.
I would not worry about the dichro filter. Remember, the light goes though the diffuser, and then through the plastic diffusers in the mixing box. A few blemishes shouldnt hurt.
But I would clean all the dichro filters, and the IR and UV filters, before I reassembled the enlarger head. I cleaned all my filters by removing the glass from the frame, and soaking it in warm water with lots of dishwashing liquid. Rinse it off in warm water and blot with a paper towel. By being warm, the glass dries fast.
One other thing
Those dicro filters have an up and a down side, and I think the only way to tell is by the appearance of the reflection when you hold them at an angle to a light. So when you remove a filter from the assembly, look at the reflection on both sides and determine what the up side looks like. Then be sure to reinstall it with the same reflection up.
Positively grateful for these essential tips. Thanks!
| Photrio.com contains affiliate links to products. We may receive a commission for purchases made through these links. To read our full affiliate disclosure statement please click Here. |
PHOTRIO PARTNERS EQUALLY FUNDING OUR COMMUNITY:  |