DIY Sink...

Recent Classifieds

Forum statistics

Threads
198,722
Messages
2,779,917
Members
99,691
Latest member
Vlad @ausgeknipst
Recent bookmarks
0

ChristopherCoy

Subscriber
Joined
Aug 9, 2011
Messages
3,599
Location
On a boat.
Format
Multi Format
I'm lacking a formal darkroom sink, and it really inhibits my ability to wash my prints.

So today I started thinking about how I can build something that is lightweight, water tight, and has a drain hose that I can place in the existing sink. I need something long enough to hold three processing trays and a print washer.

So I thought about forming a fiberglass sink myself, but that would be too heavy to set up and take down each time I wanted to work. (I have to tear down because I use the laundry room.)

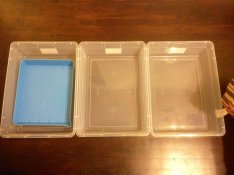
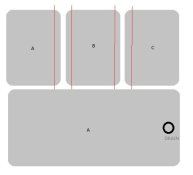
And then I thought about those big Sterilight bins. The cheap ones from the dollar store or Walmart? I thought that perhaps I could cut the ends off of three of them and glue them together somehow and then silicone the seams so that its water tight. Or even two of those long, shallow ones that fit under your bed.

Any ideas on what to use, or how to get this done? I'm thinking superglue and tub/tile caulk.

Here is a crude diagram of my idea.
ImageUploadedByTapatalk1365545627.877931.jpg
 

pbromaghin

Subscriber
Joined
Sep 30, 2010
Messages
3,805
Location
Castle Rock, CO
Format
Multi Format
Home Depot has plastic concrete-mixing tubs, 10 and 20 gallons, about 8 inches deep, around $5 and $13. Look under concrete, then tools. If you use these or the sterlite, you could probably string some together with tubes and some kind of fitting to make them watertight without worrying about big seams. Make the outlet lower than the inlet so water flows through.
 
Last edited by a moderator:

mesantacruz

Member
Joined
Feb 21, 2013
Messages
256
Format
Medium Format
i just use a wood sink i built and coated with rust-o-leum... i put a 2x4 on one side and drain it into a bucket (this has a pond pump-which drains into the laundry drain which was to high, for gravity to do its thing)... anyway... i thought of doing your idea, but the plastic bins i saw were not wide enough, and i didn't think of solution... my concern is that, the seams will spring a leak... even with silicone...

maybe if you use pvc glue and silicone (as a precaution) i think it will work... definitely with the pvc glue, that thing is incredible.

Are you sure a wooden sink won't work... that you could just stand on it's side (longways) and just take up minimal amounts of space. the benefits of this, is that you get to make it the perfect size.

what size are the trays?
 
Joined
Dec 10, 2009
Messages
6,297
Format
Multi Format
I made my darkroom sink out of wood and coated with resin. I've been using it for decades. There are some darkroom sinks available from folks getting rid of their darkrooms also. Try Ebay or Craig's list.
 

JOSarff

Member
Joined
Mar 5, 2008
Messages
203
Location
Santa Fe, NM
Format
8x10 Format
Christopher:

WIthout knowing the largest print you intend to make on a regular basis, It's hard to say what the best choice would be.
 
OP
OP
ChristopherCoy

ChristopherCoy

Subscriber
Joined
Aug 9, 2011
Messages
3,599
Location
On a boat.
Format
Multi Format
Are you sure a wooden sink won't work... that you could just stand on it's side (longways) and just take up minimal amounts of space. the benefits of this, is that you get to make it the perfect size.

what size are the trays?


8x10 and 11x14.

I thought about a wooden something or another coated with resin, but figured it would be too heavy for temporary setups that have to come down each time I'm through printing.
 
OP
OP
ChristopherCoy

ChristopherCoy

Subscriber
Joined
Aug 9, 2011
Messages
3,599
Location
On a boat.
Format
Multi Format
I made my darkroom sink out of wood and coated with resin. I've been using it for decades. There are some darkroom sinks available from folks getting rid of their darkrooms also. Try Ebay or Craig's list.


I've found some, but again most are too big for temporary set ups. I need minimal investment, lightest weight, and easy setup/tear down.
 

JOSarff

Member
Joined
Mar 5, 2008
Messages
203
Location
Santa Fe, NM
Format
8x10 Format
half inch plywood edges sealed with fibreglas resin and painted isn't too heavy. Can you hinge it to the wall and fold it up?
 
OP
OP
ChristopherCoy

ChristopherCoy

Subscriber
Joined
Aug 9, 2011
Messages
3,599
Location
On a boat.
Format
Multi Format
half inch plywood edges sealed with fibreglas resin and painted isn't too heavy. Can you hinge it to the wall and fold it up?

hmmm... Didn't think about hingeing it to a wall. It would have to go above a toilet.
 
OP
OP
ChristopherCoy

ChristopherCoy

Subscriber
Joined
Aug 9, 2011
Messages
3,599
Location
On a boat.
Format
Multi Format
This was my idea since I already have these. That's an 11x14 tray in the first one.

ImageUploadedByTapatalk1365551095.558587.jpg

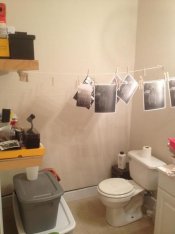
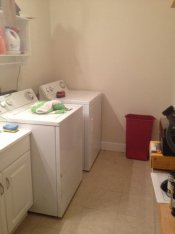
And this is my darkroom. It's about 10x6 now that I'm looking at it. I set the enlargers up on the dryer, and my three trays on the washer. Then wash in my itty bitty sink using soak and change methods.

ImageUploadedByTapatalk1365551226.132652.jpg ImageUploadedByTapatalk1365551235.620702.jpg
 

mgb74

Subscriber
Joined
Jan 24, 2005
Messages
4,773
Location
MN and MA US
Format
Multi Format
I've seen some nice darkrooms, but most darkrooms I've seen don't have a bathroom like yours does, much less a washer and dryer. :smile:

Will the sink be used to hold water or just manage water that comes out of the trays (i.e. will there be a plug used in the drain)? I'll assume the later. Also, when you look at sizing the sink, keep in mind you need to make sure you can prevent splashing stop bath into developer.

Given that the base of the sink will be well supported, here's an option: build a sink using 2x4 (or even 5/4x4) cedar and 1/4" cedar plywood. 2x4 cedar for the front and back, plywood for the bottom and ends. Paint the inside with epoxy paint, or even just use spar varnish and silicone caulk the seams. Cedar will cut the weight significantly, though at greater cost. For drainage, simply put a 1x1" piece of wood underneath the end furthest from the drain.

Alternatively, look at the plastic containers used for underbed storage. They may be large enough, at least for 8x10 trays. Consider 6" high divider between developer and stop bath trays. That divider could be anything from 1/4" plywood to varnished cardboard.
 
Last edited by a moderator:
OP
OP
ChristopherCoy

ChristopherCoy

Subscriber
Joined
Aug 9, 2011
Messages
3,599
Location
On a boat.
Format
Multi Format
How will the sink be supported? Will the sink be used to hold water or just manage water that comes out of the trays (i.e. will there be a plug used in the drain)?


My thought is to just manage water. The trays and/or print washer will be set inside and the "sink" will have a drain hose that either goes into the washer drain, or the bathroom sink between the toilet and washer. Water will come either from the washer connection, or from the sink faucet attachment.
 

MattKing

Moderator
Moderator
Joined
Apr 24, 2005
Messages
52,848
Location
Delta, BC Canada
Format
Medium Format
Have you looked at the underbed storage containers?

Dead Link Removed
 

ac12

Member
Joined
Apr 27, 2010
Messages
720
Location
SF Bay Area (SFO), USA
Format
Multi Format
I made a partial sink.
It was a sink w 3 sides, and 2 hinged legs. 1/2 plywood bottom and 1x4 sides.
It sat over the toilet, and the 2 legs would be next to the wall, the open end of the sink rested on the edge of the sink counter.
When I was done printing, the legs folded up, and I rested it against the wall.
I painted it with epoxy paint.
The only thing is because it isn't a real sink, I could not put water in it. It was just to catch the dripping when I used the trays. Although I could have closed the 4th side and put in a drain with a tube to a bucket, and that would make it into a sink.

Using the plastic tubs would be a problem. When you move it, there is a good likelihood of the seams breaking.
Unless you put it onto something rigid like a sheet of 1/2 plywood, which would minimize the stress on the seams.
 
Joined
Jan 19, 2008
Messages
280
Location
Upper Hunter
Format
8x10 Format
Do what I did, made a tray stacker. the trays above each other. You could use kitty litter trays for a water bath for the chemical trays. I made one 2 trays high, the third sitting on the base. It was 16x 20 for trays and extended back on slope so you could access the lower trays. Dev on top, stop under the fix. I used the sink to wash the prints under neath the tray stacker. To make you cut the bases all the same 3 @ 18 x 22. then you make 4 uprights say 4 x 18 these are screwed to the sides of the bases. You stagger the bases/shelves back say 4 -8 inches back to give you access to each tray. Maybe some rubber feet to protect the surface. I place mine on the laundry sink. The shelf height depends on the depth of your trays. you don't need to watch the stop and fix as much as the dev. You could place on the washer. hope this helps, I cut mine up when I built my 10 x 20 darkroom, if you wish I can draw something and scan and send?
 

mesantacruz

Member
Joined
Feb 21, 2013
Messages
256
Format
Medium Format
mgb74 had what i thought was a good idea... also, the way i built the sink, i used the plumbing from the washer for the my sink... I attached a y adapter to split the water that was going into the washer into a second hose...

http://www.amazon.com/Orbit-58248-Garden-Y-Connector-Shut-Off/dp/B000YDVRH8

when i'm in the darkroom, the open up the water to the darkroom hose , and then in the darkroom sink i have the same y adapter, so that i can turn the water on and off to the sink, these are just attached to 1/2 inch pond tubing so that i can have a 'movable/directional' spout. i would have both y adapters so that i can regulate flow easily...

with this in mind, i don't know if you need a darkroom sink, or just a container which you could place over your sink, with a hole drilled to it, so that it drains into the sink. then just clamp down the the hose onto the side of the container while doing darkroom work.
 

mr rusty

Member
Joined
Sep 7, 2009
Messages
827
Location
lancashire,
Format
Medium Format
If you have the space for a permament sink, it isn't too difficult to make one. Mine is 18mm ply initially glued and screwed together. The glue I used was one of the high-performance glues that are used from a mastik gun and dry like very tough silicon. Waterproof. I screwed at 100mm intervals all round. Then I used a 2-pack yacht epoxy. Not cheap, but seems to be absolutely fine 1+ year on. I used a standard sink drain unit and recessed the top slightly to avoid a "step" and make sure it totally drained every time.
 
Joined
Mar 3, 2013
Messages
13
Format
Medium Format
You could use acrylic glass for your sink: easily moldable with a hot air gun, lighweight, chemical-resistant, can be glued, drilling and sawing is no problem.
 

Neal

Subscriber
Joined
Dec 3, 2004
Messages
2,019
Location
Chicago, West Suburbs
Format
Multi Format
Dear Christopher,

If the reason you are trying to build a sink is to help washing prints, I would like to suggest finding a used print washer. I am also in the situation where I can't have a proper sink, but that has not been an issue for me. In my case, I built a nice print washer, because a shop I used to work for gave me a bunch of Lexan sheets they were throwing away. From what I've seen, a used print washer is usually very close in price to the cost of new materials. My washer handles 11x14 and 8x10. On the grand occasion when I print 16x20 or 20x24, I use a tray with an old Kodak siphon. The tray sits on the washing machine with the siphon hanging over the laundry room sink.

Good luck,

Neal Wydra
 
OP
OP
ChristopherCoy

ChristopherCoy

Subscriber
Joined
Aug 9, 2011
Messages
3,599
Location
On a boat.
Format
Multi Format
with this in mind, i don't know if you need a darkroom sink, or just a container which you could place over your sink, with a hole drilled to it, so that it drains into the sink. then just clamp down the the hose onto the side of the container while doing darkroom work.


I'm wanting something to put the trays in and also something that I can run a print washer in. I have one if those print washers that has the sprinkler looking pipe running across it.
 

sdotkling

Member
Joined
Nov 30, 2010
Messages
66
Location
Outside of N
Format
35mm RF
Your current set up is almost perfect, actually. You would only need one of those bins to drain, right? Why not drill a 1" hole in bin 3, find a rubber fitting you can seal and tighten, and then run a length of 1/2" vinyl tubing out of it into your sink drain? Run another tube from the faucet into the bin and you've got a wash sink. When you're done, stack 'em back up in the corner. No need for the developer and stop bins to drain.
 
OP
OP
ChristopherCoy

ChristopherCoy

Subscriber
Joined
Aug 9, 2011
Messages
3,599
Location
On a boat.
Format
Multi Format
Your current set up is almost perfect, actually. You would only need one of those bins to drain, right? Why not drill a 1" hole in bin 3, find a rubber fitting you can seal and tighten, and then run a length of 1/2" vinyl tubing out of it into your sink drain? Run another tube from the faucet into the bin and you've got a wash sink. When you're done, stack 'em back up in the corner. No need for the developer and stop bins to drain.


I feel like such an idiot now... That never even occurred to me!! LOL

I can cut a whole in one of the plastic tubs, place it over the current household bathroom sink, and put the wash tray in it.

THANKS!!!!

ETA: I think the light bulb just kicked on... A wall mounted piece of 3/4" ply that is hinged to fold up for processing trays and extra counter space, and then a hole cut in one of those bins for my print washer and placed over the sink for draining.

I can't wait to get this started!!
 
Last edited by a moderator:
Photrio.com contains affiliate links to products. We may receive a commission for purchases made through these links.
To read our full affiliate disclosure statement please click Here.

PHOTRIO PARTNERS EQUALLY FUNDING OUR COMMUNITY:


Ilford ADOX Freestyle Photographic Stearman Press Weldon Color Lab Blue Moon Camera & Machine
Top Bottom