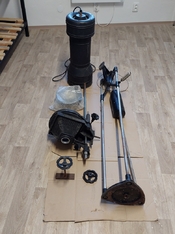
DIY LED horizontal 8x10 enlarger

In the Vondelpark

A
In the Vondelpark

  • 0
  • 0
  • 18
Cascade

A
Cascade

  • sly
  • May 22, 2025
  • 2
  • 0
  • 18
submini house

A
submini house

  • 0
  • 0
  • 49
Diner

A
Diner

  • 5
  • 0
  • 93
Gulf Nonox

A
Gulf Nonox

  • 10
  • 3
  • 116

Forum statistics

Threads
197,818
Messages
2,764,941
Members
99,481
Latest member
chopfalne
Recent bookmarks
0

albada

Subscriber
Joined
Apr 10, 2008
Messages
2,172
Location
Escondido, C
Format
35mm RF
thanks so much, this is great, really appreciate this Koraks!

Another approach which costs much more is to buy the Intrepid enlarger:
Intrepid Enlarger

Then use only the controller and lamp. Remove the diffuser from the lamp, and build your own diffusion chamber with the lamp at the top and diffuser at the bottom. The only work you will need to do is building the diffusion chamber; all the electronics can be used unchanged.

Mark
 

blacksquare

Member
Joined
Sep 8, 2015
Messages
74
Location
Czech Republic
Format
Large Format
The fact that you'll only do B&W helps to keep things simple!


Good; this gives you a simple option you could consider, as the former will be a little easier. Components would be something like this:
* 20-50W warm white COB LED for direct AC operation; something like this: https://www.aliexpress.com/item/1005007023067678.html
* Suitable COB LED heatsink, e.g. https://www.aliexpress.com/item/32754202850.html
* I'd recommend also getting a fan that mounts onto the heatsink; most of these are 12VDC so you'll need a small 12VDC wall wart power supply to power it from.
* You can use any regular enlarger timer and plug the LED into this.
In this setup there may be a very slight afterglow to your COB LED (but usually it's insignificant) which you'll just have to live with. If it's bothersome, try some other LEDs until you find one that doesn't exhibit this behavior (they're cheap anyway). The addressable RGB LEDs in the 'fancy' option above don't have this problem anyway.

This approach requires no microcontroller or coding; you just use a regular enlarger timer. You'll use Multigrade filters like with any bulb-based enlarger. You will still have to build a diffusion box so that the illumination of your negative is even. This challenge will be pretty much the same as with the fancy option I'll discuss below.


If you want to use "dial-a-grade" functionality where you basically have similar functionality to an Ilford 500 head, where you set the contrast grade and exposure time on a little screen by punching some buttons, you could build a more fancy version. You would need, for instance:
* Four or more 10W addressable 'smart pixel' LEDs. https://www.aliexpress.com/item/1005001379075638.html
* A suitable heatsink for each of the 10W LEDs. Something like this: https://www.aliexpress.com/item/1005003605697738.html
* A 12VDC power supply. If you use e.g. 4 LEDs, use e.g. a 5-6A rated unit. This can be something like this: https://www.aliexpress.com/item/4000594896227.html. if you use more LEDs, scale the power supply with it (!)
* A microcontroller of your choice; e.g. an Arduino UNO R4 WiFi https://store.arduino.cc/products/uno-r4-wifi
* A display and some form of data entry; for instance something like this: https://www.aliexpress.com/item/32475515474.html

There are roughly 80 million other ways and combinations of parts that will boil down to the same, so the above is just one possible approach. But it'll work and relies on fairly standard stuff for which plenty of code examples are available.

The display/keypad module I linked to should fit on top of an Arduino UNO-sized board, so that combination is convenient to use. You'll need to solder two wires to the display module for a GND and signal connection to the RGB LED modules. You power the UNO + display from the 12V of your power supply using the "Vin" pin. The LEDs are directly powered from the 12V power supply. All GND's need to be connected on your project.

You'll have to be creative in physically bolting everything together on your enlarger setup. You can use something like frosty/milky plexiglass as a diffusor. You may/will have to fashion some kind of diffusion chamber with the LEDs on one end and the diffusor at the other end, and a light-proof housing around it so you don't fog the paper, and this somehow needs to fit on/in your enlarger. The only advise I can give in this regard is "be creative"...

As to the number of LEDs you need: I expect you'll be able to do fine with 4 pcs of 10W RGB LEDs of the type suggested above. If you feel like beefing things up, you could use more. Keep in mind that your power supply needs to scale with the number of LEDs.

The real work will be in coding the system; you need to write the software for it, basically. If you have affinity with programming, this will be a huge bonus. If not, you'll either have to learn (which will take quite some time) or you'll have to bribe/convince someone else to do the work for you. To the best of my knowledge there's no ready-made software/code for this application that you can plug into your microcontroller of choice and it'll magically work. Even if I handed you the code that my enlarger runs on, it'd be useless to you; it's hardware-specific. On the plus side: it doesn't have to be very complicated to get the job done.

I'm always willing (to a reasonable extent) to give pointers and help with troubleshooting.
I am planning to build an LED light source for my enlarger and came across your extensive answer. Thanks you very much for info like this.

I don't mind working with filters, for now I would go the easier way with warm white COB LED.
Do you have any idea how to diffuse light from small LED like this?

I have a very simple enlarger where there is a large round condensor, just frosted glass over it, and then an opal bulb was used which moved up and down on a rod in the lamp housing to provide even illumination at different magnifications.

20240522_192231.jpg
 

koraks

Moderator
Moderator
Joined
Nov 29, 2018
Messages
21,253
Location
Europe
Format
Multi Format
Do you have any idea how to diffuse light from small LED like this?

An easy way is to place a diffusor (e.g. milky plexiglass) at a good distance from the light source. You'll have to experiment how much distance you need to get even illumination for your setup.
You can reduce the loss of light by putting the LED on one end of a diffusion chamber and the diffusor at the other end. If the inner walls are white, they'll reflect quite some light onto the diffusor.
1724079341028.png

If you can't make enough distance between the LED and the diffusor, you can work with two diffusors in series, at some distance from each other. You'll lose some more light, but you can get away with a smaller physical package.

I have a very simple enlarger

You could try to end up with a hybrid diffusor-condenser setup where you project a diffuse light source onto the condenser. Again, you'll have to experiment to get the distances etc. right.
An easier method would be to replace the condenser with a diffusor at the end of the tube, at a short distance above the film stage. It will no longer be a condenser enlarger that way, but that's not necessarily a problem.
 

blacksquare

Member
Joined
Sep 8, 2015
Messages
74
Location
Czech Republic
Format
Large Format
An easy way is to place a diffusor (e.g. milky plexiglass) at a good distance from the light source. You'll have to experiment how much distance you need to get even illumination for your setup.
You can reduce the loss of light by putting the LED on one end of a diffusion chamber and the diffusor at the other end. If the inner walls are white, they'll reflect quite some light onto the diffusor.
View attachment 376607
If you can't make enough distance between the LED and the diffusor, you can work with two diffusors in series, at some distance from each other. You'll lose some more light, but you can get away with a smaller physical package.


You could try to end up with a hybrid diffusor-condenser setup where you project a diffuse light source onto the condenser. Again, you'll have to experiment to get the distances etc. right.
An easier method would be to replace the condenser with a diffusor at the end of the tube, at a short distance above the film stage. It will no longer be a condenser enlarger that way, but that's not necessarily a problem.

Thanks for the quick reply.

I will definitely try it. I can get COB LED in various power from local shop, although it need a power source, but I have no problem with that.
I don't mind getting rid of the condenser, I have a smaller enlarger with a color head a and I'm happy with it.
I'll just have to add some weight to balance it out. That condenser is really heavy.
 
Photrio.com contains affiliate links to products. We may receive a commission for purchases made through these links.
To read our full affiliate disclosure statement please click Here.

PHOTRIO PARTNERS EQUALLY FUNDING OUR COMMUNITY:


Ilford ADOX Freestyle Photographic Stearman Press Weldon Color Lab Blue Moon Camera & Machine
Top Bottom