I’ve been looking for a solution for an air-timed film drying system that is inexpensive, easy, portable, and effective. Growing up I used to hang my film to dry in a closet and fought dust, then in the shower which wasn’t convenient.
There are expensive, industrial metal film drying cabinets, Jobo Mistral film dryer (a complete one in good shape goes for hundreds), and more. I also didn’t want to build something heavy and non-portable; it needed to be easy to setup and really keep all dust out completely out in my makeshift darkroom that I’ve established in my garage which doubles as a portrait studio and darkroom – not the most dust-proof environment even though I keep it very clean.
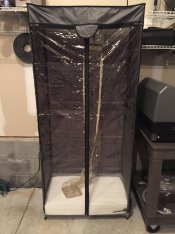
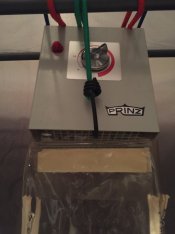
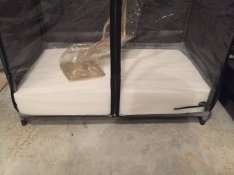
I built the picture setup quite easily. I picked up this relatively inexpensive clothes closet from Home Depot. I liked the vinyl cover that is well sealed all around except for the base and clear zippered door and rod. I added a 5-inch block of foam to the floor of the portable closet and sealed it on the exterior and interior with wide gaffers cloth tape to the vinyl so that no dust can get in from the bottom. I then picked up a used filtered Ptrinz film dryer head for about $15 on eBay – these are virtually identical to the more expensive used Jobo Mistral dryer heads and usually sell for a fraction of the Jobo – same filtering, same timer etc. The one I bought has the clear bag attached that I didn’t need, but I left it attached and now have twice the dust protection. Even though I’m not using the full length of the dryer bag I don’t need it as I’m doing medium format and 4x5, not long 35mm rolls which might also fit.
Anyway, not a slick, sophisticated solution but it works. I don’t think I spent more than $75USD on the whole contraption – it is portable and assembly took literally minutes.
Mike
There are expensive, industrial metal film drying cabinets, Jobo Mistral film dryer (a complete one in good shape goes for hundreds), and more. I also didn’t want to build something heavy and non-portable; it needed to be easy to setup and really keep all dust out completely out in my makeshift darkroom that I’ve established in my garage which doubles as a portrait studio and darkroom – not the most dust-proof environment even though I keep it very clean.
I built the picture setup quite easily. I picked up this relatively inexpensive clothes closet from Home Depot. I liked the vinyl cover that is well sealed all around except for the base and clear zippered door and rod. I added a 5-inch block of foam to the floor of the portable closet and sealed it on the exterior and interior with wide gaffers cloth tape to the vinyl so that no dust can get in from the bottom. I then picked up a used filtered Ptrinz film dryer head for about $15 on eBay – these are virtually identical to the more expensive used Jobo Mistral dryer heads and usually sell for a fraction of the Jobo – same filtering, same timer etc. The one I bought has the clear bag attached that I didn’t need, but I left it attached and now have twice the dust protection. Even though I’m not using the full length of the dryer bag I don’t need it as I’m doing medium format and 4x5, not long 35mm rolls which might also fit.
Anyway, not a slick, sophisticated solution but it works. I don’t think I spent more than $75USD on the whole contraption – it is portable and assembly took literally minutes.
Mike