ucsugar
Member
This was done before, but for those trying to do something similar this might be some inspiration:
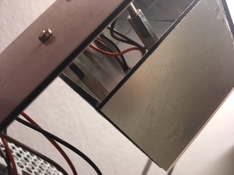
I built a LED head for a Durst M601 enlarger. It serves as a 'drop in' replacement for the original CLS66 color head. No modifications on the enlarger itself are required, and also no 3d-printing involved. I must admit, the project stopped in the 'first working prototype' phase, because the first prototype does the job surprisingly well.

The light source:
* 3x 3W LED green
* 3x 3W LED 'actinic blue'
* 2x 3W LED white for focus
* 1x 3W LED red
These are LEDs pre-fitted on a 'star-aluminium' board, I have mounted them on a 6x6cm aluminum board, around that a cube, consisting of 4 acrylic-glass mirrors and a plexiglass acting as a diffusor.


The original "Sivobox" (a cube with a reflecting inner side, I assume it acted for mixing/diffusing the light that came from the CLS66 head) is still in place, light exits the acrylic-mirror-cobe just above the Sivobox. I never did a scientific test, but there are no visible hot-spots.
The mirrors are just glued together (still in place after 18months), the board with the LEDs and the plexiglass diffusor screwed and a PVC-board - and that' it mechanically - it really comes handy that the M601 was designed with a quick-changeable light source in mind.
Electronics:
Meanwell LDD, LED drivers, PWM controlled by a ATTiny. Two channels, a relais switching between green/blue and white/red. A I2C connection (yes) to a control box, where a ATmega88 does the rest.... PCBs designed with Kicad. An other connection goes to a I2C controlled red-light (just a bunch of red LEDs)

It has two modes, one emulating different filters by mixing the green and blue LEDs and a "split-grade-mode" using the green and blue color independently.
What I like:
* saves a lot of space (transformer and timer)
* makes split-grade-printing much easier and less error-prone
* about 1 stop faster than the original CLS66 with 100W halogen bulb
* oh, and the controller can serve as a development-timer, saving even more space! (My dark'room' is a dark corner in my bedroom, space is at a premium)
Pitfalls:
* paper seems to be very sensitive to blue (actinic blue, 430nm). I "calibrated" the unit so, that equal time green/blue gives the same contrast like a filter 2: blue operates with ~25% of the power as green, so its' really dark for the human eye, making dodge/burn with blue a bit difficult.
I built a LED head for a Durst M601 enlarger. It serves as a 'drop in' replacement for the original CLS66 color head. No modifications on the enlarger itself are required, and also no 3d-printing involved. I must admit, the project stopped in the 'first working prototype' phase, because the first prototype does the job surprisingly well.
The light source:
* 3x 3W LED green
* 3x 3W LED 'actinic blue'
* 2x 3W LED white for focus
* 1x 3W LED red
These are LEDs pre-fitted on a 'star-aluminium' board, I have mounted them on a 6x6cm aluminum board, around that a cube, consisting of 4 acrylic-glass mirrors and a plexiglass acting as a diffusor.
The original "Sivobox" (a cube with a reflecting inner side, I assume it acted for mixing/diffusing the light that came from the CLS66 head) is still in place, light exits the acrylic-mirror-cobe just above the Sivobox. I never did a scientific test, but there are no visible hot-spots.
The mirrors are just glued together (still in place after 18months), the board with the LEDs and the plexiglass diffusor screwed and a PVC-board - and that' it mechanically - it really comes handy that the M601 was designed with a quick-changeable light source in mind.
Electronics:
Meanwell LDD, LED drivers, PWM controlled by a ATTiny. Two channels, a relais switching between green/blue and white/red. A I2C connection (yes) to a control box, where a ATmega88 does the rest.... PCBs designed with Kicad. An other connection goes to a I2C controlled red-light (just a bunch of red LEDs)
It has two modes, one emulating different filters by mixing the green and blue LEDs and a "split-grade-mode" using the green and blue color independently.
What I like:
* saves a lot of space (transformer and timer)
* makes split-grade-printing much easier and less error-prone
* about 1 stop faster than the original CLS66 with 100W halogen bulb
* oh, and the controller can serve as a development-timer, saving even more space! (My dark'room' is a dark corner in my bedroom, space is at a premium)
Pitfalls:
* paper seems to be very sensitive to blue (actinic blue, 430nm). I "calibrated" the unit so, that equal time green/blue gives the same contrast like a filter 2: blue operates with ~25% of the power as green, so its' really dark for the human eye, making dodge/burn with blue a bit difficult.