elgatosuizo
Member
Hi everyone,
I wanted to share a project I’ve been working on: a modular, DIY-friendly RA-4 paper processor named RePrinto. Inspired by the classic Durst Printo, this is not a 1:1 replica, but rather a modern reinterpretation using 3D-printed parts, off-the-shelf components, and open hardware principles. So these here re not parts compatible with the original Printo.
As a student in the early 90s, I did some color printing when RA-4 chemistry became more accessible. After a long break, I got back into analog photography a few years ago – encouraged by my daughter, who also learned C-41 and RA-4 processing. One day, she asked me if there wasn’t an easier way to develop color prints at home (the annoying full darkness and tray temperature). I remembered those cool tabletop processors from Durst and Ilford – the kind I couldn’t afford as a student. I looked around and found the Durst Printo again… but even second-hand units were surprisingly expensive (when you find one...).
That’s when the idea struck: could I build something similar myself? I already built large format enlargers and some darkroom gear. My idea was to have:
My Challenges & Solutions:
Next steps:


This is still very much a work in progress, but I’ll post updates as things evolve. I’d love to hear your feedback – especially if you’ve ever used the original Durst Printo or built something similar.
Cheers. Marco
I wanted to share a project I’ve been working on: a modular, DIY-friendly RA-4 paper processor named RePrinto. Inspired by the classic Durst Printo, this is not a 1:1 replica, but rather a modern reinterpretation using 3D-printed parts, off-the-shelf components, and open hardware principles. So these here re not parts compatible with the original Printo.
As a student in the early 90s, I did some color printing when RA-4 chemistry became more accessible. After a long break, I got back into analog photography a few years ago – encouraged by my daughter, who also learned C-41 and RA-4 processing. One day, she asked me if there wasn’t an easier way to develop color prints at home (the annoying full darkness and tray temperature). I remembered those cool tabletop processors from Durst and Ilford – the kind I couldn’t afford as a student. I looked around and found the Durst Printo again… but even second-hand units were surprisingly expensive (when you find one...).
That’s when the idea struck: could I build something similar myself? I already built large format enlargers and some darkroom gear. My idea was to have:
- A modular RA-4 paper processor with at least 2 stages, but expandable up to 5.... and a feeding module.
- Fully 3D-printable parts, with standard aluminum tubing and PETG.
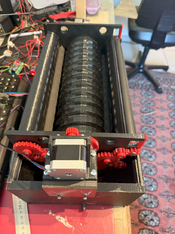
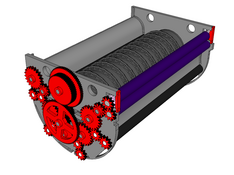
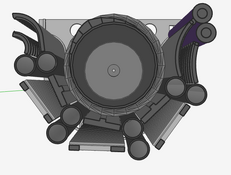
- Transport via 8+2 rollers (like in the Printo), using shrink tube for grip.
- Target processing time: base ~45 seconds per module, continuous feed, with option for other processing times with digital controlled motor.
- Compact and affordable – and free to use or adapt (non-commercial license)
My Challenges & Solutions:
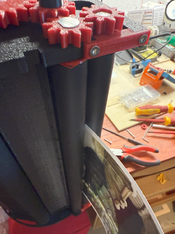
- Rollers: I used 20 mm aluminum tubing (for electrical installation) and found heat-shrink grip tubing (originally meant for sports equipment) to simulate the original rubber coating. The foam squeeze rollers were made from pipe insulation over 10 mm rods.
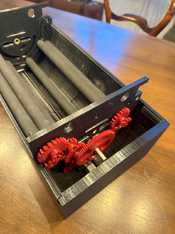
- Gearing: Durst used a custom pitch – I standardized on module 2 gears (with wide pressure angle) for the rollers and module 1.5 for the motor drive train. All gears are 3D printed. The swappable gears for speed change are not needed.
- Transport Mechanism: I designed roller ends with brass bushings (instead of ball bearings, which don’t survive RA-4 chemicals). A NEMA 17 stepper motor drives the system with a calculated gear ratio to achieve a precise and variable speed (no gear swapping needed).
- Paper Guides: In the original Printo these are made out of molded plastic (even integrated in the tray) or stainless steel. I designed 3D printed guides the will be trated with epoxy resin to be smooth.
- Heating: A small aquarium heater brings the fluids up to 35 degrees (Celsius) and have already all the needed temperature regulation built in.
- Materials & Printing: PETG was the obvious choice for water/chemical resistance. It’s tricky to print cleanly – most parts needed post-adjustment due to PETG’s shrinkage and tolerances. Also, I designed everything support-free for better quality and easier printing.
- First tests: The prototype already works with real RA-4 paper and water. The routing of the paper is working too. No chemistry yet – but the transport is smooth, consistent, and even handles wet paper well.
Next steps:
- Build a second and third process module.
- Add the feed-in module and finalize light-tight features.
- Begin tests with actual chemistry.
- Publish files and documentation on GitHub (soon).
- Create BOM with part sources and instructions.


This is still very much a work in progress, but I’ll post updates as things evolve. I’d love to hear your feedback – especially if you’ve ever used the original Durst Printo or built something similar.
Cheers. Marco


