Dealing with a development mistake when printing

End Table

A
End Table

  • 0
  • 0
  • 22
Cafe Art

A
Cafe Art

  • 8
  • 3
  • 160
Sciuridae

A
Sciuridae

  • 6
  • 3
  • 163
Takatoriyama

D
Takatoriyama

  • 6
  • 3
  • 161

Recent Classifieds

Forum statistics

Threads
197,656
Messages
2,762,464
Members
99,430
Latest member
colloquialphotograph
Recent bookmarks
0

Daniela

Member
Joined
Feb 20, 2017
Messages
1,012
Location
France
Format
Multi Format
I'd like to know how you'd deal with the following problem in order to properly print a photo you really love.

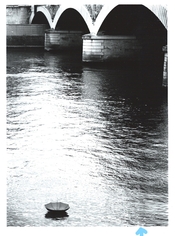
When developing the film of the attached picture, I repeated a mistake that I've made before (and was coincidentally one of my first posts in apug years ago 🙄): I poured the developer too fast, an air pocket formed at the top of the tank and the negatives feature a beautiful light band of underdeveloped film.

In order to print this negative, I dodged the bejesus out of that band marked with a blue arrow (2/3 of the total exposure time) and got it to be virtually invisible on the wet print. Imagine my surprise when I opened the blotter book days later and found that the area had darkened considerably. So, while I wait for the darkroom to open back up: how would you deal with this? Is there an alternative to dodging that I should explore? If it's any help, I'm just using one filter on this one, no split-grade filtering.

Thank you!
 

Attachments

  • Umbrella.jpg
    Umbrella.jpg
    998.8 KB · Views: 207

mshchem

Subscriber
Joined
Nov 26, 2007
Messages
14,295
Location
Iowa City, Iowa USA
Format
Medium Format
Extremely dilute bleach, water, cotton ball and time. Print should be wet, go very slow. That's a wonderful photo! Of course you could scan and let photoshop do the magic.
 
Joined
Sep 10, 2002
Messages
3,569
Location
Eugene, Oregon
Format
4x5 Format
I second the bleach idea, but I'd use a calligraphy brush of the appropriate size. When I deal with things like this, I usually make a number of prints and plan on ruining several in the process. It's a matter of skill and luck. Make your best batch with dodging and then bleach or spot back the prints after drying if needed.

Nice image! It should be worth the effort.

Doremus
 

Bill Burk

Subscriber
Joined
Feb 9, 2010
Messages
9,153
Format
4x5 Format
I know the pain of a photo that can’t be saved easily but which must be printed.

You did the right thing but maybe need to do a little more dodging. Dodge more if you can do it without causing a halo.

If you make the area a little lighter than surrounding you can carefully spot it down. Step back and look as you go until it blends at a distance.
 
OP
OP
Daniela

Daniela

Member
Joined
Feb 20, 2017
Messages
1,012
Location
France
Format
Multi Format
Extremely dilute bleach, water, cotton ball and time. Print should be wet, go very slow. That's a wonderful photo! Of course you could scan and let photoshop do the magic.

I second the bleach idea, but I'd use a calligraphy brush of the appropriate size. When I deal with things like this, I usually make a number of prints and plan on ruining several in the process. It's a matter of skill and luck. Make your best batch with dodging and then bleach or spot back the prints after drying if needed.

Nice image! It should be worth the effort.

Doremus
I didn't know this was a possibility! In looking at photo chemicals on the website I use, there's no bleach listed. What do you use for this? I assume you're not talking about household bleach...
Thank you!
 
OP
OP
Daniela

Daniela

Member
Joined
Feb 20, 2017
Messages
1,012
Location
France
Format
Multi Format
I know the pain of a photo that can’t be saved easily but which must be printed.

You did the right thing but maybe need to do a little more dodging. Dodge more if you can do it without causing a halo.

If you make the area a little lighter than surrounding you can carefully spot it down. Step back and look as you go until it blends at a distance.

Thank you! I've done some spotting before, but hadn't considered it either.
 

Sirius Glass

Subscriber
Joined
Jan 18, 2007
Messages
50,168
Location
Southern California
Format
Multi Format
I didn't know this was a possibility! In looking at photo chemicals on the website I use, there's no bleach listed. What do you use for this? I assume you're not talking about household bleach...
Thank you!

No, use potassium ferracyanide diluted with a cotton ball and lots of water to rinse as soon as it is light enough.
 

MattKing

Moderator
Moderator
Joined
Apr 24, 2005
Messages
52,043
Location
Delta, BC Canada
Format
Medium Format
No, use potassium ferracyanide diluted with a cotton ball and lots of water to rinse as soon as it is light enough.

Or you can use the re-halogenating bleach that is one of the two parts of a commercially packaged Sepia Toner, and then re-fix the print before the wash.
That gives you the option to reverse the bleaching by re-developing - you can start over.
 

GregY

Member
Joined
Apr 12, 2005
Messages
2,975
Location
Alberta
Format
Large Format
Daniela, bleach = potassium ferricyanide. I'm not sure using bleach is an easy solution....except for trying to salvage the print you have. It sounds to me as if you've been the victim of dry down. If you're reprinting (& kept track of your previous time) make it still lighter (Maybe make some dodging test strips of the area and dry them in a microwave or with a hairdryer) Bleaching is also hit & miss.....because if you wait until it looks just right...by the time you rinse it...it may have bleached too far. Check out the tips here gleaned from Bruce Barnbaum.
It's a beautiful image, it may just take a while to get it the way you want it.....
 
OP
OP
Daniela

Daniela

Member
Joined
Feb 20, 2017
Messages
1,012
Location
France
Format
Multi Format
No, use potassium ferracyanide diluted with a cotton ball and lots of water to rinse as soon as it is light enough.
Thanks!

Or you can use the re-halogenating bleach that is one of the two parts of a commercially packaged Sepia Toner, and then re-fix the print before the wash.
That gives you the option to reverse the bleaching by re-developing - you can start over.
Good to have an alternative that allows for a do-over. Thanks!
 
OP
OP
Daniela

Daniela

Member
Joined
Feb 20, 2017
Messages
1,012
Location
France
Format
Multi Format
Daniela, bleach = potassium ferricyanide. I'm not sure using bleach is an easy solution....except for trying to salvage the print you have. It sounds to me as if you've been the victim of dry down. If you're reprinting (& kept track of your previous time) make it still lighter (Maybe make some dodging test strips of the area and dry them in a microwave or with a hairdryer) Bleaching is also hit & miss.....because if you wait until it looks just right...by the time you rinse it...it may have bleached too far. Check out the tips here gleaned from Bruce Barnbaum.
It's a beautiful image, it may just take a while to get it the way you want it.....

I like the idea of making dodging test prints because the amount of paper I've already used for this print...🤦‍♀️
Awesome link with more detailed instructions. Thank you!
 

mshchem

Subscriber
Joined
Nov 26, 2007
Messages
14,295
Location
Iowa City, Iowa USA
Format
Medium Format
Or you can use the re-halogenating bleach that is one of the two parts of a commercially packaged Sepia Toner, and then re-fix the print before the wash.
That gives you the option to reverse the bleaching by re-developing - you can start over.

👍
 

Pieter12

Member
Joined
Aug 20, 2017
Messages
7,533
Location
Magrathean's computer
Format
Super8
I didn't know this was a possibility! In looking at photo chemicals on the website I use, there's no bleach listed. What do you use for this? I assume you're not talking about household bleach...
Thank you!
Something like this should be available:

Moersch Photochemie Bleach Concentrate

27595-Moersch_Bleicher_250ml.jpeg
 

Maris

Member
Joined
Jan 17, 2006
Messages
1,549
Location
Noosa, Australia
Format
Multi Format
I reckon the picture is more than good enough to simply crop the "wrong" bit out and call the rest a tall vertical composition. And then burn in the specular reflection in the water so it shows rivers of tone instead of glare.
 

jeffreyg

Subscriber
Joined
Jun 12, 2008
Messages
2,599
Location
florida
Format
Medium Format
I would scan the negative and see if there’s the details you’re seeking. If it’s there you have a chance. I would add that you can add some fixer to the potassium ferricyanide that was called Farmers Reducer Best to go slow when bleaching. If you can get the results you are looking for by dodging that’s how I would go but learning to bleach might be worthwhile.
 
OP
OP
Daniela

Daniela

Member
Joined
Feb 20, 2017
Messages
1,012
Location
France
Format
Multi Format
Something like this should be available:

Moersch Photochemie Bleach Concentrate

View attachment 340042
Thank you! I have some potassium ferricyanide from a cyanotype kit, but I'll keep this in mind for the future.
I would scan the negative and see if there’s the details you’re seeking. If it’s there you have a chance. I would add that you can add some fixer to the potassium ferricyanide that was called Farmers Reducer Best to go slow when bleaching. If you can get the results you are looking for by dodging that’s how I would go but learning to bleach might be worthwhile.
Got it. Thanks!
I reckon the picture is more than good enough to simply crop the "wrong" bit out and call the rest a tall vertical composition. And then burn in the specular reflection in the water so it shows rivers of tone instead of glare.
I tried cropping and I didn't like the results at all. I'll give the glare a burn and see what happens. For what it's worth, it's much more subtle on the print than on the scan. Thanks!
 

snusmumriken

Subscriber
Joined
Jul 22, 2021
Messages
2,369
Location
Salisbury, UK
Format
35mm
Another reversible approach would be to place a material like ground glass or scotch tape (the frosted type) over the top of your negative carrier and scribble on the relevant part with a graphite pencil. The pencil marks must be far enough from the negative so as to be out of focus when projected onto the paper.

This used to be common practice among pictorialists using glass plate negatives, and in my youth you could buy a matt varnish to give the glass surface some ‘tooth’ for the pencil. I never thought of using it with film until someone on this forum posted the idea. Having tried it, I can report that it’s not easy to get it right with small formats, but it can be done effectively. Practice would no doubt make perfect, but one hopes not to need it that often!
 
OP
OP
Daniela

Daniela

Member
Joined
Feb 20, 2017
Messages
1,012
Location
France
Format
Multi Format
Another reversible approach would be to place a material like ground glass or scotch tape (the frosted type) over the top of your negative carrier and scribble on the relevant part with a graphite pencil. The pencil marks must be far enough from the negative so as to be out of focus when projected onto the paper.

This used to be common practice among pictorialists using glass plate negatives, and in my youth you could buy a matt varnish to give the glass surface some ‘tooth’ for the pencil. I never thought of using it with film until someone on this forum posted the idea. Having tried it, I can report that it’s not easy to get it right with small formats, but it can be done effectively. Practice would no doubt make perfect, but one hopes not to need it that often!

Interesting idea! I have seen Borut Peterlin doing that on his glass plates, but didn't think it could be applied to film either. And it'd certainly make life easier when reprinting it...I'll keep it in mind. Thank you!
 
OP
OP
Daniela

Daniela

Member
Joined
Feb 20, 2017
Messages
1,012
Location
France
Format
Multi Format
the Lootens reference is on archive. https://archive.org/details/lootensonphotogr00jghi/page/n10/mode/1up
View attachment 340237
ch.12 and 16 may help

also, after one good print, you could make a copy neg using Ilford Ortho+ . Was a common commercial lab mode when dealing with difficult negs.

Thank you for that resource! I'll check it out before my next darkroom session.
Making a new negative from a print is a great idea! May I ask why that film in particular? Does it have to do with it being orthochromatic?
 

GregY

Member
Joined
Apr 12, 2005
Messages
2,975
Location
Alberta
Format
Large Format
Daniela, I'll be interested to see the product of your next darkroom session with this negative.
 
OP
OP
Daniela

Daniela

Member
Joined
Feb 20, 2017
Messages
1,012
Location
France
Format
Multi Format
-- more to do with its tungsten response.
it can also be developed by inspection. develops easily in range of developers.

> see the datasheet: https://www.ilfordphoto.com/amfile/file/download/file/1948/product/1658/
for range of devs.

> it also makes a great masking film for bw films.
Wonderful. Thanks!

Daniela, I'll be interested to see the product of your next darkroom session with this negative.
Will be there next Monday and hopefully have a success story to report! ✨
 
OP
OP
Daniela

Daniela

Member
Joined
Feb 20, 2017
Messages
1,012
Location
France
Format
Multi Format
A little update:
I did split-grade printing and found that dodging the whole time the print was being exposed with the 4 1/2 filter gave me a good enough result!
Umbrella_tests.jpg

So, while not perfect and I get varying results when I make copies, I'm pretty happy with this:
Umbrella3.jpg

So...why did that work?
Also, someone else suggested I print it much darker to get an almost dream-like image. That'll be the next experiment!
I also kept a list of all your other suggestions. Thanks!
 

snusmumriken

Subscriber
Joined
Jul 22, 2021
Messages
2,369
Location
Salisbury, UK
Format
35mm
I just followed up the link to the Looten book, and thought chapter 16 was very relevant to your problem here - a way of adapting the negative so that it prints true every time, and rather more controlled than the older pencil idea. I think I might try it myself on a couple of shots that are otherwise useless. Promises to be fun!
 
Photrio.com contains affiliate links to products. We may receive a commission for purchases made through these links.
To read our full affiliate disclosure statement please click Here.

PHOTRIO PARTNERS EQUALLY FUNDING OUR COMMUNITY:


Ilford ADOX Freestyle Photographic Stearman Press Weldon Color Lab Blue Moon Camera & Machine
Top Bottom