Darkroom "tricks of the trade"

Fence line

A
Fence line

  • 2
  • 0
  • 29
Ford Trimotor

A
Ford Trimotor

  • 1
  • 0
  • 47
museum

A
museum

  • 5
  • 1
  • 84
Old Willow

H
Old Willow

  • 0
  • 2
  • 105

Recent Classifieds

Forum statistics

Threads
198,139
Messages
2,770,189
Members
99,567
Latest member
Annaphot
Recent bookmarks
0
Joined
Oct 1, 2004
Messages
456
Location
Paris, France
Format
Multi Format
My friend Jean-Marie Francius is a darkroom gadget genius. This afternoon he invited me into his darkroom to show-off his latest innovations. All interesting, but the most impressive was what he came up with to unstick just-washed / just-squeegeed prints from his plexiglass squeegee board: a guitar pick!

This is so obvious that perhaps it's not news... but it's the first time I'd ever seen it. Anyway, he keeps the thing literally close-at-hand by having drilled a little hole into it and attaching it to a cool multi-colored nylon braclet. Ah! Practicality and fashion.

A few other ideas:

-I remember that Al Weber used to use a slab of marble (stays cold) to lay prints upon which were still warm from the press. Their curl would flatten out naturally.

-Al also used wooden thread spools as handles at the end of pull-chains for lights. Safe for wet hands. Enough surface for luminescent tape.

-I know that several of us use an abacus to count the number of prints, rolls or sheets which pass through certain chemicals.

-I keep my dodging tool on a "necklace" around my neck. No more frantic searching after I've hit the timer and forgotten to pick it up

-Velcro on the pencil lets me stick it to the wall.

-Paper trimmer is mounted on glides. Slides under the darkroom bench when not in use. A little garbage sack attached to the side catches the trimmings and tucks away under the board —held in place by velcro. I empty it when it gets a little full.

-I have a double-curtain darkroom entrance with —as a light-lock system— three valances, one on the outside, one between the two curtains and the third on the inside.

Anyone else have tricks, ideas or innovations to share?

Best,

Christopher

.
 
Last edited by a moderator:

Photo Engineer

Subscriber
Joined
Apr 19, 2005
Messages
29,018
Location
Rochester, NY
Format
Multi Format
I use a single edged razor blade, as it is thinner than the pick and will not fray the wet edges. Also, the razor blade has other uses, so having one handy is useful.

PE
 

Toffle

Member
Joined
Mar 27, 2007
Messages
1,930
Location
Point Pelee,
Format
Multi Format
I use a single edged razor blade, as it is thinner than the pick and will not fray the wet edges. Also, the razor blade has other uses, so having one handy is useful.

PE

As for me, I've had more than one printing session go horribly wrong, so I keep the razor blades far out of reach. :smile:

Cheers,
 
OP
OP
Christopher Nisperos
Joined
Oct 1, 2004
Messages
456
Location
Paris, France
Format
Multi Format
I use a single edged razor blade, as it is thinner than the pick and will not fray the wet edges. Also, the razor blade has other uses, so having one handy is useful.

PE


Thanks, Ron. Blades are a good idea too, but the plastic guitar pick idea intriqued me because I don't suppose it would scratch the plexiglass. Plus it might be a bit safer in wet hands.

My own method over the years has been to simply bend up a miniscule corner
of the print and not squeegee over it. It allows me to readily seperate my print from my squeegee board or tray bottom. Nobody notices it (my borders are usually at least a few inches wide) and it hasn't seemed to hurt any prints so far!

BTW, have you got any hints for picking prints off a ferrotype plate (btw...any ferrotype tips —especially glossening* solution formulae— would be considered a Christmas present. My birthday is coming up, too!)

Best,

Christopher
*OK, so I invented a word. Big deal. Hey, wanna play Scrabble?
 

Andy K

Member
Joined
Jul 3, 2004
Messages
9,420
Location
Sunny Southe
Format
Multi Format
-Al also used wooden thread spools as handles at the end of pull-chains for lights. Safe for wet hands. Enough surface for luminescent tape.

You can also shape them so that say the round one operates the safelight, the jagged one operates the white light.
 

Roger Hicks

Member
Joined
May 17, 2006
Messages
4,895
Location
Northern Aqu
Format
35mm RF
Cher Nisp,

If you have to pick it off... it failed. I've NEVER successfully got a glazed print off a glazing plate if it didn't jump off of its own accord, except by soaking.

Amitiés,

R.

(When are you coming to stay?)
 

Jim Noel

Member
Joined
Mar 6, 2005
Messages
2,261
Format
Large Format
I don't use ferrotype tine any longer, but did so for years.

If properly clean the prints pop off when dry. If they stick inplaces, the tin was not clean.
Before each use wash well with liquid detergent and rinse well. If the rinse water sheets off they are ready for use.
If this doesn't cure the problem, after washing rub the paltes with glycerin.
 

Photo Engineer

Subscriber
Joined
Apr 19, 2005
Messages
29,018
Location
Rochester, NY
Format
Multi Format
Guys, Roger;

These were wet prints just after squegeeing, not after drying.

As for Razor blades, I have never had a problem with them. I recognize the inherent danger, and now that I've said I've never had a problem, I probably will, but they remain good tools. Remember, these are single sided. They have a heavy metal guard at the other edge to prevent accidents, and they come with a disposal container.

They also come in handy in scraping grunge out of trays and off of the sheets of glass (plexi or otherwise).

PE
 

Roger Hicks

Member
Joined
May 17, 2006
Messages
4,895
Location
Northern Aqu
Format
35mm RF
Guys, Roger;

These were wet prints just after squegeeing, not after drying.

As for Razor blades, I have never had a problem with them. I recognize the inherent danger, and now that I've said I've never had a problem, I probably will, but they remain good tools. Remember, these are single sided. They have a heavy metal guard at the other edge to prevent accidents, and they come with a disposal container.

They also come in handy in scraping grunge out of trays and off of the sheets of glass (plexi or otherwise).

PE
Dear Ron,

Ah, thanks for the clarification. Yes, I'd go for single-edge too.

But as you say, now you've boasted of no problems... How long before we start calling you 'nine-fingers'?

Cheers,

R.
 

Konical

Subscriber
Joined
Jun 1, 2003
Messages
1,824
Good Afternoon,

Thanks to Christopher and Andy. I'm about to install a couple of safelights and a couple of white lights and was already planning to use pull-strings; I was hoping to use some luminescent tape, but hadn't hadn't yet determined exactly how. It's embarrassing how easily the obvious sometimes eludes me!

Konical
 

gandolfi

Member
Joined
Jan 28, 2005
Messages
1,820
Location
Denmark
Format
Large Format Pan
My friend Jean-Marie Francius is a darkroom gadget genius. This afternoon he invited me into his darkroom to show-off his latest innovations. All interesting, but the most impressive was what he came up with to unstick just-washed / just-squeegeed prints from his plexiglass squeegee board: a guitar pick!

This is so obvious that perhaps it's not news... but it's the first time I'd ever seen it. Anyway, he keeps the thing literally close-at-hand by having drilled a little hole into it and attaching it to a cool multi-colored nylon braclet. Ah! Practicality and fashion.

A few other ideas:

-I remember that Al Weber used to use a slab of marble (stays cold) to lay prints upon which were still warm from the press. Their curl would flatten out naturally.

-Al also used wooden thread spools as handles at the end of pull-chains for lights. Safe for wet hands. Enough surface for luminescent tape.

-I know that several of us use an abacus to count the number of prints, rolls or sheets which pass through certain chemicals.

-I keep my dodging tool on a "necklace" around my neck. No more frantic searching after I've hit the timer and forgotten to pick it up

-Velcro on the pencil lets me stick it to the wall.

-Paper trimmer is mounted on glides. Slides under the darkroom bench when not in use. A little garbage sack attached to the side catches the trimmings and tucks away under the board —held in place by velcro. I empty it when it gets a little full.

-I have a double-curtain darkroom entrance with —as a light-lock system— three valances, one on the outside, one between the two curtains and the third on the inside.

Anyone else have tricks, ideas or innovations to share?

Best,

Christopher

.

:rolleyes: oups.. I have now worked in a darkroom for over 25 years, and I have no clue on what you're talking about....:confused:

I use my hands. period.
I don't squeegee a lot..
I don't use heat to dry my images.

the idea of having razors in the darkroom scares me.. (I have to consider my students....)

Ideas? Well more a dream! : in my school, where I work, we're about to move to a whole house, dedicated to analouge photography.
Studio - darkroom - exhibition etc..

my dream is to make this new darkroom the best looking in the world!
By that I mean the interior!
Images on the walls - framed in mahogany or gold.
red light in crystal glass or similar.
really good stereo.

why?

the more you like a working space, the more you want to spend your time in it.. simple.
Like now up here, I think the majority of darkrooms around the world is based in "shitty" cellars or in one bathroom or so..

not here. I'd LOVe to be able to brag about our space of mystery!
 
OP
OP
Christopher Nisperos
Joined
Oct 1, 2004
Messages
456
Location
Paris, France
Format
Multi Format
Cher Nisp,

If you have to pick it off... it failed. I've NEVER successfully got a glazed print off a glazing plate if it didn't jump off of its own accord, except by soaking.
Amitiés,
R.
(When are you coming to stay?)

Hi Raj,

You're right —and you know I hate that! I wasn't thinking. I guess I'm just getting in the mood for the upcoming strike(s). Again.

However, I'd still give my eyeteeth (whatever that means) for a good formula from Ron's magic library for making prints stick uniformly well to ferrotype plates. As you'll well know, the BJ Almanacs —up until about the late 1950's— used to list such a formula ... made from ox gall bile. (Eeeeeuuu!) I've heard from old-timers that it's incredibly smelly, but works incredibly well. Now that Tetenal has discontinued Glanzol, it'd be nice to be able to mix-up a batch of
odorless stickgoodjuice (<- English version of a German word which doesn't exist).

About visiting: I'd love to if the French train system took food stamps! Why don't y'all mosey on up to Paris for a weekend? Paris Photo is coming up soon . . . Michael and Paula will be there. Bring your press pass. The champagne in the press lounge is exceptional .. er, I mean, ideas for articles abound!

Bien amicalement,

Le Nisp
 

Photo Engineer

Subscriber
Joined
Apr 19, 2005
Messages
29,018
Location
Rochester, NY
Format
Multi Format
For those nervous about razor blades, I have used a good new putty knife in the darkroom.

This is also useful to lift dye transfer prints after rolling them.

PE
 
OP
OP
Christopher Nisperos
Joined
Oct 1, 2004
Messages
456
Location
Paris, France
Format
Multi Format
:rolleyes: oups.. I have now worked in a darkroom for over 25 years, and I have no clue on what you're talkin about....:confused: I use my hands. period. I don't squeegee a lot..

Dear Gandolfi,

I'm not sure I understand your confusion, but one irony of your post —relative to me— is that, when I was a kid, I used to "squeegee" with my hands! Actually, my fingers: I used to squeegee film between my forefinger and middle finger. Worked OK. Won't work with sheet film, though, unless you have fingers like E.T. It's bad enough that I look like him.. I don't want to start working like him, too! Now I use Kimwipes. Never have calcium residue. Negative are pristine.

About your dream darkroom: I'm sure that I'm not the only one here who'd love to see some photos of the final results!

Best,

Christopher

. . . .
 

patrickjames

Member
Joined
Mar 25, 2005
Messages
742
Format
Multi Format
have always thought that it would be great to start a thread like this because it is the little things that can make or break printing. Here are a few from moi-

To make a dodging tool, I take some electrical wire and debraid/unwrap the inside small wires. They are so thin that they will never show up in your prints, and it is impossible to hold them steady, so you won't get those weird halos!

I also use cut up multi-contrast filters for dodging and burning. I very rarely use anything opaque.

If you do print washing with a tray siphon, putting the prints back to back and front to front will keep them from sticking to each other. I don't know why this works but it does.

Hope these help and I hope others will pony up some good tricks as well.

Patrick
 

Konical

Subscriber
Joined
Jun 1, 2003
Messages
1,824
"If you do print washing with a tray siphon, putting the prints back to back and front to front will keep them from sticking to each other. I don't know why this works but it does."

Good Evening,

Patrick is correct, but with smaller sizes (up to 8 x 10 or so) the face-up print, especially with RC paper, will often sink to the bottom of the tray. To get it "re-circulating," I keep a plastic-handled rubber spatula hanging near the wash tray. I use it to lift or separate prints with getting my hands wet and needing to wash up each time I do it.

Konical
 

gandolfi

Member
Joined
Jan 28, 2005
Messages
1,820
Location
Denmark
Format
Large Format Pan
:D hey - I just thought of one thing/gizmo I use....
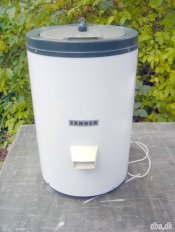
a centrifuge/spin dryer to spin my films before drying the films...

works like a charm - no surface water= no chalk stains and much quicker drying..

can't live without it!

(works for 135 film and medium format, but not for LF film..
 

Flotsam

Member
Joined
Sep 30, 2002
Messages
3,221
Location
S.E. New Yor
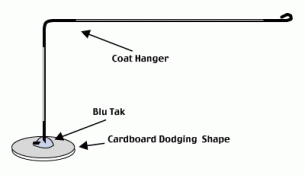
Here's a simple but useful gimmick that I came up with years ago when I was printing 10 hours a day in a custom lab. I'm still using the first one that I made.

By bending the wand so that the handle is about four inches higher than the dodging shape, not only does it throw a more out of focus shadow but the shadow of the handle moves around much more radically than the shape while dodging. No more prints ruined by wand shadow, ever.
 

Attachments

  • dodger.gif
    dodger.gif
    3 KB · Views: 316

patrickjames

Member
Joined
Mar 25, 2005
Messages
742
Format
Multi Format
:D hey - I just thought of one thing/gizmo I use....

a centrifuge/spin dryer to spin my films before drying the films...

works like a charm - no surface water= no chalk stains and much quicker drying..

can't live without it!

(works for 135 film and medium format, but not for LF film..

Could you attach a picture or tell us where you got it?

Patrick
 

gandolfi

Member
Joined
Jan 28, 2005
Messages
1,820
Location
Denmark
Format
Large Format Pan
Could you attach a picture or tell us where you got it?

Patrick

yes - I found one type on the net...

It is actually just a plain centrifuge to drain water from wet, newly washed clothes..

the one our mothers used to use...

they come in quite small sizes, and the small ones are, as far as I know, most usable...

then one attached would cost about 40$ or less.
 

Attachments

  • centrifuge.jpg
    centrifuge.jpg
    37.3 KB · Views: 207

David A. Goldfarb

Moderator
Moderator
Joined
Sep 7, 2002
Messages
19,974
Location
Honolulu, HI
Format
Large Format
I've seen spin dryers like that in Europe, but I don't think I've ever seen one in the U.S. Electric washing machines all have spin cycles over here, and when people wash clothing by hand, they usually just wring it out and hang it up to dry.

A salad spinner, though, might do.
 
Joined
Mar 18, 2005
Messages
451
Location
Toronto
Format
Medium Format
I find for big prints (ie; anything over 16x20), the single tray method is the way to go. I'll do my test strips in little 8x10 trays, or beakers as Les Mclean mentions in one of his books. I find the single tray is also really useful for single weight papers, as there is much less chance of the paper bending and creasing.
 
Joined
Apr 6, 2007
Messages
907
Location
Nanaimo, Bri
Format
35mm
An idea I borrowed from a Fred Picker video I found in my school library was similar to the metal wire idea. Bend a coat hanger or some other object in to a circle. I've found a coat hanger works fine for 8x10, or 11x14 if I keep it high enough off the easel. Cross it lengthwise and widthwise with extremely fine thread or fishing line. I use a black thread that came off of some piece of clothing and have not had problems. at the point where the threads cross you can attach various shapes of dodging tools using a weak tape. This works very well for dodging in the middle of a print, and I've found the circle shape much easier to control than the wand type.

- Justin
 
Photrio.com contains affiliate links to products. We may receive a commission for purchases made through these links.
To read our full affiliate disclosure statement please click Here.

PHOTRIO PARTNERS EQUALLY FUNDING OUR COMMUNITY:


Ilford ADOX Freestyle Photographic Stearman Press Weldon Color Lab Blue Moon Camera & Machine
Top Bottom